Summary of Crius OctaPot Midi Controller
This article details the DIY construction of the "Crius OctaPot," a custom MIDI mixer featuring eight potentiometers to control VST parameters like volume and reverb. The project utilizes an Arduino Nano, rotary potentiometers, and a breadboard for circuit assembly. It includes instructions for uploading code via the Arduino IDE, constructing a case from plastic covers, and configuring software like LoopMIDI and Hairless Midi Serial to translate serial data into usable MIDI messages for Digital Audio Workstations (DAWs).
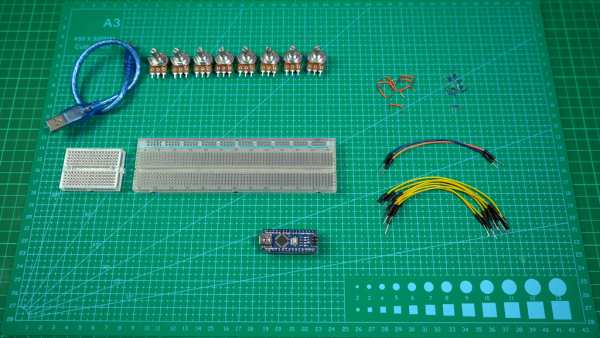
Parts used in the Crius OctaPot:
- Arduino Nano x1
- Linear Rotary Potentiometers 10 KOhm x8
- Jumper Wires x10
- Small Jumper Wires x16
- Breadboard 830 points x1
- Micro USB cable x1
- Caps for the potentiometers x8 (Optional)
- Solder Iron
- Plastic covers for electric boxes
- Metal stand-offs
- Double sided tape
- Hotglue
I am Crius and I LOVE MIDI Controllers!
The last couple of years I started learning about electronics from nothing to be able to build my own MIDI controllers that would serve my needs , taste and be cheaper overall in comparison with the branded products.
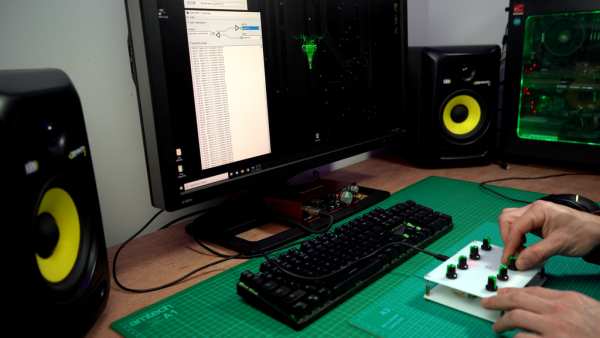
Crius “OctaPot” MIDI Mixer consists of 8 potentiometers with which we can control the parameters such as Volume,Pan,Delay,Reverb,Attack ect.. of the VST-Plugin or the DAW that we play music with.
Supplies
- Arduino Nano x1 (We can alternatively use the UNO or the Mega depending on how many potentiometers we want to have. The Mega has 16 analog inputs)
- Linear Rotary Potentiometers 10 KOhm x8
- Jumper Wires x10
- Small Jumper Wires x16
- Breadboard 830 points x1
- Micro USB cable x1
- Optionally CAPs for the potentiometers x8
Step 1: Cricuit Assembly
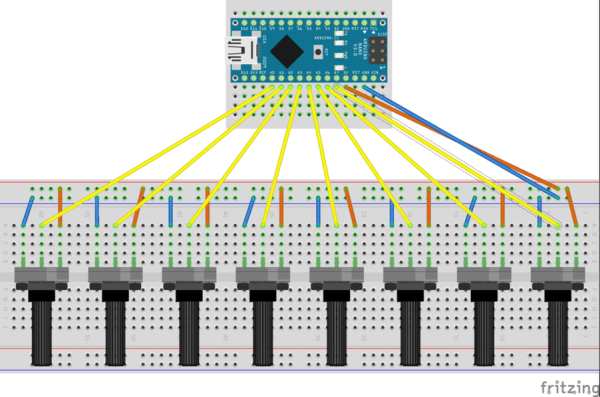
We want to make a simple circuit with 8 potentiometers
- So we have to connect the left pin of each potentiometer with the GND Pin (Ground / Ground) of the Arduino
- the right pin with the 5Volt pin of the Arduino
- the middle pin of each potentiometer with an Analog Input of the Arduino. (The Arduino via Analog Inputs will read the value of each potentiometer to send the value to the parameter we have assigned it.)
Step 2: Upload the Code
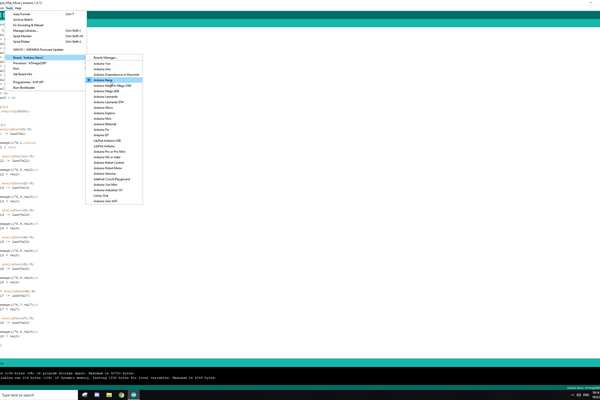
- To upload the code to Arduino we need to download the Arduino IDE from the Arduino site
- After installing the Arduino IDE, open the Crius_Octapot_Midi_Mixer.ino file but BEFORE pressing Upload to pass the code to the Arduino
- we have to choose from the menu Tools the model of Arduino that we use
- and the Port we have connected the Arduino.
- Now we can click Uploadand upload the code.
Step 3: Build a Case
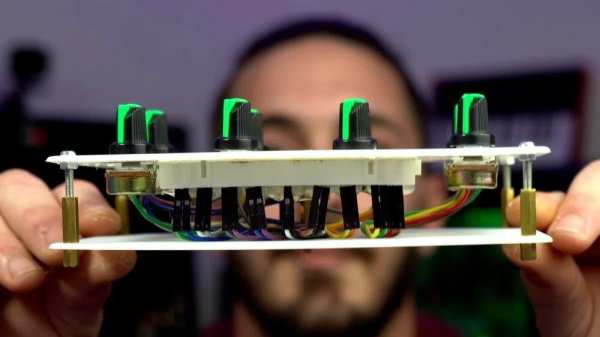
At the time I built this project I didn’t own a 3D Printer that would give me a lot of ease to the building proccess so I choosed to go with 2 pieces of plastc covers for electric boxes.
Construction Steps:
- I used a Solder Iron to open 8 holes for the potentiometers
- and 4 holes for the metal stand-offs
- I placed the Power and Ground pieces of the breadboard with the double sided tape that the breadboard has on it
- and placed the arduino with hotglue
- I used metal stand-offs to create the desired gap between the plastic covers so it can fit the circuit.
Ovreall you can use your imagination and creativity to make your own design
Step 4: Setting It Up to Be Recognized From the DAW Software
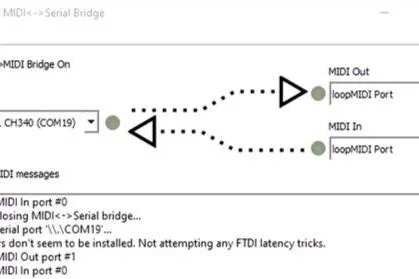
Arduino Nano and the Midi.h library that both DO NOT support USB MIDI function.This means that we will need to translate the data that the Arduino sends via Serial port to MIDI messages.
In order to do that we will need to install to our PC 2 FREE softwares :
- The LoopMIDI that crates a Virtual MIDI device
- And the Hairless Midi Serial that translates the Serial data that the Arduino sends to MIDI data so that it is recognized by the software we play music with.
In the DAW Software where we play music we must select the Loop MIDI as MIDI IN and MIDI OUT.
Step 5: Download Links for Softwares
- Arduino IDE : https://www.arduino.cc/en/software
- LoopMidi : https://www.tobias-erichsen.de/software/loopmidi.html
- Hairless Midi Serial : https://projectgus.github.io/hairless-midiserial/
Step 6: END
I hope you enjoyed the proccess and made one for your self!
You can find everything you need for this project INCLUDING INSTRUCTIONS IN ENGLISH to my website : www.criusdigitalstudio.com
You can find my projects and support me at the following social media and websites:
1. Crius Digital Studio Youtube Channel
2. Crius Digital Studio Thingiverse Profile
3.Crius Digital Studio Github Profile
Source: Crius OctaPot Midi Controller
- Can I use an Arduino Uno or Mega instead of the Nano?
Yes, you can alternatively use the UNO or the Mega depending on how many potentiometers you want to have. - How do I connect the potentiometer pins to the Arduino?
Connect the left pin to GND, the right pin to the 5Volt pin, and the middle pin to an Analog Input of the Arduino. - What software is required to translate serial data to MIDI?
You need to install LoopMIDI to create a Virtual MIDI device and Hairless Midi Serial to translate the serial data. - Does the Arduino Nano support USB MIDI natively?
No, the Arduino Nano and the Midi.h library do not support USB MIDI function directly. - What materials did the author use to build the case?
The author used two pieces of plastic covers for electric boxes since they did not own a 3D printer. - How should I configure my DAW software settings?
In your DAW Software, you must select the Loop MIDI as both MIDI IN and MIDI OUT. - Where can I find the source code for this project?
The code file is named Crius_Octapot_Midi_Mixer.ino and is available via the provided links or the author's Github Profile. - What is the best way to attach the breadboard inside the case?
You can place the Power and Ground pieces of the breadboard using the double sided tape that comes with it.