Summary of Controlling Cubase with Arduino based MIDI
This article details a DIY project to control Cubase recording software remotely using an Arduino. By connecting push buttons to the Arduino, users can send MIDI signals to start and stop recordings without touching the computer keyboard. The setup involves wiring switches and resistors to a breadboard and programming the Arduino to transmit specific MIDI notes over a serial connection to a MIDI interface connected to the computer.
Parts used in Controlling Cubase with Arduino:
- Normally open push buttons
- 10K-Ohm resistor
- Arduino (Diecimila version or similar with 5V power)
- Solderless breadboard
- MIDI jack
- 220-Ohm resistor
- Computer running Cubase
- MIDI Cable
- USB to MIDI input adapter
A friend of mine wanted to control Cubase, his audio recording software, with a push button so that he could stop and start recordings remotely without having to go over to the computer and type on the keyboard. You may be able to do this in other recording software, we just happen to use Cubase.
Step 1: What you need
Normally open push buttons (one for every action you want to perform like these)
10K-Ohm resistor (one for every button)
Arduino with a good solid 5V. I had to externally power mine (I’m using the bare-bones version running Diecimila) get it here
Solderless breadboard (like this one)
MIDI jack (you only need one, since all you’re doing is sending like a dis)
220-Ohm resistor (for the MIDI jack)
Computer running Cubase or some other recording software
MIDI Cable (here’s a 20’er)
You may need a USB to MIDI input, I have used and liked, this one, and this one
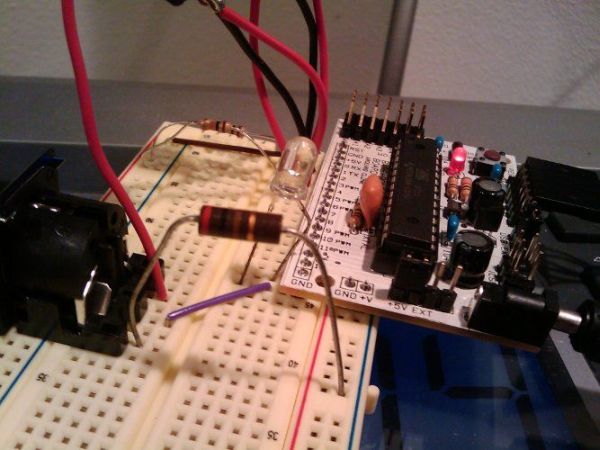
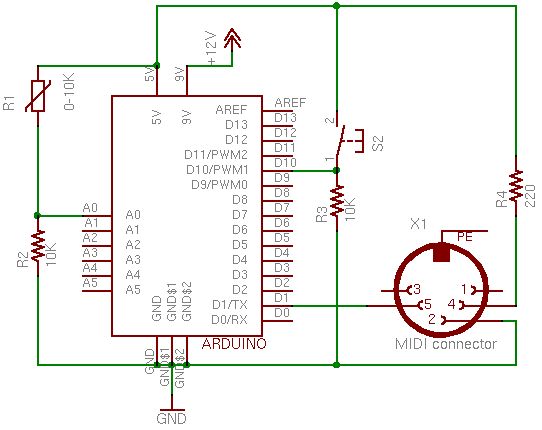
Step 2: Hardware Setup
Schematic and pic attached. NOTE: the schematic is the work of ITP Physical Computing
Basically it’s 5V to switch, switch to control pin, 10K resistor from control pin to GND
For the MIDI jack it’s pin 5 to serial pin, pin4 to 5V through the 220 resistor
Load the following sketch on your Arduino:
{{{
/* Convert Arduino to a MIDI controller using as many digital inputs
* as you need.
*
* This sketch is set up to send 2 MIDI notes on MIDI channel 5,
* but it can be easily reconfigured for other notes and channels
*
* Created 3 Nov 2008
* By Hyeki Min
*
* Modified 14 May 2009
* By Petyr Stretz
* Changed switch logic so that the pin low and high made the
* notes play like a keyboard, removed unneeded pins, changed
* output MIDI channel to 5
*/
// define the pins we use, MIDI port is always on Arduino pin 1 (TX)
int switchPin1 = 2;
int switchPin2 = 3;
// general midi notes
char note1 = 60; //Middle C
char note2 = 62; //D
// Variables
int switchState1 = LOW;
int switchState2 = LOW;
int currentSwitchState1 = LOW;
int currentSwitchState2 = LOW;
void setup() {
// set the states of the I/O pins:
pinMode(switchPin1, INPUT);
pinMode(switchPin2, INPUT);
// set MIDI baud rate :
Serial.begin(31250);
}
void loop() { //switchPin1
currentSwitchState1 = digitalRead(switchPin1);
if( currentSwitchState1 == HIGH && switchState1 == LOW ) // push
//Note on channel 5 (0x94), some note value (note), middle velocity (0x45):
noteOn(0x94, note1, 0x45);
if( currentSwitchState1 == LOW && switchState1 == HIGH ) // release
//Note on channel 5 (0x94), some note value (note), silent velocity (0x00):
noteOn(0x94, note1, 0x00);
switchState1 = currentSwitchState1; //switchPin2
currentSwitchState2 = digitalRead(switchPin2);
if( currentSwitchState2 == HIGH && switchState2 == LOW ) // push
//Note on channel 5 (0x94), some note value (note), middle velocity (0x45):
noteOn(0x94, note2, 0x45);
if( currentSwitchState2 == LOW && switchState2 == HIGH ) // release
//Note on channel 5 (0x94), some note value (note), silent velocity (0x00):
noteOn(0x94, note2, 0x00);
switchState2 = currentSwitchState2;
}// Send a MIDI note-on/off message.
void noteOn(char cmd, char data1, char data2) {
Serial.print(cmd, BYTE);
Serial.print(data1, BYTE); Serial.print(data2, BYTE);
}
}}}
Solderless breadboard
MIDI jack
For more detail: Controlling Cubase with Arduino based MIDI
-
How do I stop and start recordings remotely?
You can use normally open push buttons connected to an Arduino to send MIDI signals that trigger start and stop actions in Cubase. -
What hardware is required for the switch connections?
Each button requires a 10K-Ohm resistor connected from the control pin to GND, along with a connection from 5V to the switch. -
Which Arduino pins are used for the MIDI output?
The MIDI port is always located on Arduino pin 1 (TX), while pin 5 connects to the serial pin and pin 4 connects to 5V through a 220-Ohm resistor. -
Can this setup work with other recording software?
Yes, while the article specifically demonstrates Cubase, you may be able to perform similar controls in other recording software. -
What baud rate must be set for the Arduino Serial connection?
The sketch sets the MIDI baud rate to 31250 using the command Serial.begin(31250). -
How many push buttons can be used in this project?
You need one normally open push button for every action you want to perform, such as starting or stopping a recording. -
Is external power necessary for the Arduino?
Yes, the author had to externally power their bare-bones Diecimila version because it needed a good solid 5V supply. -
How does the code detect a button press?
The loop reads the digital state of the pins; if the state changes from LOW to HIGH, it triggers a Note On message with middle velocity.