In this tutorial we’re going to play with a gesture sensor (APDS-9960) and a neopixel ring to learn how to combine them both using an Arduino UNO.
The end product will respond to left – right gestures by animating led movement right or left, and to up-down gestures by changing leds color.
In the next steps, you’ll briefly overview the part list and how to connect the components. And then we’ll review the code step by step to learn how it works.
Step 1: Components
1. Arduino UNO
2. usb cable
3. APDS9960 gesture sensor (https://www.sparkfun.com/products/12787)
4. 24 led neopixel led ring (https://www.adafruit.com/product/1586)
5. male-female, male-male breadboard cables
6. breadboard
7. 5 V power supply for the led ring (i’m using a 4 battery back)
8. To attach the neopixel ring to the breadboard you’ll need to solder three male pins to it: GND, PWR, and control pin. For this you’ll need a soldering iron and flux
The main components here are APDS-9960 gesture sensor and the 24 neopixel ring. You can switch different arduinos, usb cables power supplies and breadboards as you wish.
Step 2: Assembly & Upload
Assembly
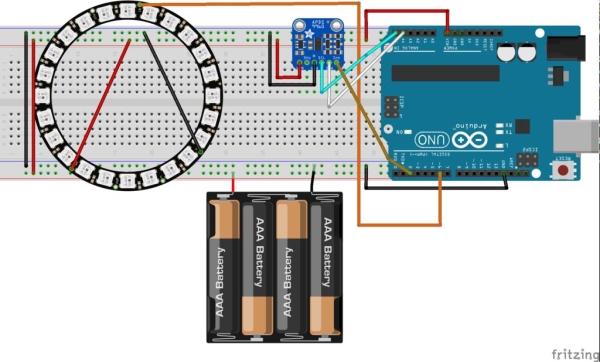
Before you’ll get started make sure you have all the components on you’re table. We’ll have some nice steps to follow :). I’ve also attached the Fritzing schematic as a picture and also in fritzing format.
1. Solder 3 male pins to the neopixel ring (GND, PWR, control pin)
2. attach the neopixel ring to the breadboard
3. attach the APDS9960 sensor to the breadboard
4. connect the grounds: battery pack, arduino UNO, APDS9960 and neopixel to the breadboard ground
5. connect the power: arduino UNO 3V to APDS9960 power pin, neopixel to battery pack power
6. connect the neopixel control pin to arduino D6 pin
7. connect SDA and SCL of the APDS9960 to the A4 and A5 respectively
8. connect the APDS9960 interrupt pin to the arduino D2
Code upload
First of all you’ll need to download and install the necessary arduino libraries:
1. Neopixel ring library: https://github.com/adafruit/Adafruit_NeoPixel
2. Gesture sensor library: https://github.com/sparkfun/SparkFun_APDS-9960_Sensor_Arduino_Library
If you don’t know how to install arduino libraries check out this tutorial.
After you have downloaded and installed the libraries above, you can clone or download my arduino repository located here: https://github.com/danionescu0/arduino, and we’ll use this sketch: https://github.com/danionescu0/arduino/tree/master/projects/neopixel_ring_gestures
In the next section i’ll embed the code directly into this tutorial, so if you like you can copy and paste it from there.
Finally connect the arduino the computer using the usb cable, put 1.5 v batteries into the battery pack, and upload the sketch into the arduino.
Step 3: How Does It Work ?
In this last part we’ll learn how these components are combined together, how to use their libraries and how i’ve structured my code:
First let’s get a quick glance through the sensor and the neopixel library API methods that we’ll use
1. Neopixel API from adafruit
From this library we’ll be using the methods that control individual led’s color and apply them
– include the library:
#include <Adafruit_NeoPixel.h>
– declare the library
#define NEOPIXED_CONTROL_PIN 6

#define NUM_LEDS 24

Adafruit_NeoPixel strip = Adafruit_NeoPixel(NUM_LEDS, NEOPIXED_CONTROL_PIN, NEO_RBG + NEO_KHZ800);
– initialize
#typically inside the setup block
void setup() {
    strip.begin();
    # maybe some other stuff here    # ....
}
– light up individual pixels then apply all modifications to the strip (render it in a way)
# set up pixel 0 to be red

strip.setPixelColor(0, strip.Color(255, 0, 0));

# set up pixel 1 to be green

strip.setPixelColor(1, strip.Color(0, 255, 0));

# set up pixel 2 to be blue

strip.setPixelColor(2, strip.Color(0, 0 255));

strip.show();
2. APDS 9960 gesture sensor
From this library we’ll be using the “read gesture” function. This function will be able to distinguish between left-right, up-down, close-far commands. There is a trick here, we’re not going to ask the sensor continuously for the last gesture perceived. The board has the capability to “ping” through a interrupt that a gesture has been found.
– include the library, similar to the neopixel
– declare the library the interrupt pin, and the interrupt flag
#define APDS9960_INT 2

SparkFun_APDS9960 apds = SparkFun_APDS9960();

int isr_flag = 0;
– initialize the library, typically inside setup function
void setup()

{
    # declare the interrupt pin as INPUT and attach a function to it
    pinMode(APDS9960_INT, INPUT);
    attachInterrupt(0, interruptRoutine, FALLING);
    if ( apds.init() && apds.enableGestureSensor(true)) {
         Serial.println("APDS-9960 initialization complete");
    } else {
        Serial.println("Something went wrong during APDS-9960 init!");
    }
   # initialize other things maybe
}
– define the interrupt function, here we’ll set only a flag
void interruptRoutine() {
    isr_flag = 1;
}
– inside the loop function check the flag periodically to see if a gesture has been detected
void loop()

{
   # check the flag
    if( isr_flag == 1 ) {
     # if the flag is set, remove the interrupt, make the necessary processing inside handleGesture() function
      # and then reset the flag and reattach the interrupt
      detachInterrupt(0);
      handleGesture();
      isr_flag = 0;
      attachInterrupt(0, interruptRoutine, FALLING);
    }
    # some other code here maybe
}
– define handleGesture() function where we can ask for the last gesture
void handleGesture() {
    # if no gesture is avalible return, this is only a safe check
    if ( !apds.isGestureAvailable() ) {
        return;
    }
    # reads the last gesture, compares with the known ones and print a message
    switch ( apds.readGesture() ) {
      case DIR_UP:
        Serial.println("UP");
        break;
     case DIR_DOWN:
        Serial.println("DOWN");
        break;
      case DIR_LEFT:
        Serial.println("LEFT");
        break;
      case DIR_RIGHT:
        Serial.println("RIGHT");
        break;
      case DIR_FAR:
        Serial.println("FAR");
        break;
    }
}
Now let’s see the whole code in action:
So i’ve explained the base API of the gesture sensor and the neopixel ring, now let’s put things together:
The algorithm runs like this:
– initialize the libraries (see the code above)
– create an array of led intensities called “ledStates”. This array will contain 24 led intensities that are arranged in a descending manner from 150 to 2
– inside the main loop check if the interrupt pin has been modified if so it’s time to change led’s animation or color
– the “handleGesture()” function checks the last gesture and calls the function “toggleColor” for UP -DOWN gestures or set a global variable “ledDirection” for LEFT – RIGHT gestures
– the “toggleColor()” function simply changes a global variable named “colorSelection” with one of the values 0, 1, 2
– also inside the main loop function another function named “animateLeds();” is called. This function checks if 100 milliseconds passed, and if so it rotates the leds using “rotateLeds()” function and then redraws them
– the “rotateLeds()” will “rotates” the leds forward or backward by using another array called “intermediateLedStates”.
The rotation “effect” will look like this:
# after initialization

{150, 100, 70, 50, 40, 30, 10, 2, 0, 0, 0, 0, 0, 0, 0, 0, 0, 0, 0, 0, 0, 0, 0, 0};

# after rotateLeds() is called

{0, 150, 100, 70, 50, 40, 30, 10, 2, 0, 0, 0, 0, 0, 0, 0, 0, 0, 0, 0, 0, 0, 0, 0};

# after rotateLeds() is called again

 {0, 0, 150, 100, 70, 50, 40, 30, 10, 2, 0, 0, 0, 0, 0, 0, 0, 0, 0, 0, 0, 0, 0, 0};

# and so on
For this first creates the new array and copies the old led intensities on the new positions (increment the position or decrement it). After that it overwrites the “ledStates” array with the “intermediateLedStates” so the process will continue after another 100 milliseconds.
#include "SparkFun_APDS9960.h"#include "Adafruit_NeoPixel.h"#include "Wire.h"


#define NEOPIXED_CONTROL_PIN 6
#define NUM_LEDS 24
#define APDS9960_INT 2
#define LED_SPEED_STEP_INTERVAL 100

Adafruit_NeoPixel strip = Adafruit_NeoPixel(NUM_LEDS, NEOPIXED_CONTROL_PIN, NEO_RBG + NEO_KHZ800);
SparkFun_APDS9960 apds = SparkFun_APDS9960();

unsigned long lastLedChangeTime = 0;
short ledDirection = 0;
short colorSelection = 0;
byte ledStates[] = {150, 100, 70, 50, 40, 30, 10, 2, 0, 0, 0, 0,
          0, 0, 0, 0, 0, 0, 0, 0, 0, 0, 0, 0};
int isr_flag = 0;

void setup()
{
    Serial.begin(9600);
    Serial.println("Program started");
    strip.begin();
    pinMode(APDS9960_INT, INPUT);
    attachInterrupt(0, interruptRoutine, FALLING);
    if ( apds.init() && apds.enableGestureSensor(true)) {
         Serial.println("APDS-9960 initialization complete");
    } else {
        Serial.println("Something went wrong during APDS-9960 init!");
    }
    lastLedChangeTime = millis();
    Serial.println("Init succesfully");
}

void loop()
{
    if( isr_flag == 1 ) {
      detachInterrupt(0);
      handleGesture();
      isr_flag = 0;
      attachInterrupt(0, interruptRoutine, FALLING);
    }
    animateLeds();
}

void interruptRoutine()
{
    isr_flag = 1;
}

/**
 * This will handle gestures from the APDS9960 sensor
 * Up and Down gestures will call toggleColor function
 * Left and Right gestures will change the led animation
 */
void handleGesture() {
    if ( !apds.isGestureAvailable() ) {
        return;
    }
    switch ( apds.readGesture() ) {
      case DIR_UP:
        Serial.println("UP");
        toggleColor();
        break;
     case DIR_DOWN:
        Serial.println("DOWN");
        toggleColor();
        break;
      case DIR_LEFT:
        ledDirection = 1;
        Serial.println("LEFT");
        break;
      case DIR_RIGHT:
        ledDirection = -1;
        Serial.println("RIGHT");
        break;
      case DIR_FAR:
        ledDirection = 0;
        Serial.println("FAR");
        break;
    }
}

/**
 * Change current leds color
 * Each time this function is called will change the leds state
 */
void toggleColor()
{
    if (colorSelection == 0) {
        colorSelection = 1;
    } else if (colorSelection == 1) {
        colorSelection = 2;
    } else {
        colorSelection = 0;
    }
}

/**
 * The animation will run after LED_SPEED_STEP_INTERVAL millis
 * First the rotateLeds function is called, then the leds colors are set using the strip api
 */
void animateLeds()
{
    if (millis() - lastLedChangeTime < LED_SPEED_STEP_INTERVAL) {
        return;
    }
    rotateLeds();
    for (int i=0; i < NUM_LEDS; i++) {
        strip.setPixelColor(i, getColor(ledStates[i]));
        strip.show();
    }
    lastLedChangeTime = millis();
}

/**
 * Using a secondary array "intermediateLedStates", leds intensities are animated
 * First the values from "ledStates" are copied on "intermediateLedStates" like so
 * let's sat the "ledStates" array is {100, 80, 60, 0, 0, 0} and the ledDirection is 1
 * then after this function is called "ledStates" array is {0, 100, 80, 60, 0, 0} simulating a rotation effect
 */
void rotateLeds()
{
    byte intermediateLedStates[NUM_LEDS];
    for (int i=0; i < NUM_LEDS; i++) {
        intermediateLedStates[i] = 0;
    }
    for (int i=0; i < NUM_LEDS; i++) {
        if (ledDirection == 1) {
            if (i == NUM_LEDS -1) {
                intermediateLedStates[0] = ledStates[i];
            } else {
                intermediateLedStates[i + 1] = ledStates[i];
            }
        } else {
            if (i == 0) {
                intermediateLedStates[NUM_LEDS - 1] = ledStates[i];
            } else {
                intermediateLedStates[i - 1] = ledStates[i];
            }
        }
    }
    for (int i=0; i < NUM_LEDS; i++) {
        ledStates[i] = intermediateLedStates[i];
    }
}

uint32_t getColor(int intensity)
{
    switch (colorSelection) {
        case 0:
          return strip.Color(intensity, 0, 0);
        case 1:
          return strip.Color(0, intensity, 0);
        default:
          return strip.Color(0, 0, intensity);
    }
}
I hope you enjoyed this, you can use the comments section to ask me questions.
Source: Controlling a Neopixel Led Ring With a Gesture Sensor