LCD display is great way to display output from your arduino when it not connected to your computer.
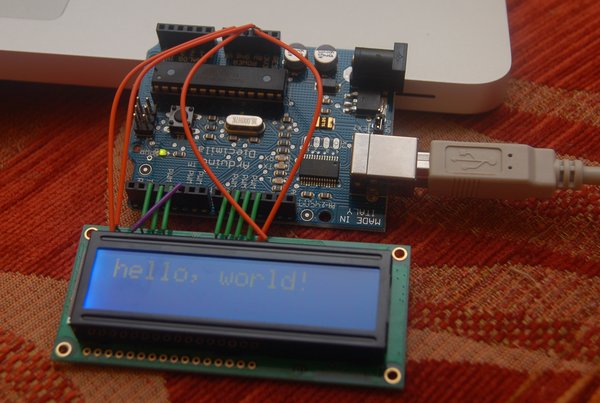
The common display used in arduino projects is 16×2 parallel LCD display which compatible with the Hitachi HD44780 driver. It can easily recognize with it 16 pin interface.
This sketch will print out text message “hello, world” and time in second since last reset.
Instruction;
1) Connect all jumper wire as shown in diagram.
2) Plug in 10kΩ potentiometer on breadboard. This potentiometer use for adjusting the contrast of the LCD character.
3) Plug in LCD display on breadboard.
Upload this code to your arduino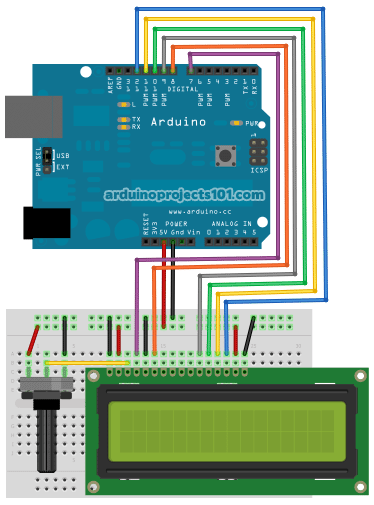
/*
  LiquidCrystal Library - Hello World

 Demonstrates the use a 16x2 LCD display.  The LiquidCrystal
 library works with all LCD displays that are compatible with the
 Hitachi HD44780 driver. There are many of them out there, and you
 can usually tell them by the 16-pin interface.

 This sketch prints "Hello World!" to the LCD
 and shows the time.

  The circuit:
 * LCD RS pin to digital pin 7
 * LCD Enable pin to digital pin 8
 * LCD D4 pin to digital pin 9
 * LCD D5 pin to digital pin 10
 * LCD D6 pin to digital pin 11
 * LCD D7 pin to digital pin 12
 * LCD R/W pin to ground
 * 10K resistor:
 * ends to +5V and ground
 * wiper to LCD VO pin (pin 3)

 Library originally added 18 Apr 2008
 by David A. Mellis
 library modified 5 Jul 2009
 by Limor Fried (http://www.ladyada.net)
 example added 9 Jul 2009
 by Tom Igoe
 modified 22 Nov 2010
 by Tom Igoe

 This example code is in the public domain.

 http://www.arduino.cc/en/Tutorial/LiquidCrystal

 Code hosted at: arduinoprojects101.com
 */

// include the library code:
#include <LiquidCrystal.h>

// initialize the library with the numbers of the interface pins
LiquidCrystal lcd(7, 8, 9, 10, 11, 12);

void setup() {
  // set up the LCD's number of columns and rows:
  lcd.begin(16, 2);
  // Print a message to the LCD.
  lcd.print("hello, world!");
}

void loop() {
  // set the cursor to column 0, line 1
  // (note: line 1 is the second row, since counting begins with 0):
  lcd.setCursor(0, 1);
  // print the number of seconds since reset:
  lcd.print(millis()/1000);
}
Major Components in Project
Parts List;
1) 1x 16×2 parallel LCD display (compatible with Hitachi HD44780 driver)
2) 1x Arduino
3) 1x 10kΩ potentiometer
4) Jumper wire
1) 1x 16×2 parallel LCD display (compatible with Hitachi HD44780 driver)
2) 1x Arduino
3) 1x 10kΩ potentiometer
4) Jumper wire
For more detail: Connecting Arduino LCD Display Code