So how did the idea of a robotic arm come to me? Well, the first thing I remember is our chemistry teacher (!) coming to me yelling that she has a project for me. It was for science Olympiad, however, apparently it was different from all the others, “something related to electronics” (that’s what she said!) and since I had a bit of a reputation in the school for my skills with robots, she thought I would be the right person to ask from!
And well, what could I say to the teacher? I accepted, and she put me in the team. Next thing I remember is my dad yelling at me for the $200 I spent for the equipment I needed, and next… well, the robot was built!
So we went there and harvested the medals with this arm (it didn’t have the high-tech bluetooth utility back then, I controlled it using our TV’s remote controller!), and I came back and decided to post an Instructable for the first time in my life, since I thought this project is actually worth it! Arduino contest was up too, so I was tempted and…
In a nutshell, this Instructable is over how to build a robotic arm which can be controlled by your phone through Bluetooth + Your old TV’s remote controller from the garbage! Sounds pretty cool, huh? I personally like it since next time I’m doing my homework and my pencil is dropped on the ground, and I don’t have to reach down and grab it and instead I can make the arm do it for me! (too lazy I guess!) (And I better not mention that I should be lucky enough that the arm happens to be right beside the pencil)
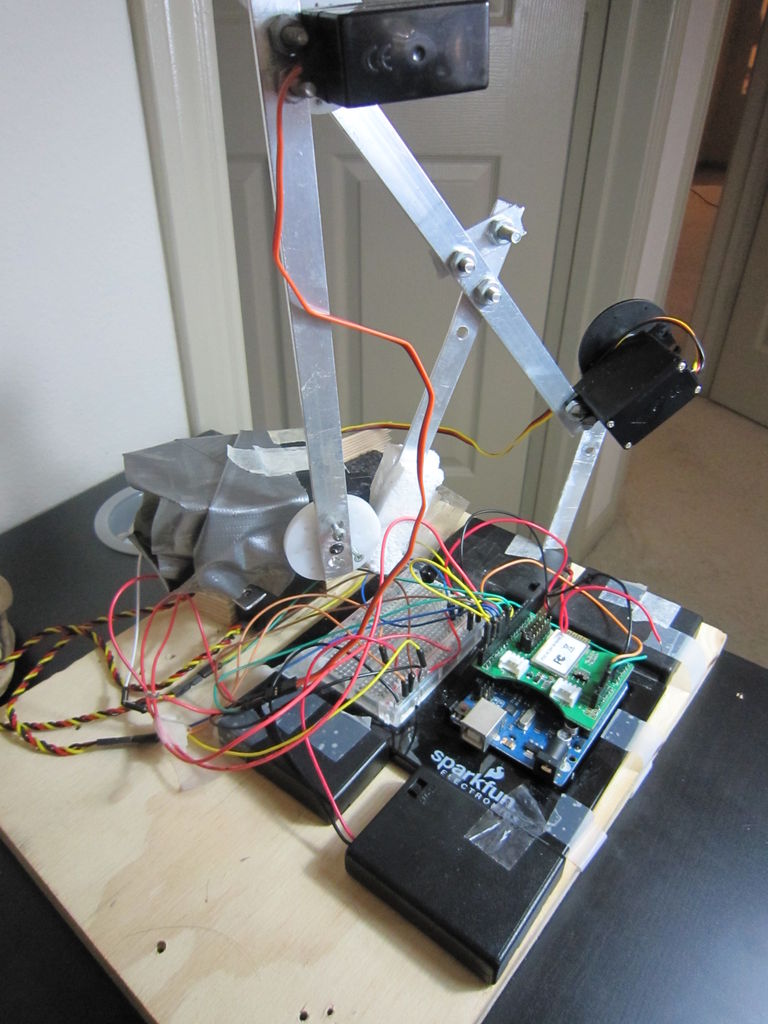
I’ve done my best to make it as cool and easy as possible. It’s not the biggest robotic project on earth, and it’s not as trivial as some simple robots. I’ve tried to categorize it and make it step by step, however, I’m posting this tutorial after I built the arm, so I couldn’t take pictures of some of the individual parts. Please forgive me if that makes the tutorial difficult to understand!
These pictures were also taken before I attached the claws. I had some really crappy claws before, as you can see in the video below! But don’t worry, this instructable offers better claws! HAIR CLIPS!
Here’s the arm being controlled using Bluetooth, which is significantly harder than infrared (also the claws were crappy when I recorded this):
ALSO ALSO ALSO if you like this, please vote for it on Arduino Challenge HERE. Now that you’ves seen what we’re talking about, lets get down to serious business and build it!
Step 1: Get The Stuff!
Arduino! (Sparkfun.com, I bought it with the Arduino Inventor’s kit that’s why I have the little black board that holds the Arduino + The breadboard, however, that’s totally optional)
Breadboard + Wires (also Sparkfun.com !)
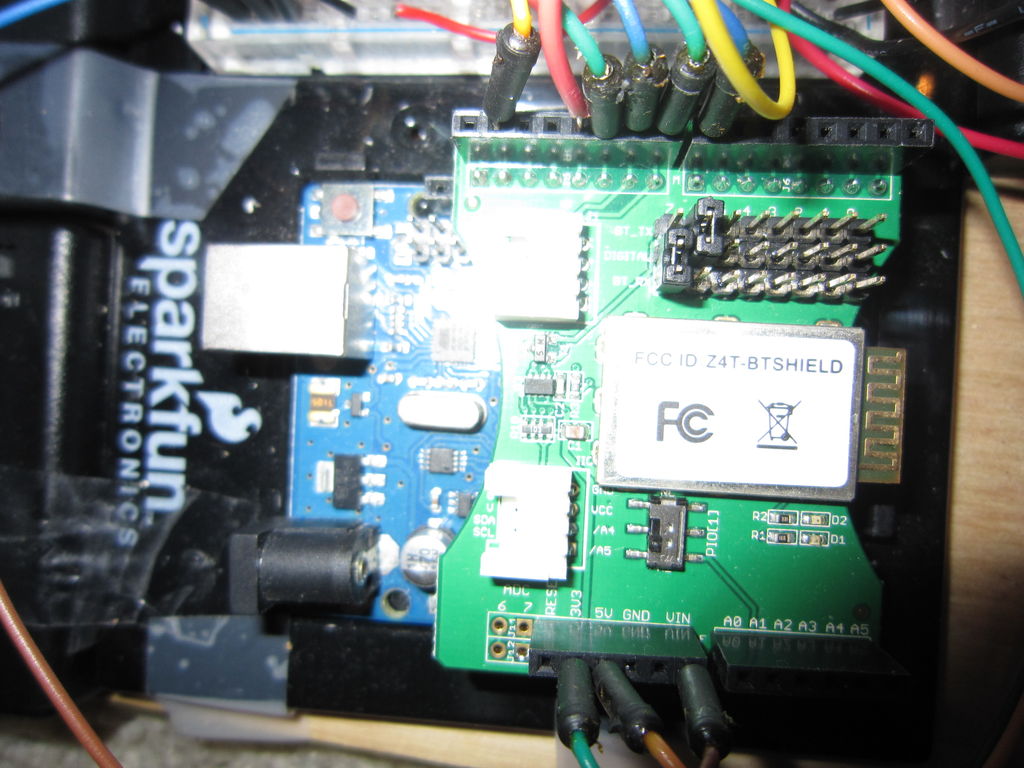
Bluetooth Shield (I’m using a SeeedStudio Bluetooth shield bought from Radioshack)
Servo Motors x 4 (3 standard sized servos and 1 giant servo. I’m using a “HS-485HB” for the base servo, two “HS-645MG” servos for the arms and a HS-805BB giant servo from ServoCity.com)
Batteries (RC batteries recommended, however, AAA Alkaline also worked for me, except for the Giant Servo. For the giant one, I’m using a RC battery with +5A current.)
An Infrared Remote Controller (Back in the garage!)
An IR Receiver (Radioshack + Sparkfun)
Hair Clips (or some type of Claw!)
Wood & Aluminum (or some material with which you can build the mechanics)
Screws (they’re everywhere!)
Super Glue (Walmart!)
A computer with Arduino software + a cable for connecting the arduino
********************************************************************************
Step 2: Bluetooth
Section 1 – Bluetooth
I would prefer to do this step first (I didn’t, but I realized that it’d be better if I’d done this first, since we won’t have to re-wire the circuit again if we mount the shield first). However, it doesn’t make much difference, and if you’re not planning on using Bluetooth for controlling your robot, you may skip this step. Otherwise, here’s what you have to do:
First of all here’s a nice documentation over the Seeedstudio BT Shield: http://www.seeedstudio.com/wiki/index.php?title=Bluetooth_Shield
Whenever you feel like you’re stuck, take a look over here and they give you some instructions, HOWEVER, read these instructions first I made them even easier for you:
a) Mount the Bluetooth shield: It’s the green chip with a protrusion in one end. All you have to do is to put it on the Arduino. If it’s your first time mounting a shield on Arduino, all you have to do is to match the shield’s pins with the Arduino’s, and then plug them in all together. Make sure that the pins match and you’re not mounting it the wrong way, the mounted shield should look like the picture above.
If the BT Shield is mounted correctly, the 01 LED should be blinking in green.
b) THE CODE: This was the HARDEST section for me, since the tutorials regarding bluetooth networking with Arduino are extremely rare on the Internet! However, you may not worry, I’ve already done the hard job. I’ve written the code, and all you have to do is to download it to your computer and upload it to your Arduino! You can also take a look and see how Bluetooth networking works, but I don’t go over it either (an Instructable is not supposed to do so!) However, this is not as easy as what it looks, you have to go through some steps. I put it all here the easy way, step by step:
First, you have to see which Arduino version you’re using:
IF USING ARDUINO 1.0: Download the complete Source Code from Here. This is the complete source code written by me, which will also rotate the servos if they’re connected. This one is recommended since it’s TESTED and I used this one, so I know that it works! For the sample code example which simply enables a Bluetooth connection to the shield, go Here.
IF USING THE PREVIOUS ARDUINO VERSIONS: First, download Software Serial library from Here, (this lib already comes with Arduino 1.0 software but if you’re using previous versions you need to download it) and put it in your libraries directory. If you don’t know how to put a library into your libraries directory, you have to do this:
1.1: go to the “C:\Users\[username]\Documents\Arduino” directory ( [username] is your username in your computer)
1.2: If there is no “libraries” folder in there, you should create one. Create a folder called “libraries”.
1.3: Copy the folder containing the library into the “libraries” folder. Restart the Arduino IDE if it’s open. Next time you open it up, the library and code examples should be available through the menu.
Then Download THIS source code. For the sample code example which simply enables a Bluetooth connection to the shield, go Here.
C) In any case, you’ll need another library for the Infrared controller as well. Download it here, extract it, and put it in the same “libraries” folder no big deal!
After you’ve restarted the Arduino software and made sure that all the libraries are available through Sketch > Import library menu, You may open up the code and compile it to make sure that it compiles. If there are errors, feel free to message me about it and I’ll help you as much as possible, because I KNOW that some of you might face some problems, because I DID face LOTS of problems when I was trying to do this. If you do exacly as the instructions say, you should not normally have any problems.
The code should be compiled successfully if it doesn’t, you’re either using the wrong source code or you haven’t imported the libraries correctly.
D) If the code compiles successfully, go ahead and upload it to the Arduino.
E) Testing it: You’ll perform 2 tests:
1. If the right code is uploaded correctly, the 01 and 02 LEDs should be blinking: 01 in green, 02 in red. One after the other. This shows that the BT shield is put in the Slave mode and is ready for accepting connections from Master devices.
2. Open up the Serial Monitor, wait a couple of seconds, and you should see the message: “The slave bluetooth is inquirable!”
If both conditions are met, WOOOHOOO! Congrats! You’ve passed the hardest section! Now you will try connecting your phone to the BT shield.
What does the code do?
Ok this is the programming section. I just thought I owe you an explanation for those tangled lines of code I just offered you! If you don’t care about the code or you’re not much of a programmer and just want to get things going, you may skip this step. If you’re a curious code digger like me (!), this section is for you.
a) setupBlueToothConnection() function: puts the BT shield into the slave mode.
b) parse() function: parses the entry according to a separator character (which is ‘:’ in this code example), taking the Servo number and the servo position according to the sent data, and writing it to the servos if validated. The format must be the servo motor number, followed by the separator character, followed by the servo position.
So say, you want servo #1 to be put into 30 degree position. What you have to send from you phone is this: “1:30”
Notice that you can never put servo in 0 position because 0 value is used to evaluate the validity of entered data, and is considered to be invalid. Also the servo motors numbering starts from “1” not “0”, like the arrays.
c) loop(): Checks for data, and parses the received data.
d) setup: Attaches servo pins and calls setupBlueToothConnection() function.
2. Download the Android app for sending data to the BT shield Here. This app is called “ITEAD BT Debugging Assistant”, or BTDA for short. The downloaded file is an .apk file which can be installed on your Android phone, so go ahead and install it. Open it up to make sure that it’s installed correctly.
3. Test the connection between your phone and the BT shield. In order to do this, you have to be exact: we have 2 processes in order to make the connection: You have to pair the devices first, then establish a connection.
In order to pair the devices, here’s what you should do:
1. Go to the Settings section in your phone. Then go to Wireless & networks.
2. Turn on the Bluetooth.
3. Go to Bluetooth Settings, and “Scan for Devices”.
4. You should see a device coming up, called “SeeedBTSlave”.
5. Just click on it to pair the device. You may be asked for a PIN number, enter “0000” if so.
6. You should see “paired but not connected” under the device name after a while.
Now, In order to connect the devices:
(6.5) – first make sure that a serial monitor is opened up on your computer and Arduino + BT shield is connected to your computer. This is needed to make sure that Arduino receives signals from Android via the BT shield.
7. Open up the BTDA app, it’s the app you downloaded and installed on your Android device.
8. Click on “Search Devices”.
9. You should see MAC addresses displayed in the list + the name of the device associated with that address. The name of your BT Shield device is “SeeedBTSlave”. Find it in the list. If it’s not there, make sure that and your Bluetooth is turned on and the LEDs on the BT Shield are flashing Red & Green. If not, check the code and make sure it’s uploaded correctly.
10. If “SeeedBTSlave” is found, click on it, and there you go, you should see a screen with a textbox, some checkboxes including “Send as Newline”, and “send as hexadecimal”, and a “Send” button. Go ahead and enter some text in the textbox, check the“Send as Newline” checkbox, and click on “Send”.
11. You should see the input coming up on your serial monitor on your computer.
If all goes well, you’ve successfully connected your Android Device to Arduino, thanks to the Bluetooth Shield!
You may proceed to the next step for building your arm!