Summary of Binary metric clock using Arduino
This article describes a DIY binary metric clock project using an Arduino. The clock displays time in deci-days, centi-days, and milli-days (where one day equals 10 deci-days) via 12 LEDs. The author explains the setup, code logic for tracking time variables, and provides a parts list. The project is designed for beginners and uses a breadboard with specific resistors to light up LEDs representing binary values.
Parts used in the Binary Metric Clock:
- 12 leds
- 12 330 ohm resistors
- An Arduino Uno r3
- A breadboard
- 14 Wires
This is a very odd kind of clock, which can easily be made with simple supplies.
To begin the explanation, I would like to say that I have always wanted time to be metric. 5 o’clock would be mid-day, 7:5 would be three quarters (6:00 pm), and so on. This prototype tells deci-days, centi-days, and milli-days, in that order. For those that are unfamiliar, ten deci-days are in a day, ten centi-days are in a deci-day, and ten milli-days are in a centi-day. For comparison, a milli-day is 86.4 seconds.
With my limited supplies, I had to make it read in binary, but that’s alright with me!
A note:
I am a beginner at Arduino. And a beginner at instructables. So at times it may not be perfect, and I hope you have some understanding!
Step 2: Building it
Step 3: Code & explanation
The complete code is available as binarymetricclock.ino. I will now proceed to explain the code:
int deci = 0, centi = 0, milli = 0, micro = 0;
These are the variables that keep track of the time. 0, 0, 0, 0 means midnight. These should be set to the time when you upload the code, or power it on for the first time.
void setup ()
{
pinMode(13, OUTPUT);
pinMode(12, OUTPUT);
pinMode(11, OUTPUT);
pinMode(10, OUTPUT);
pinMode(9, OUTPUT);
pinMode(8, OUTPUT);
pinMode(7, OUTPUT);
pinMode(6, OUTPUT);
pinMode(5, OUTPUT);
pinMode(4, OUTPUT);
pinMode(3, OUTPUT);
pinMode(2, OUTPUT);
}
This code is fairly self explanatory. I could have used a loop or something, but I chose not to.
Supplies
Here is a list of what you’ll need (not very much):
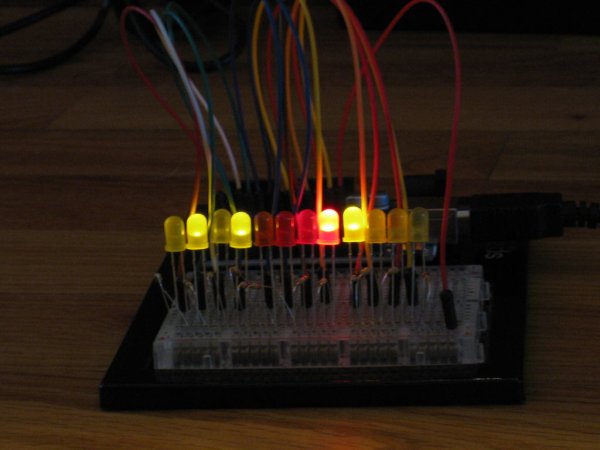
12 leds. It helps if 8 are one color, and 4 are another, but that isn’t all that important.
12 330 ohm resistors. 10k works too, but it makes the leds a bit dim.
An Arduino I have an Uno r3, but anything with 12 or more output pins will work.
A breadboard You could probably survive without one, but I would highly recommend one.
14 Wires
For more detail: Binary metric clock using Arduino
- How does this clock measure time?
The prototype tells deci-days, centi-days, and milli-days, where ten deci-days are in a day. - What is the duration of a milli-day?
A milli-day is equal to 86.4 seconds. - Can I use 10k resistors instead of 330 ohm resistors?
Yes, 10k works too, but it makes the leds a bit dim. - Does the Arduino model matter for this project?
You can use any Arduino with 12 or more output pins, though the author used an Uno r3. - Is a breadboard required for the build?
You could probably survive without one, but the author highly recommends one. - What do the colors of the wires represent in the diagram?
In the Fritzing picture, blue lines are wires and red things are leds. - What should the initial variable values be when uploading the code?
They should be set to the current time when you upload the code or power it on for the first time. - Does the color of the LEDs need to match exactly?
It helps if 8 are one color and 4 are another, but that isn't all that important.