
Summary of Beginners guide to building Arduino robots with Bluetooth and Android
This beginner's tutorial guides users through constructing an Arduino robot controllable via Bluetooth using an Android device. It details the necessary hardware components, assembly steps including soldering and wiring the motor driver to the chassis, and provides instructions for programming the Arduino with a specific sketch. The guide also lists required tools like a computer with Arduino IDE and a soldering iron to complete the project successfully.
Parts used in the Bluetooth Controlled Arduino Robot:
- Pololu Zumo chassis
- DRV8833 dual motor driver
- Arduino Uno or compatible board
- Bluetooth modem (Silvermate)
- Android phone or tablet
- Computer with Arduino IDE
- Soldering iron
- Solder and wires
In this tutorial we are going to go over building a Arduino robot that can be controlled via bluetooth with an Android phone/tablet. This is a beginners guide that is going to briefly go over the process of wiring and programming your robot.
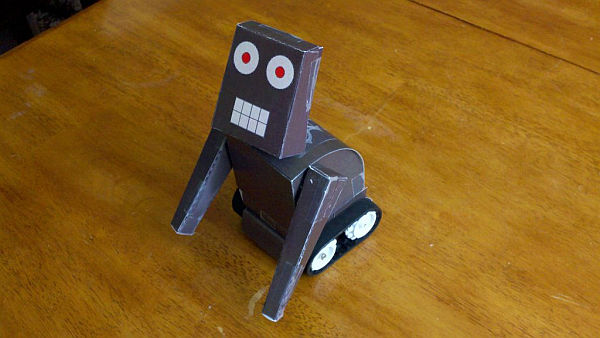
Build list…
The following is the list of components we are going to use:
1. Pololu Zumo chassis http://www.zagrosrobotics.com/shop/item.aspx?itemid=884
2. DRV8833 dual motor driver http://www.zagrosrobotics.com/shop/item.aspx?itemid=879
3. Arduino Uno or compatible http://www.zagrosrobotics.com/shop/item.aspx?itemid=868
4. Bluetooth modem http://www.zagrosrobotics.com/shop/item.aspx?itemid=883
5. Android phone or tablet
Along with that list of parts for the robot you are going to need these basic things to build and program your robot
1, Computer with the Arduino IDE http://arduino.cc/en/Main/Software
2. Soldering iron
3. Some solder and wires
Assembly…
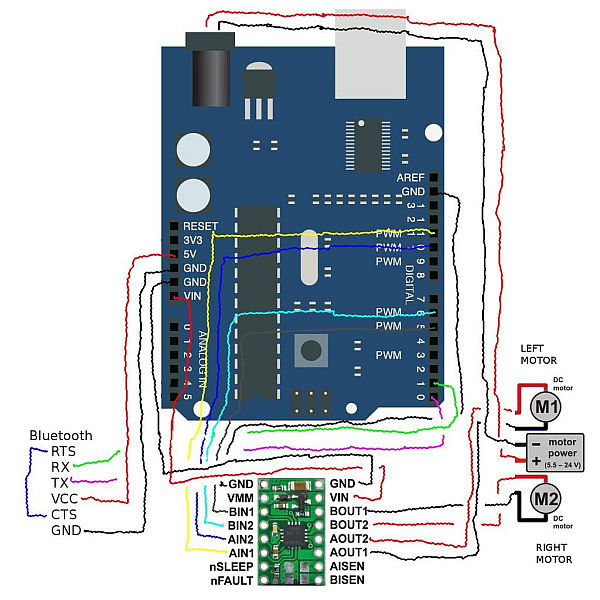
After you have assembled your robot chassis and solderd your motor driver and modem, the next step is to wire up your Arduino Uno to the motor drivers and chassis. Here is the wiring diagram
Arduino PIN GND — DRV8833 GND
Arduino PIN 10 — DRV8833 ain2
Arduino PIN 11 — DRV8833 ain1
Arduino PIN 5 — DRV8833 bin1
Arduino PIN 6 — DRV8833 bin2
Arduino PIN GND — DRV8833 GND
Arduino PIN VIN — DRV8833 VIN
Arduino PIN (TX)1 — Silvermate RX
Arduino PIN (RX)0 — Silvermate TX
Arduino PIN 5V — Silvernate VCC
Arduino PIN GND — Silvernate GND
Silvermate CTS — Silvermate RTS
Arduino Sketch.
Download the attached sketch and flash it to your Arduino. If you are new to Arduino you can always reference their home page and or the Playground for ideas and insight into everything Arduino.
Robots sketch download link https://www.box.com/s/25c8f3c14c8b0217759e
Home page http://www.arduino.cc/
Playground http://arduino.cc/playground/
For more detail: Beginners guide to building Arduino robots with Bluetooth and Android
-
What is the main purpose of this tutorial?
The tutorial covers building an Arduino robot that can be controlled via Bluetooth with an Android phone or tablet. -
Which chassis is recommended for this robot build?
The Pololu Zumo chassis is the component listed for the robot build. -
How do I wire the Arduino pins to the DRV8833 motor driver?
Pins 10 and 11 connect to ain2 and ain1, pins 5 and 6 connect to bin1 and bin2, while GND and VIN connect to their respective counterparts. -
How are the Bluetooth modem pins connected to the Arduino?
The Arduino TX pin connects to Silvermate RX, RX pin to Silvermate TX, 5V to VCC, and GND to GND. -
Can I use a different microcontroller instead of the Arduino Uno?
Yes, the list specifies an Arduino Uno or a compatible board can be used. -
What software is required to program the robot?
A computer with the Arduino IDE is required to download and flash the attached sketch. -
Where can I find the robot sketch code?
The sketch is available for download via a Box.com link provided in the article. -
What basic tools are needed to assemble the robot?
You need a soldering iron, some solder, and wires in addition to the electronic components.
