Summary of Arduino traffic lights
This article describes a beginner-friendly Arduino traffic light project designed for children and novices. It simplifies the traditional LED Blink tutorial into a real-world application, focusing on hardware setup and basic wiring without deep electronics theory. The guide assumes prior knowledge of connecting an Arduino to a computer and stripping wires, aiming to provide a quick, engaging first project using standard components like LEDs and a breadboard.
Parts used in the Arduino Traffic Light:
- 1 x Arduino (Duemilanove 328)
- 1x Breadboard (fairly large)
- 3 x LEDs (Red, amber, and green)
- Wire
- USB cable for programming
- Computer or laptop with a desk
- 1 x Paper clip
I made this project on the same night that my Arduino Duemilanove arrived from Cool Components. After being an Instructables member for about a year I though it was time I should contribute. There is another Arduino traffic light project similar to this, but it is much more complex; mine is aimed at beginners and children (who already know the basics).
As a beginner to the Arduino I had spent a fair amount of time researching them and how they work prior to investment, I had already learnt a little about www.processing.org so I was familiar with the programming environment.
This project takes very little skill to make, and I think it is ideal as a ‘first’ project (it gives a ‘real world’ application to the traditional ‘LED Blink’ tutorial.
This instructable aims to give beginner Arduino users a project to do, rather than teach them about electronics, so I have left out things such as the polarity of LEDs, because information like this can be found in a myriad of locations. Because of this I have made the presumption that you own (or are getting) an Arduino, can connect it to your computer, know how to strip wires and the such.
“Hear me ye foreigners, there be Angles on this here site!” – The code and hardware is designed for the English lighting system, feel free to adapt it to your preferred pattern/colours etc.
Step 1: Bits and bobs.
For this project you will need:
1 x Arduino (Duemilanove 328)
1x Breadboard, fairly large one (I don’t know the size)
3 x LEDs (Red, amber and green)
*some wire*
USB cable for programming
Computer / laptop preferably with a desk
1 x paper clip
The paper clips shown in the picture have already been shaped. (sorry)
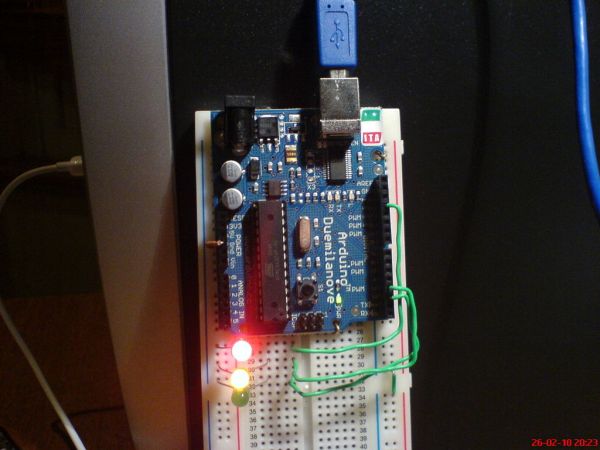
Step 2: Mount the Arduino
I needed to come up with a way of fastening my Arduino to my breadboard, so I put a cut, bent paper clip through the PCB and into two of the boards holes.
The close-up photo was taken using a home made macro lense – search instructables to find out how! 😀
Step 3: Wires, wires, wires.
According to the programme the wiring should go like this:
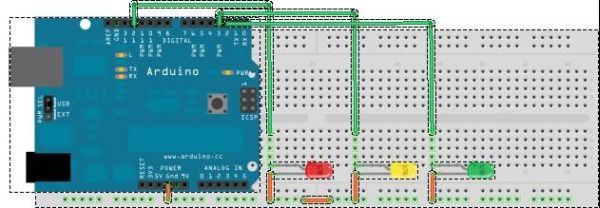
Pin 12 – Red LED
Pin 3 – Amber LED
Pin 2 – Green LED
Ground – bottom row of breadboard
have a look through all the pictures to get a better idea of what is going on.
Don’t ask why I did not use pins nearer to each other 😀
1x Breadboard, fairly large one
3 x LEDs
For more detail: Arduino traffic lights
- What is the primary target audience for this project?
The project is aimed at beginners and children who already know the basics. - How are the LEDs connected to the Arduino pins?
Pin 12 connects to the Red LED, Pin 3 to the Amber LED, and Pin 2 to the Green LED. - Can I adapt the code for my local lighting system?
Yes, the text states you can adapt the pattern and colors to your preferred system. - What is the best way to fasten the Arduino to the breadboard?
You can put a cut, bent paper clip through the PCB and into two of the board's holes. - Does this project teach electronics polarity?
No, the author left out information like LED polarity because it can be found elsewhere. - What skills are presumed before starting this project?
You should own an Arduino, know how to connect it to a computer, and know how to strip wires. - Why did the author choose specific pins for the LEDs?
The author does not explain why they did not use pins nearer to each other. - Is this project complex compared to others?
No, it is described as much simpler than another similar traffic light project available.