Summary of Arduino Sound Alarm
Summary: A sound level detector built with an Arduino that triggers a flashing-LED alarm when classroom noise stays too loud. It uses an electret microphone/sound detector, an LCD for display, and an IR-controlled LED string whose remote codes were reverse-engineered with the IRremote library. Breadboard diagrams, photos, and the Arduino sketch are available; the design is configurable and based on the ZX-Sound board and Arduino.cc examples.
Parts used in the Arduino Sound Alarm:
- Arduino (Uno or compatible)
- ZX-Sound based sound detector board
- Electret microphone (Adafruit)
- IR detector (Adafruit)
- IR LED (Adafruit)
- 16×2 LCD display ($10 Adafruit module)
- LED string (flashing LEDs used as alarm)
- Breadboard and jumper wires
- Resistors and capacitors as per ZX-Sound design
- Power supply (for Arduino and LEDs)
I’ve just completed my second Arduino project, a sound level detector which sets off an “alarm” when there’s the sound level is to high for too long. I built it for use in a school that wants to provide visual feedback to students when they are being too loud. The “alarm” is a string of flashing LEDs that’s controlled by an IR-remote, which I reverse engineered using the the arduino itself and the excellent IRremote library to figure out which codes activate the LED string.
The IRremote library includes an example that dumps the codes and code types that remotes typically use. So I just ran that example with my arduino hooked up to an IR detector from adafruit. It was really quite easy to do.
It’s been a fun project because it’s quite flexible and configurable. Here’s a short video of the finished product:
For anyone who wants to build one of these here’s a bread-board diagram that I made using the very cool Fritzing package:
The Adruino sketch that powers this is available on github.
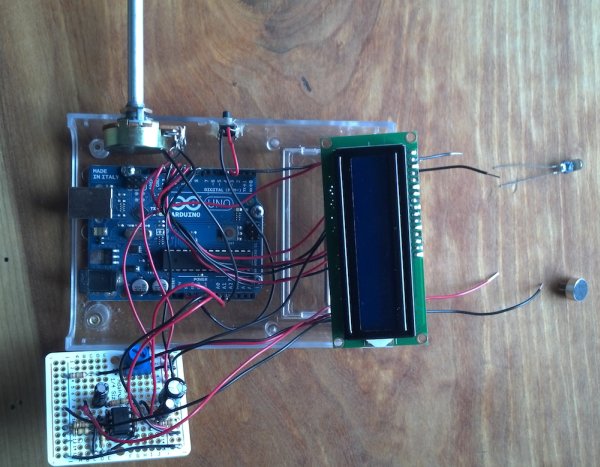
Here are some details on the circuitry. The sound detector is based on the ZX-Sound board. Here’s a nice post on the arduino.cc site that I used as my starting place for building the sound part of this board. The video helpfully includes a parts list which I sourced from Allied electronics, all except for the mic.

The LCD is the $10 16×2 from Adafruit (their tutorial on wiring it up was great), and I also used their electret microphone. One note about the microphone is that it’s polarity matters. If you get it in backwards, it’s much less sensitive. I found this out purely by accident! I also used their IR LED.
Here are some photos of assembling the project.
For more detail: Arduino Sound Alarm
- How did you determine the IR remote codes for the LED string?
I used the Arduino with the IRremote library example and an Adafruit IR detector to dump and read the codes. - Can the alarm be configured for different noise thresholds and durations?
Yes, the project is described as flexible and configurable, and the Arduino sketch is available on GitHub. - What microphone was used and does polarity matter?
I used the Adafruit electret microphone and its polarity matters; if reversed it is much less sensitive. - What sound detector design was the project based on?
The sound detector is based on the ZX-Sound board and started from an Arduino.cc post. - Is there documentation or diagrams to build this on a breadboard?
Yes, a breadboard diagram was made using Fritzing and is provided with the project details. - Where can I find the Arduino sketch for this project?
The Arduino sketch that powers the project is available on GitHub. - What visual feedback is provided when the alarm triggers?
A string of flashing LEDs serves as the visual alarm, controlled via IR codes. - Which LCD was used and was wiring guidance available?
The $10 16×2 Adafruit LCD was used and Adafruit provided a helpful wiring tutorial.