
Summary of Arduino Sketch ServoSweep
This article presents the "Servo Sweep" Arduino sketch, which demonstrates four distinct movement patterns for a hobby servo motor. The code includes uncontrolled maximum speed movements, stepped angle loops, smooth subroutine-driven sweeps, and mathematically generated sine wave motions. It utilizes the standard Servo library and requires specific baud rate settings for serial communication.
Parts used in the Servo Sweep:
- Arduino UNO board
- Small hobby servo motor
- Servo library (Servo.h)
- Digital pin 9
- Serial console
This sketch is used by Exercise: Servo Sweep.
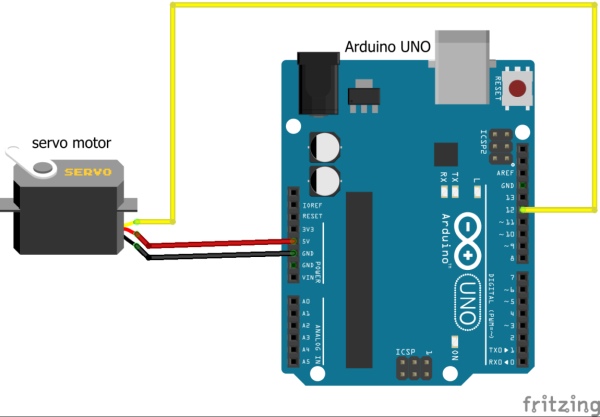
Full Source Code
The full code is all in one file ServoSweep.ino.
// ServoSweep - move a servo along trajectories
//
// Copyright (c) 2016, Garth Zeglin.  All rights reserved. Licensed under the
// terms of the BSD 3-clause license as included in LICENSE.
//
// This program assumes that:
//
//  1. A small hobby servo is connected to pin 9.
//     Note: this sensor has +5V digital outputs can connect directly to the
//     digital input pins on the Arduino UNO.
//
//  2. The serial console on the Arduino IDE is set to 9600 baud communications speed.
//
// ================================================================================
// Import libraries.
#include <Servo.h>

// ================================================================================
// Definitions of constant values.

// The wiring assignment.
const int SERVO_PIN = 9;

// ================================================================================
// Global variable declarations.

// Create an object to control the servo by declaring it.  The Servo C++ class
// is defined in the Servo library.
Servo wiggling_servo;

// Declaration for the subroutine function defined below.  Normally the Arduino system
// doesn't require forward declarations, but the optional argument defeats it.
void linear_move(int start, int end, float speed = 60.0);

// ================================================================================
// Configure the hardware once after booting up.  This runs once after pressing
// reset or powering up the board.

void setup()
{
  // Initialize the serial UART at 9600 bits per second.
  Serial.begin(9600);

  // Initialize the Servo object to use the given pin for output.
  wiggling_servo.attach(SERVO_PIN);
}

// ================================================================================
// Run one iteration of the main event loop.  The Arduino system will call this
// function over and over forever.
void loop()
{
  //================================================================
  // Movement template 1: perform several uncontrolled movements at maximum speed.
  for (int i = 0; i < 2; i = i+1) {
    wiggling_servo.write(0);
    delay(500);
    wiggling_servo.write(90);
    delay(500);
    wiggling_servo.write(180);
    delay(500);
    wiggling_servo.write(0);
    delay(500);
  }

  //================================================================
  // Movement template 2: loop over angles to create a series of stepped movements.
  for (int i = 0; i < 180; i += 10) {
    wiggling_servo.write(i);
    delay(500);
  }

  //================================================================
  // Movement template 3: sweep back and forth a few times using a subroutine
  // which produces a smooth sweep.
  for (int i = 0; i < 2; i = i+1) {
    // Call the movement function defined in the code below.
    linear_move(0, 180);
    linear_move(180, 0);
  }
  linear_move(0, 45); // move to the start point

  // Similar, but using different angles and a slower speed.
  for (int i = 0; i < 2; i = i+1) {
    linear_move(45, 135, 30);
    linear_move(135, 45, 30);
  }
  linear_move(45, 90);  // move to the center

  //================================================================
  // Movement template 4: generate a movement profile using a mathematical function.

  // Perform a smooth movement around the center several times.
  for (int i = 0; i < 4; i = i+1) {

    // Define a few constants governing the motion.  Note that this example
    // uses a C++ style of declaration which looks more like a normal variable
    // declaration, but whose value cannot be changed.
    const float center    = 90.0;     // in degrees
    const float magnitude = 30.0;     // in degrees
    const float period    =  4.0;     // in seconds, duration of cycle
    const float interval  =  0.020;   // in seconds, duration of each step

    int cycle_steps = period / interval;

    for (int step = 0; step < cycle_steps; step++) {
      // Compute the 'phase angle' for the sine function.  Note that the sin()
      // function requires an angle in radians.
      float phase = step * (2*M_PI/cycle_steps);

      // Compute the angle to send to the servo.
      float angle = center + magnitude * sin(phase);
      wiggling_servo.write(angle);

      // Wait for one sampling period.
      delay(1000*interval);
    }
  }
}
// ================================================================================
// Subroutine definitions.

// Linear servo movement function.  This will step from the start angle to the
// end angle as requested.  This emits servo updates at a constant rate.  It
// does not return until the movement is complete.
//
//   start - angle in degrees
//     end - angle in degrees
//   speed - optional argument, speed in degrees/sec
//

void linear_move(int start, int end, float speed)
{
  // Specify the number of milliseconds to wait between updates.
  const int interval = 20;

  // Compute the size of each step in degrees.  Note the use of float to capture
  // fractional precision.  The constant converts speed units from milliseconds
  // to seconds:   deg/step = (deg/sec) * (sec/msec) * (msec/step)
  float step = speed * 0.001 * interval;

  // Declare a float variable to hold the current servo angle.
  float angle = start;

  // Begin a do-loop.  This always executes the body at least once, and then
  // iterates if the while condition is met.
  do {
    wiggling_servo.write(angle);  // update the servo output
    delay(interval);     // pause for the sampling interval

    if (end >= start) {
      angle += step;       // movement in the positive direction
      if (angle > end) angle = end;
    } else {
      angle -= step;      // movement in the negative direction
      if (angle < end) angle = end;
    }
  } while (angle != end);

  // Update the servo with the exact endpoint before returning.
  wiggling_servo.write(end);
}
// ================================================================================
Source: Arduino Sketch ServoSweep
- Which pin is the servo connected to?
The servo is connected to digital pin 9. - What baud rate is required for the serial console?
The serial console must be set to 9600 baud communications speed. - Can the sensor outputs connect directly to Arduino inputs?
Yes, the +5V digital outputs can connect directly to the digital input pins on the Arduino UNO. - How does the code move the servo smoothly?
It uses a linear_move subroutine that emits updates at a constant rate based on a specified speed. - What mathematical function generates the final movement profile?
A sine function is used to generate a smooth movement profile around a center point. - How long is each step duration in the sine wave example?
The interval for each step is 0.020 seconds. - Does the linear_move function return immediately?
No, it does not return until the requested movement from start to end angle is complete. - What unit is used for the speed argument in linear_move?
The speed is measured in degrees per second.
