Summary of Arduino Motion Detection Simple Project
This project uses a PIR motion sensor with an Arduino to detect motion and turn LEDs purple (or off otherwise). It shows wiring: PIR signal to digital pin 2, VCC to 5V, GND to ground, and LEDs driven from pin 13 via a breadboard. Upload provided Arduino code to read the PIR, print motion messages and distances to Serial, and set LED color with setColor. When motion is detected LEDs light; when motion ends they turn off.
Parts used in the Arduino Motion Detection Simple Project:
- Arduino (board)
- PIR motion sensor
- LEDs
- Breadboard
- Jumper wires
This is a very basic tutorial for Arduino beginners , we tried to keep it simple and to the point, how to use PIR motion detection sensors and how to control LED based on the sensor outpu.
and so simply put,The main idea of this project is to light a number of LEDs after sensing a motion with the PIR Sensor, LEDs are going to be turned on with a specific color which here we chose to be purple.. otherwise the LEDs are going to be off.
Step 1: Step 1:What Will You Need

For this project we will need :
- LED
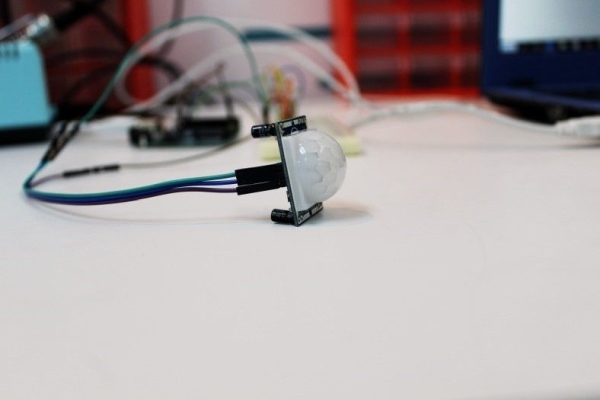
- PIR sensor
- Breadboard
- Arduino
- Jumpers
Step 2: How to Connect Them
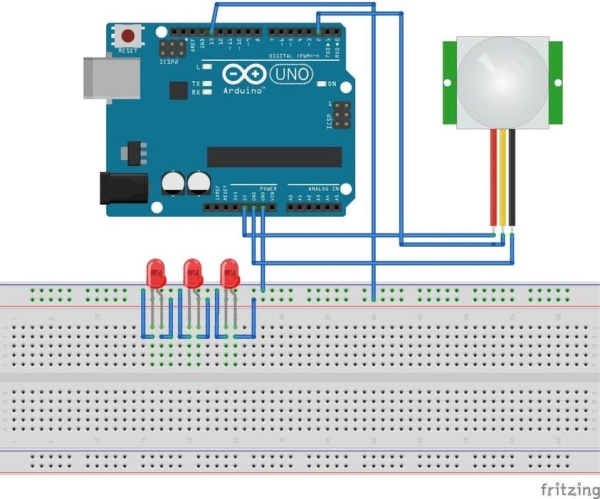
- Connect PIR Sensor to Arduino :
- – Yellow wire to PIN 2 in the Arduino
- – Black to GND
- – Red to 5V
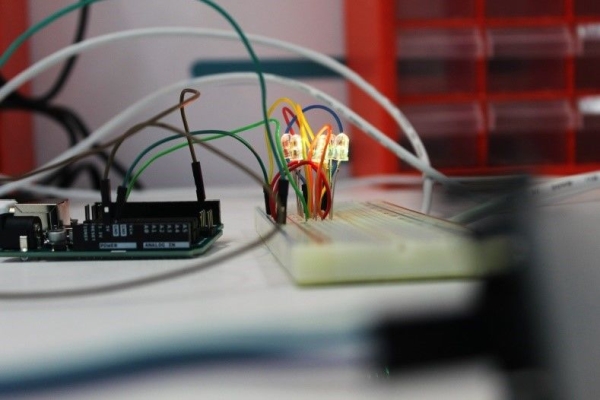
- All LEDs to PIN 13 by using the breadboard as shown in the figure below
just follow the circuit diagram at the top, you can’t go wrong
Step 3: Copy the Code
Just copy the code to Arduino IDE , and upolad it to your Arduino , all commands are commented , so you can read it line by line to understand the whole thing
Code:
int ledPin = 13; // choose the pin for the LED
int inputPin = 2; // choose the input pin (for PIR sensor)
int pirState = LOW; // we start, assuming no motion detected
int val = 0; // variable for reading the pin status
//variables needed to store values
long pulse, inches, cm;
void setup() {
pinMode(ledPin, OUTPUT); // declare LED as output
pinMode(inputPin, INPUT); // declare sensor as input
Serial.begin(9600);
}
void loop(){
val = digitalRead(inputPin); // read input value
if (val == HIGH) { // check if the input is HIGH
setColor(250,0,255,ledPin); // choose the color value
digitalWrite(ledPin, HIGH); // turn LED ON
if (pirState == LOW) {
// we have just turned on
Serial.println(“Motion detected!”);
// We only want to print on the output change, not state
pirState = HIGH;
pulse = pulseIn(inputPin, HIGH);
//147uS per inch
inches = pulse/147;
//change inches to centimetres
cm = inches * 2.54;
Serial.print(inches); // print for the inches value
Serial.print(“in, “);
Serial.print(cm);
Serial.print(“cm”); // print for the centinetres value
Serial.println();
delay(500);
}
} else {
digitalWrite(ledPin, LOW); // turn LED OFF
if (pirState == HIGH){
// we have just turned of
Serial.println(“Motion ended!”);
// We only want to print on the output change, not state
pirState = LOW;
}
}
}
void setColor(int red, int green, int blue,int led) // color function to set the color you want for the LED
{
#ifdef COMMON_ANODE
red = 255 – red; // the red channel value
green = 255 – green; // the green channel value
blue = 255 – blue; // the blue channel value
#endif
// dedicate every channel value to get one color
analogWrite(led, red);
analogWrite(led, green);
analogWrite(led, blue);
}
Step 4: Conclusion
there’s nothing much to say , whenever you wave your hand near the sensor, you gonna see the LEDs blinking
leave a comment if you had any trouble
Source: Arduino Motion Detection Simple Project
- How do you connect the PIR sensor to the Arduino?
Yellow wire to pin 2, black to GND, red to 5V. - Which pin is used for the LED in the project?
The LEDs are connected to pin 13. - How is motion detected in the code?
The code reads digitalRead on input pin 2 and checks for HIGH to indicate motion. - What color do the LEDs turn when motion is detected?
The code sets the LEDs to a purple color using setColor(250,0,255,ledPin). - Does the project print any information to Serial?
Yes; it prints Motion detected, Motion ended, and distance values in inches and cm. - How does the code avoid repeated Serial prints for the same state?
It tracks pirState and only prints when the state changes between LOW and HIGH. - Can the LED color be changed in the code?
Yes; change the values passed to setColor to set a different RGB color. - What happens when no motion is present?
The code sets the LED pin LOW and prints Motion ended when pirState transitions to LOW.