The Origin
My dad is a musician. He can play a multitude of instruments. However, he only has two arms, BUT he also has legs! That’s when we decided that we would reuse the foot pedals from an old organ and convert them into an arduino powered MIDI keyboard. Now he can easily play electric guitar and fill the empty sound with excellent bass notes produced from his QS8 Quadrasynth.
An Introduction to MIDI
MIDI stands for Musical Instrument Digital Interface. As you can guess, it conducts all operations digitally. MIDI doesn’t send sound frequencies as instruments do. MIDI works generally with two parts: a controller and a sequencer. The controller is what is manipulated by the musician and sends serial data to the sequencer. The sequencer can be a computer, keyboard, synthesizer, or even a standalone rack mount sequencer.
The MIDI controller does not make any sound on its own. It REQUIRES some form of a sequencer. The sequencer decodes the serial data and produces sound based on the given data.
MIDI data is commonly sent in three parts: the MIDI channel (up to 16 channels can be used at once), the note, and the velocity (basically the volume of the note or how loud you want it to be).
Step 1: Materials
I ordered my arduino parts, crystals, powersupply, and capacitors from http://cutedigi.com. Use a common 12V power adapter to power the powersupply. I can’t imagine this project drawing much current, so I’m sure a 500mA power adapter will suffice.
Step 2: Obtaining the Foot Pedals
What a steal!
The organ used in this instructable is a Wurlitzer organ. My dad found it on craigslist and picked it up for $25!! Everything worked, but he didn’t care for the tone. The pedals, however, were perfect. There are twenty five keys and the switches are built into the pedals instead of mounted inside the organ with the pedals hitting the switches. Also note how the switches use magnets to connect the switch. These switches will be almost impossible to wear out! Consider taking the volume pedal as well. It controls a potentiometer, which is pertinent to our interests!

This organ has an interesting version of a Leslie speaker. That might be used for another project on another day.
-Organ (to salvage foot pedals from)
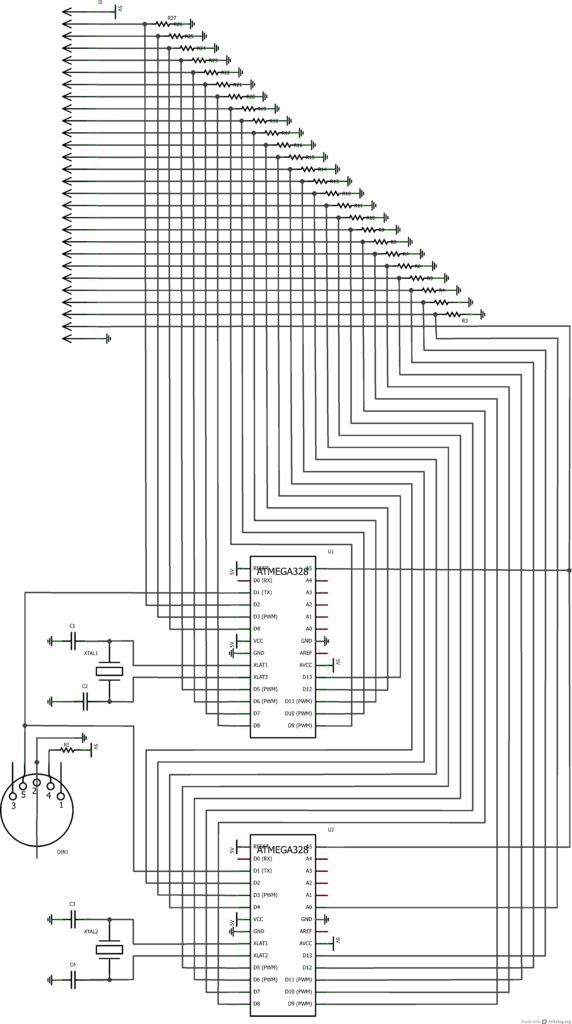
-Two ATmega328 ICs with arduino boot loader
-Seats to place the ICs in once soldered.
-Two 16 MHz crystals
-Four 22pF ceramic capacitors
-Perf board
-Power supply and adapter for ATmega ICs
-220 Ohm resistor
-Pull down resistors for the Pedals
-MIDI cable or Female MIDI connector
-Arduino and USB cable (for programming the IC. A separate programmer can be used in its place)
-Computer for programming
-Solder and Soldering Iron
-Wire Strippers and cutters
-Potentiometer (Potentially the volume pedal salvaged from organ [see what I did there?])
-At least twenty six pin connector (salvaged from organ)
-Wire
For more detail: Arduino MIDI Foot Pedal Keyboard

