Summary of Arduino Joystick Mouse Control Code
This project uses an Arduino Leonardo, Micro, or Due to control the computer mouse cursor with a 2-axis joystick. Cursor movement is relative, updating based on analog input from the joystick converted to a range of -12 to 12. A pushbutton toggles mouse control on and off, indicated by an LED on pin 5. Another pushbutton is used for mouse clicks. This setup allows for precise cursor control and safe toggling of mouse control to prevent loss of control.
Parts used in the Arduino Joystick Mouse Control:
- Arduino Leonardo, Micro, or Due board
- 2-axis joystick
- Momentary pushbutton
- 10-kilohm resistor (if needed)
- Status LED (connected to pin 5)
Using the Mouse library, you can controls a computer’s onscreen cursor with an Arduino Leonardo, Micro, or Due. This particular example uses a pushbutton to turn on and off mouse control with a joystick.
Cursor movement from the Arduino is always relative. So every time the analog input is read, the cursor’s position is updated relative to it’s current position.
Two analog inputs ranging from 0 to 1023 are translated to ranges of -12 to 12. The sketch assumes that the joystick resting values are around the middle of the range, but that they vary within a threshold.
The pushbutton allows you to toggle mouse control on and off. A status LED connected to pin 5 lights when the Arduino is controlling the mouse.
Software Required
- none
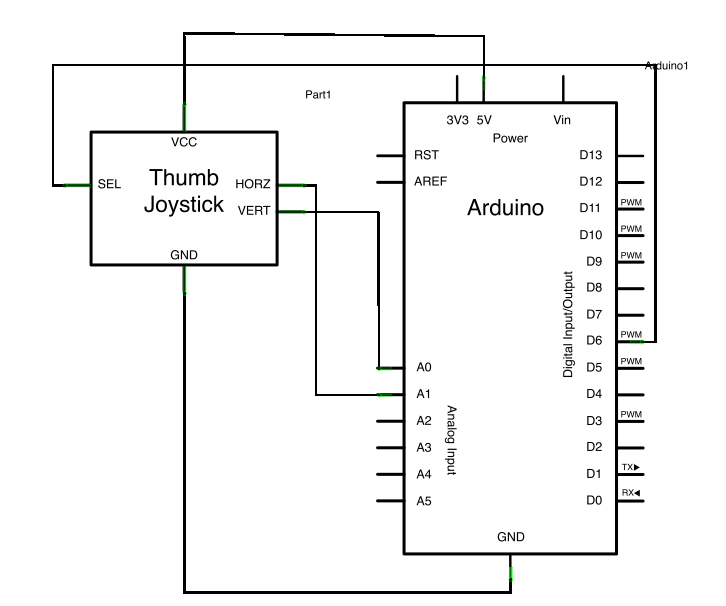
image developed using Fritzing. For more circuit examples, see the Fritzing project page
Schematic:
Code
/*
JoystickMouseControl

Controls the mouse from a joystick on an Arduino Leonardo or Micro.
Uses a pushbutton to turn on and off mouse control, and
a second pushbutton to click the left mouse button

Hardware:
* 2-axis joystick connected to pins A0 and A1
* pushbuttons connected to pin D2 and D3

The mouse movement is always relative. This sketch reads
two analog inputs that range from 0 to 1023 (or less on either end)
and translates them into ranges of -6 to 6.
The sketch assumes that the joystick resting values are around the
middle of the range, but that they vary within a threshold.

WARNING:  When you use the Mouse.move() command, the Arduino takes
over your mouse!  Make sure you have control before you use the command.
This sketch includes a pushbutton to toggle the mouse control state, so
you can turn on and off mouse control.

created 15 Sept 2011
updated 28 Mar 2012
by Tom Igoe

this code is in the public domain

*/
Hardware Required
- Arduino Leonardo, Micro, or Due board
- 2 axis joystick
- momentary pushbutton
- One 10-kilohm resistor (if needed)
For more detail: Arduino Joystick Mouse Control Code


