Summary of Arduino Hexapod Robot
This article details the construction of a smaller Arduino Hexapod Robot using plastic components to test algorithms before building a larger version. The author discusses challenges with servo interfaces, voltage regulation for battery power, and software issues regarding floating-point calculations versus integer precision affecting movement stability and speed.
Parts used in the Arduino Hexapod Robot:
- Plastic frame components
- Servo motors (18 for legs)
- Arduino Mega board
- Servo interface shield
- Adjustable voltage regulator
- Battery pack (8xAA or 3 LiPo 11V)
- Sensors
Arduino Hexapod Robot Design
I will show you how to build an arduino hexapod robot, from building the body, to how to implement the algorithm. To learn about the implementation of the algorithm, read this first, if you are not sure what is IK, read this.
中文翻译:http://blog.oscarliang.net/arduino-liu-zhua-kun-chong-liu-zhua-shou-ji-yuan-dai-ma/
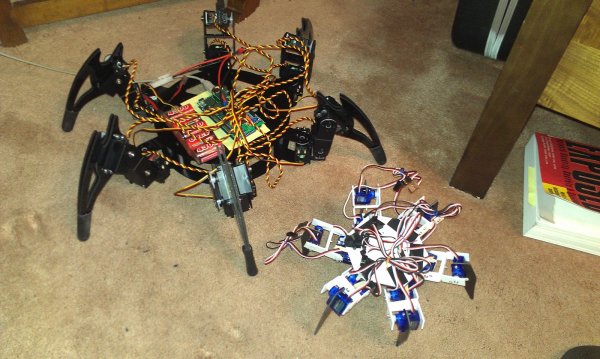
I ordered parts from a robot frame manufacturer, but they will take a while to arrive. So I decided before that, I will build a smaller version Arduino Hexapod Robot using plastic to implement the algorithms.
Most of the parts in this project would be inherited from the 2DOF Arduino Hexapod Robot, except the base.
I wanted to make a servo interface with the shield I bought off ebay for Arduino Hexapod Robot, which would making it so easy to install the servos without making a mess. In theory i could use 48 servos on a Mega board, but I only soldered 20 servo ports, just to keep wires tidy and compact. I need only 18 servos for the legs and possibly 2 for the sensors anyway.
I am leaving some space on the right hand side of the board to put a adjustable voltage regulator in, as I am planning to use 8xAA batteries, or 3 lipo 11V batteries in the future.
Redesigned and made another base, with smaller diameter and larger thickness. the Previous one was too thin that it actually bends a little when it’s standing.
found that when casting float to int, numbers are floor rounded e.g 4.4 = 4, 4.8 also = 4. which would introduce round-off error. need to implement number casting function to resolve this.
|
int FloatToInt(float input){
// this is an alternative to cast number directly, to avoid floor rounding
int temp = (int)input; // floor-rounded input
float dif = input – (float)temp; //
if (dif < 0.5) return temp;
else return temp+1;
}
|
Also there is another problem with responding speed. I check the resulted in the C++ code against the simulation excel spreadsheet, found the error margin is quite big, because I was using int for all the calculations. I then change all of them into float. Although it works on the robot, but the responding time increased quite obviously, also the Arduino Hexapod Robot movement become unstable.
I think it’s because of the computational power of the Arduino just isn’t good enough to do pure floating point IK cacluation. I will need to think of a way to balance between accuracy and computational load.
For more detail: Arduino Hexapod Robot
- Why was a smaller version built first?
The author built a smaller plastic version to implement algorithms while waiting for a larger robot frame manufacturer parts. - How many servos were soldered onto the interface shield?
Only 20 servo ports were soldered to keep wires tidy and compact, even though the Mega board could theoretically support 48. - What power sources are planned for the adjustable voltage regulator?
The design plans to use either 8xAA batteries or 3 LiPo 11V batteries. - Why was the base redesigned?
The original base was too thin and bent when standing, so it was redesigned with a smaller diameter and larger thickness. - What issue occurs when casting float to int in C++?
Casting floats to ints results in floor rounding, which introduces round-off errors that require a custom function to resolve. - Why did changing calculations to float cause instability?
Using float increased computational load beyond the Arduino's processing power, leading to slower response times and unstable movement. - What is the goal regarding accuracy and computational load?
The goal is to find a balance between calculation accuracy and the limited computational power of the Arduino.