Summary of Arduino – Getting my LCD Screen to work
### Summary The article details troubleshooting a Powertip PC1602F 16×2 LCD with an Arduino. The author initially faced hardware failure and display issues like solid blocks due to poor pin connections. The solution involved soldering jumper wires directly to the LCD pins for stability, using four data pins instead of eight, connecting the contrast pin to GND without a potentiometer, and utilizing standard Arduino LiquidCrystal libraries.
Parts used in the Arduino LCD Display:
- Powertip PC1602F 16x2 LCD screen
- Arduino board
- Jumper wires
- Soldering equipment
- Hitachi HD44780 compatible display driver
- USB chip (mentioned as burnt)
I’ve gotten hold of what I assumed was a compatible 16×2 LCD screen with my Arduino board – it’s a Powertip PC1602F and uses a compatible display driver for the Hitachi HD44780 display chip. This is essentially what the Arduino LCD libraries are built around, so when I failed to get a display this is the first thing that I checked out. I also downloaded and installed Arduino 0017 which has a better and more up to date library for LCD stuff but you can update version 0015 with this library I think.
Unfortunately this LCD screen also cost me my first Arduino board, not sure if it was coindence or not, but the USB chip burnt out when I was connecting the LCD screen via various guides and the manufacturers pin layouts. Also turns out that you don’t actually need to use all the pins – for a start my screen isn’t back lit and you only need 4 out of the 8 jumpers.
Anyway, one new Arduino board later and I wire in my display and all I would get is a line of solid block characters, so it was working and I had tried various code snippets and Arduino versions but no luck in getting any text on the screen. Occaisonally I would also get a faint cursor or no display at all – which freaked me out slightly considering i had already potentially lost an Arduino board to this LCD screen and it was beginning to frustrate me.
So now I went for broke – I soldered some jumper wires on to the LCD board pins and hey presto when any program is run text is now displayed, although at first my connections weren’t great so makesure you solder the pins really well with no bridges! Turns out that whilst the wire ends fit snug in the LCD pin holes they still don’t form a decent connection and this was causing it to have random results. For whatever reason, I decided to leave the rubber ends on the jumper wires, but this seems to have turned out fine.
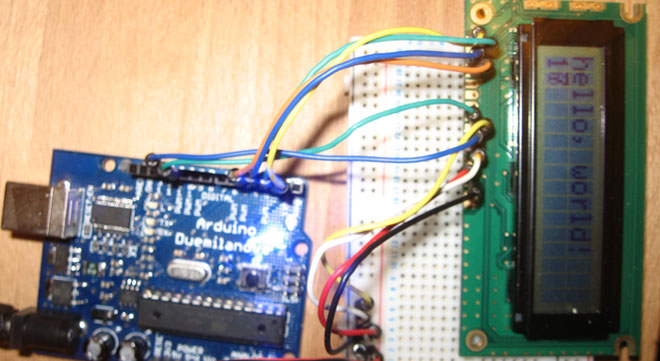
Now I just have to figure out what to do with the LCD screen! Below is the sketch that I used along with a picture of the wiring – I would recommend that you use as many different colour wires as possible for this as you could have up to 16 wires running from this board so you want save on any confusion as much as possible.
Arduino LCD Display Circuit
I didn’t bother using a potentiometer to control the contrast on the screen as recommended, so I stuck that pin to GND which seemed to work fine for the display. Other than that this is the standard circuit from the tutorials here
Arduino LCD Wiring:
Arduino LCD Display Sketch
/*
  LiquidCrystal Library - Hello World

 Demonstrates the use a 16x2 LCD display.  The LiquidCrystal
 library works with all LCD displays that are compatible with the
 Hitachi HD44780 driver. There are many of them out there, and you
 can usually tell them by the 16-pin interface.
For more detail: Arduino – Getting my LCD Screen to work
- Why did my first Arduino board fail?
The USB chip burned out during connection attempts with various guides and manufacturer pin layouts. - Do I need to use all eight pins on the LCD?
No, you only need four out of the eight jumpers for this specific display. - What caused the random results and block characters initially?
The wire ends fitting snugly in the holes did not form a decent connection, requiring soldered jumper wires. - Is it necessary to use a potentiometer for contrast control?
No, the author stuck the contrast pin to GND which worked fine without a potentiometer. - Which library is recommended for this project?
The LiquidCrystal Library works with all LCD displays compatible with the Hitachi HD44780 driver. - How can I avoid confusion when wiring up to 16 wires?
It is recommended to use as many different colored wires as possible to save on confusion. - Does leaving rubber ends on jumper wires affect performance?
Leaving the rubber ends on seems to have turned out fine according to the author. - What happens if there are bridges in the soldering?
Bridges in the soldering will cause bad connections and prevent proper text display.