Summary of Arduino-Based “Analog” Slow Cooker Controller
Summary: The author built a DIY controller for an analog slow cooker to add timed temperature ranges (Warm/Low/Med/High) without modifying the cooker. They repurposed a wireless outlet remote modified to be driven by GPIO pins for mains isolation, and used an Adafruit RGB LCD Shield for a simple local UI with buttons and display. The project prioritizes practicality over precise temperature control and started from Adafruit’s SousViduino concept.
Parts used in the Analog Slow Cooker Controller:
- Analog slow cooker
- Wireless outlet remote (modified)
- GPIO-capable microcontroller (Arduino or similar)
- Mains power switching hardware (isolated from controller)
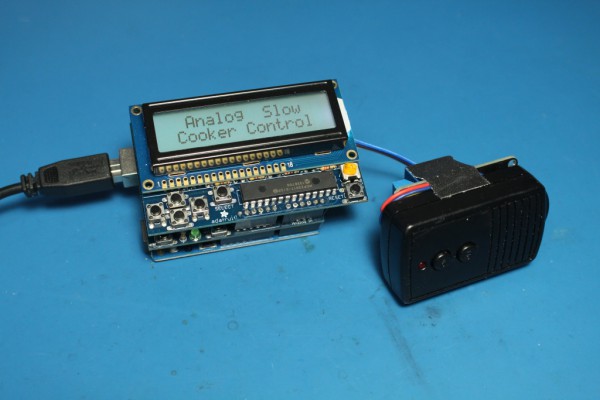
- Adafruit RGB LCD Shield (display and buttons)
- Wiring and connectors
- Enclosure or mounting hardware
I had two options: One required me to spend money. The other cost me nothing and gave me an opportunity to make something useful.
To make a short story longer, I have an “analog” slow cooker (just a dial on the front) and I wanted the ability to set the cooking time and temperature. Now I could have just gone out and bought an appliance timer, which certainly would have done the job. But that wouldn’t have given me temperature control. I had a few bits lying around from other projects, so I decided to smash them together and see what happened.
Since I would actually be using the slow cooker for its intended purpose, I really wasn’t concerned with being able to set the temperature to the exact tenth of a degree. Being able to select Warm/Low/Medium/High would be fine. Instead of modifying the slow cooker, I would just set the dial to High and control the AC power connection. Having played around with Adafruit’s SousViduino project a while back, I would use that as a starting point. There, I modified a wireless outlet remote control such that I could control it with two GPIO pins. This allowed for the actual mains power switching hardware to be completely isolated from the controller. I’ve used this trick several times to great effect. This time would be no different.
With the AC power control figured out, I considered the User Interface. I opted for something simple. The Adafruit RGB LCD Shield would work well as it had both a display and buttons built in. Sure, I could have beat this project about the head and neck with “IoT”-this and “ESP8266”-that, but I was feeling lazy and just wanted a simple timer control. Of course, there’s nothing that says I won’t add some kind of wireless connectivity, but for now, local control is fine.
For more Details: Arduino-Based “Analog” Slow Cooker Controller
- Can I add timed temperature control without modifying the slow cooker?
Yes; the project leaves the slow cooker unmodified and controls power by setting its dial to High and switching mains power externally. - What temperature precision does the controller provide?
It provides coarse selection of Warm, Low, Medium, and High rather than precise tenths of a degree. - How is mains isolation handled in this project?
Mains switching hardware is isolated from the controller by using a modified wireless outlet remote driven by GPIO pins. - Which user interface was chosen for the controller?
An Adafruit RGB LCD Shield with built-in display and buttons was used for a simple local UI. - Did the author use Wi-Fi or IoT features for this build?
No; the initial build uses local control only, though wireless connectivity could be added later. - Was buying an appliance timer considered?
Yes; buying a timer was considered but it would not have provided temperature control, so the author chose to build a custom controller. - What existing project inspired this build?
The project started from Adafruit's SousViduino project. - Is precise temperature sensing required for this controller?
No; the author was not concerned with precise temperature sensing and accepted coarse temperature ranges.