Summary of Arcade Button MIDI Keyboard
This article describes the development of version 2.0 of a DIY Arcade Button MIDI Keyboard using Arduino. The creator upgraded from an Arduino Mega to Pro Micros with 16-channel multiplexers for better input handling and compact design. The build includes laser-cut MDF for precision, extensive soldering, wiring, and addition of Neopixel lighting controlled by a dedicated Arduino. The project required careful troubleshooting and creative enclosure design to manage wiring. The code uses the Midi_Controller.h library and uploads via the Arduino Leonardo board setting. The device integrates with software like Ableton Live for music creation.
Parts used in the Arcade Button MIDI Keyboard:
- Large Arcade Buttons x15
- Small Arcade Buttons x10
- Pro Micro x2
- 16-channel Multiplexer x2
- Neopixel ring
- 10k Potentiometer x6
- Hookup wire
- Soldering tools
- 1/8'' MDF
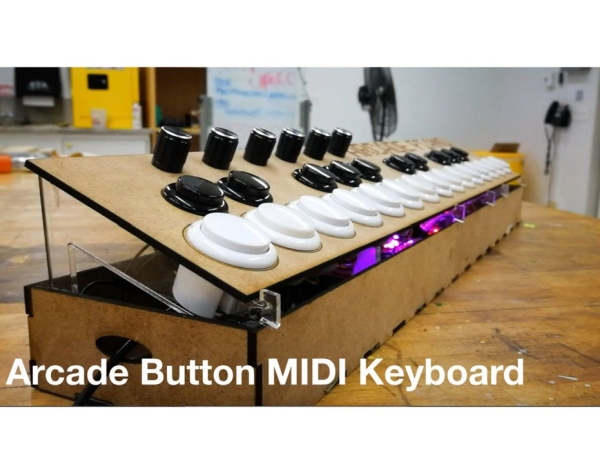
This is a version 2.0 of one of my first forays into Arduino and DIY MIDI programming. I’ve developed my skills in prototyping and design so I thought it would be a good demonstration of process and progression. With a more informed design process I recycled the buttons from my first attempt and set off to build 2.0!
Step 1: Materials
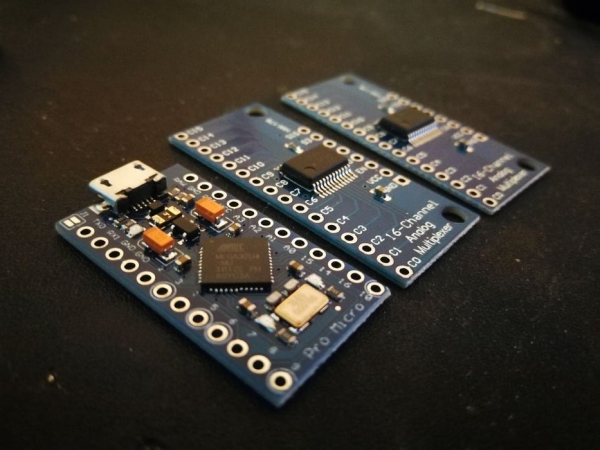
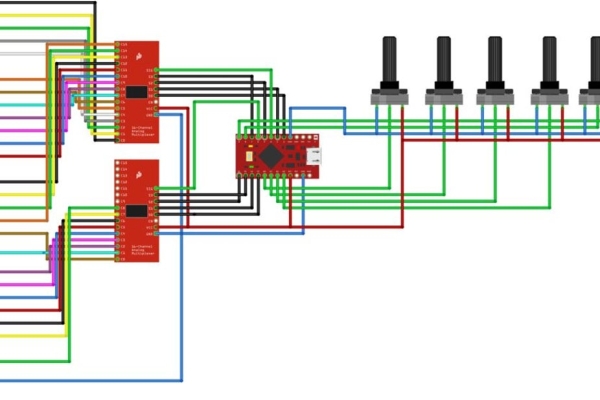
My 1st version used an Arduino Mega because of the many intputs it has but I like the small size and HID MIDI capabilities that the Pro Micro has when using the Midi_controller.h library. So I decided to use two 16-channel multiplexers to satisfy the input requirement for 2-octaves of range.
Here is a list of parts I used:
Hookup wire
Soldering tools
1/8” MDF
Step 2: Design and Cutting
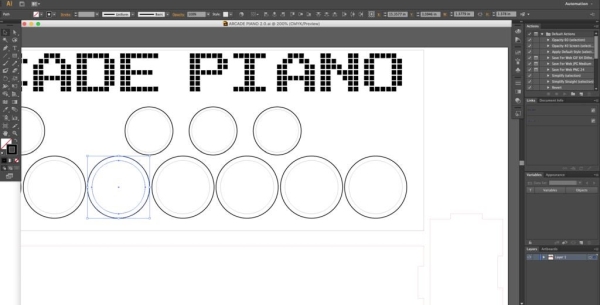
I have included an .svg file for inquiring minds if that is useful, but I encourage everyone to excersize creativity and experimentation in the design process. Maybe using acrylic instead of mdf would look awesome!
I used a drill and bore bit in the 1st version so I was looking to get a more precise product using design software and a laser cutter this time.
Step 3: Solder and Wire
This is the most time consuming part. I find certain parts of soldering therapeutic so get some tea, put on a smooth jam and know that this step is a marathon and not a sprint!
I tried to salvage as much wire as possible from the 1st version and taking note as to where I was going to place the Arduino and mux in order to try and eliminate some of the wire mass that would have to squeeze into the box after it was done.
I tend to embrace the chaos of a good diy tangle of wires more than some so follow your own ambitions when sorting out wires.
As far as a walkthrough for connections, wrote the code first and then let that dictate where the wires would go…
I built the keyboard from the lowest to the highest note with the 1st 16 notes going to mux1 and the remaining notes going to mux2 there might be a slight increase in latency with the mux setup but the 16mhz processor zips through it fast enough so that I can’t notice.
I tried diving into midi multiplexing before any tutorials and hit a wall, so I recommend doing a few basic tutorials to get a baseline understanding if things seem out of reach.
I follow these simple troubleshooting steps:
1. Make sure everything is grounded
2. Check for shorts
3. Pots get 5v
4. Double check that everything is grounded
Step 4: Too Many Wires…

I underestimated the depth of the box and was having difficulty making the top sit nicely with looking like it was about to burst out “Akira Style” so I talked through it with some friends in the studio and came up with a plan to put it on display at an angle. I did some rapid prototyping with acrylic scraps and ended up with a nice solution. It sort of showcases the birds nest out the back like the maze of patch cables in 60s Moog synthesizers. Finished, right?
Step 5: Neopixel!
I used Neopixels in a previous project using MIDI and had found that MIDI needs a dedicated board to do its job so I wired up another Pro Micro using the “RAW” input for 5v power running from the 1st board. I didn’t program anything fancy, just found a program from the strandtest sample sketch from the Adafruit library.
Step 6: Code!
To upload:
1. Make sure you download the Midi_Controller.h library
2. Select “Arduino Leonardo” from board type
3. Select borad from the Port menu
4. Compile and upload
After uploading test with a midi monitoring application. If everything seems to be working as planned it’s time to make some music!
Step 7: Jam Out!
I use Ableton Live with my projects because of it’s flexibility. If you use Garage Band it will still work but the knobs will have fixed functions depending on what you program the MIDICC numbers as in the sketch.
Any questions? Leave them in the comments!
Happy Making!
Source: Arcade Button MIDI Keyboard