
Summary of Berry Racer – a Game Programmed in Arduino and Played on a Custom PCB
Berry Racer is a handheld game built and programmed with Arduino on a Teensy 3.2, mounted to a custom PCB that connects a screen, joystick, four pushbuttons, a piezo buzzer, and optional battery power with an on/off switch. The creator documents designing the PCB in EasyEDA from an Inkscape outline, ordering manufactured boards, soldering components, uploading provided Teensy code, and optionally 3D-printing a case. The instructable includes links, build tips, testing steps, and explanations of key code parts for reproducing or adapting the GamePad and Berry Racer game.
Parts used in the Berry Racer:
- Teensy 3.2 microcontroller
- Custom PCB (manufactured from EasyEDA design)
- Screen (display)
- Joystick
- Pushbuttons (4)
- 10k resistors (4)
- Piezo buzzer (speaker)
- Slide switch (power switch)
- Header pins
- Batteries (battery pack)
- Micro USB cable (for Teensy power/programming)
- Optional 3D-printed case (designed in Fusion 360)
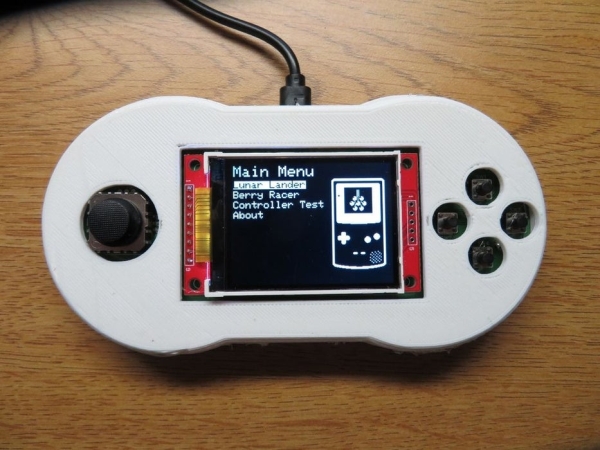
Berry Racer is a game that I came up with and programmed using Arduino’s Software. The game is run on a Teensy microcontroller which is connected through a custom PCB (Printed Circuit Board) to a Screen, a Joystick, four buttons, and a piezo speaker. The board can be powered through the micro USB port on the Teensy or with a battery that can be plugged into the back of the PCB, there is also a switch to turn the circuit off when running on battery power. This Device and Program was designed and built by me with the help of Zane Cochran who was the instructor of the CRT 420 – Special Topics Course at Berry College for the Creative Technologies major.
This instructable will go into detail about how to build a GamePad like this one, however, I hope it is also helpful in case you want to build something slightly different. The video that is linked to this intro slide covers the entire build process as well as some of the programming steps that I took, however it does not go into a lot of details about programming. I try to explain why or how I am doing the things that I am doing and in the end, I criticize my shortcomings on this project, I definitely am proud of what I was able to accomplish with this project but there are so many more things that I want to improve in the future. Let me know if you would like to see a version 2 and what improvements you would make! But for this instructable, I will detail the steps I took to accomplish this version 1 GamePad.
The following is a brief overview of the design process and provides all necessary links to the components/equipment/software that is required and will act sort of like your Bill of Materials. Read through the entire thing and figure out what components and/or software you might need.
To begin, I figured out what Game I would make and what I wanted my GamePad to look like. You will need to use Inkscape to create a DXF file for the outline of the board. I then used easyEDA to design the board based on that outline and once I was happy with the board, I ordered the boards to be manufactured. Below is the list of components that I used on the board.
Pushbuttons (4) (If you have an Arduino starter kit, you might have the right ones laying around)
10k resistors (4) (if you have a starter kit you most likely have some 10k’s leftover)
Teensy 3.2 (1)
Screen (1)
Joystick (1)
Slide switch (1)
Header Pins (1)
Piezo Buzzer (1)
Batteries (1)
The board will take about 1-2 weeks to be manufactured and shipped to your doorstep. Once you receive your boards, the next step is to gather your components and then solder them into the board. I had access to really nice soldering stations at the lab but any plain soldering iron will get the job done. The minimum order is 5 boards so you will have a couple of extras in case you screw something up with the soldering process. That being said, if you do screw up, try not to screw up with the Teensy or the screen as those are the most expensive components. Helping hands are nice to have when soldering but not required, using rubber bands can also a cheap and easy alternative to holding components into the board while you are soldering, you can actually see me doing this in the video along with helping hands. You’ll also want to have some wire cutters and Kapton tape.
Once you have correctly soldered everything into the board, you can begin testing your components by uploading the code that I will provide. This will be the code I used for my class and I will provide explanations of the most important bits to hopefully help your understanding of the code. Part of this code will show you on the screen when you interact with the joystick or the buttons letting you know that everything is working. In order to do any of this, you will need Arduino’s software (I recommend downloading the program instead of using the web version as I have not used the web version) as well as the driver for the Teensy (Follow instructions on PJRC page).
Once you have tested that your board and components work, you can go ahead and start programming your game! This instructable will show you how to program my game and hopefully also be helpful for programming a game of your own.
If you want to and have access to a 3D printer, you can also make a case for your GamePad. To model the case I used Fusion 360 but there are other options that you can use. I use Fusion because you can get it and the entire AutoCAD suite for free with a student email account.
If you find any mistakes in this Instructable, please let me know so that I can correct them right away! I am trying to be as detailed as possible but I am human and it is possible that I missed a step or am just straight-up wrong on something since it has been a while since I did this stuff.
I am also not claiming that this is the perfect way to go about making something like this, there are probably more efficient ways but this instructable will detail the steps that I took to make this GamePad and program BerryRacer.
Source: Berry Racer – a Game Programmed in Arduino and Played on a Custom PCB
- What microcontroller runs Berry Racer?
The game runs on a Teensy 3.2 microcontroller as described in the article. - Can the GamePad be battery powered?
Yes, the PCB supports a battery that plugs into the back and includes a switch to turn the circuit off when on battery power. - How is the custom PCB designed?
The PCB was designed in EasyEDA using a DXF outline created in Inkscape. - What components connect to the Teensy on the PCB?
The Teensy connects to the screen, joystick, four pushbuttons, piezo buzzer, header pins, slide switch, and battery connector on the PCB. - Do I need special soldering equipment to assemble the board?
A plain soldering iron will work, though nicer soldering stations, helping hands, and Kapton tape are useful. - How do I test the components after soldering?
Upload the provided Arduino/Teensy code which includes tests that show joystick and button interactions on the screen. - Is the project code provided?
Yes, the article states the author will provide the code used for the class and explains important parts of it. - Can I make a case for the GamePad?
Yes, the author modeled a case in Fusion 360 and suggests using a 3D printer to make one.
