Summary of Candy Claw Machine – Arduino Based Arcade Game
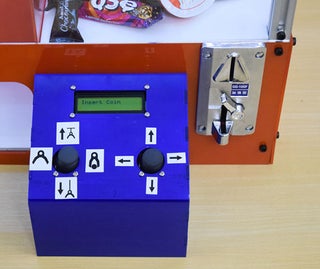
This DIY project details the construction of a home-based candy claw machine. Users insert a coin to start a timer, then use two joysticks to control the gripper's X-Y movement via stepper motors and its opening/closing action via a servo motor. The build includes an LCD display for scores or time, RGB lighting for visual feedback, and limit switches to prevent mechanical damage.
Parts used in the Candy Claw Machine:
- eviveStepper Motor
- Stepper Motor Driver A4988
- Jumper Cable
- Joystick
- 16 x 2 LCD Display
- Breadboard
- 12V 5A Power Supply Unit
- Coin Detection Machine
- Aluminum T Slot Rod- 20mm x 20mm
- T Slot 2020 Aluminum Profile L-Shape Interior Inside Corner Connector Joint Bracket
- 4mm Allen Bolts of 8mm length
- Acrylic Sheet Clear 3mm
- Acrylic Sheet Clear 5mm
- BO Motor 6V
- Micro Servo Motor
- 18mm to 5mm Flexible Coupler
- Lead Screw Rod 8mm
- 8mm Rod
- 8mm Inner Diameter Linear Bearing
- 8mm End Shaft Support
- Feviquick
- Nut and Bolts
Eyes on the prize, Violet. Eyes on the prize!
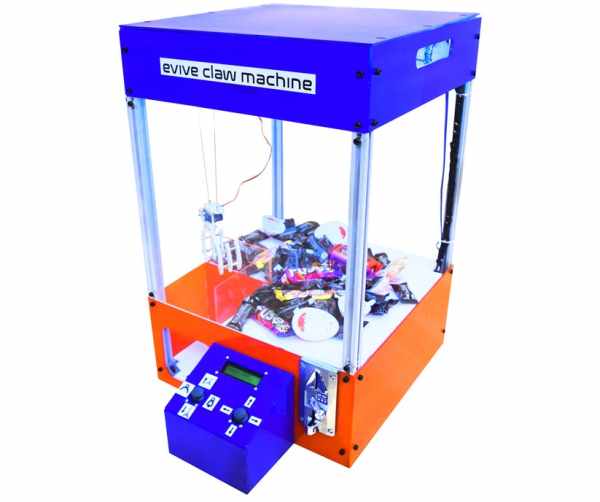
Get ready for a candy-grabbing face-off with your family and friends with this classic arcade game – the candy claw machine! But this time, it’s going to be a bit different – first, it’s going to be at your home, and second, you’re going to make it yourself! Oh yeah! Here’s bringing to you the evergreen Claw Machine with a touch of DIY! You can now easily make your own DIY candy claw machine and challenge your mates to a candy battle. Whoever gets the most candies wins the challenge. So, what are you waiting for? Jump right in before all the candies are gone!
Step 1: Things You’ll Need:
This was a brief overview of the candy claw machine. Now let us see what all components will you need to build one for yourself:
- evive
- Stepper Motor – 2
- Stepper Motor Driver A4988 – 2
- Jumper Cable
- Joystick – 2
- 16 x 2 LCD Display -1
- Breadboard – 1
- 12V 5A Power Supply Unit -1
- Coin Detection Machine -1
- Aluminum T Slot Rod- 20mm x 20mm – 9 meter
- T Slot 2020 Aluminum Profile L-Shape Interior Inside Corner Connector Joint Bracket – 24
- 4mm Allen Bolts of 8mm length – 100
- Acrylic Sheet Clear 3mm 1200mm x 900mm – 1
- Acrylic Sheet Clear 5mm 400mm x 300mm – 1
- BO Motor 6V – 1
- Micro Servo Motor – 1
- 8mm to 5mm Flexible Coupler – 2
- Lead Screw Rod 8mm – 2
- 8mm Rod – 4
- 8mm Inner Diameter Linear Bearing – 8
- 8mm End Shaft Support – 8
- Feviquick
- Nut and Bolts
Step 2: Overview
The Claw Machine that we are about to make or most of the claw machines have very simple rules.
- As soon as we insert the coin in the machine, our time starts.
- It gives us some predetermined time like 2 or 3 minutes.
- And in that stipulated time, we try to grab as many candies with the help of gripper.
- We move the gripper and open and close the gripper using the joysticks. We have used a servo for gripper open and close mechanism and a motor, thread and a pulley to move the gripper up and down.
For the XY movement of the gripper, we have used the lead screw mechanism which is driven by stepper motors. To move the gripper in XY direction, the user uses the other joystick similar to gamepad controllers. There are also limit switches for X and Y directions to prevent any damage.
In order to decorate it more, we have added RGB lights, which also tells us about the time:
Source: Candy Claw Machine – Arduino Based Arcade Game
- How does the user start the game?
The game starts as soon as the user inserts a coin into the machine. - What mechanism moves the gripper up and down?
A motor, thread, and pulley system are used to move the gripper vertically. - How is the gripper opened and closed?
A servo motor is utilized for the gripper open and close mechanism. - What controls the XY movement of the gripper?
The XY movement is driven by lead screw mechanisms powered by stepper motors. - How does the user control the stepper motors for movement?
The user operates other joysticks similar to gamepad controllers to move the gripper in the XY direction. - What prevents damage during movement?
Limit switches for both X and Y directions are installed to prevent any damage. - What feature provides visual feedback regarding the time?
RGB lights are added to decorate the machine and indicate the remaining time. - Can this machine be built at home?
Yes, the article describes it as a DIY project that can be made for your own home.