About This Candle & How to Read This Instructable
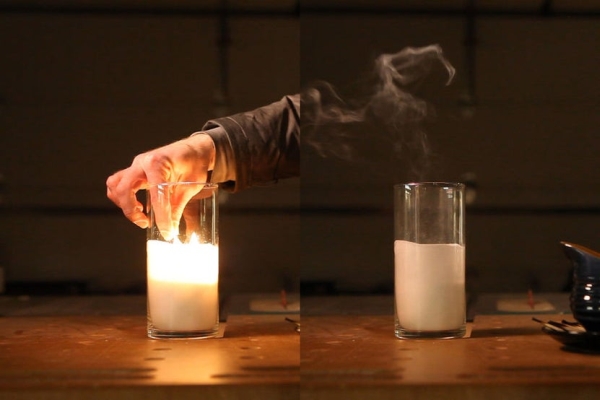
Here’s my take on a LED candle that offers the full experience of a real candle. Start to finish.
Be sure to watch the YouTube video below!
Background:
I bought my first Arduino about 3 years ago with a LED candle project in mind. I wanted to make a candle that you could light with a match, then blow it out. I’ve been fine-tuning various aspects of it ever since. About a month ago, I realized that adding smoke was a very real possibility. Since then, I’ve been finalizing the candle, recording videos, and preparing content for this Instructable.
How To Read This Instructable
This candle is a very technical candle, so you and I must proceed carefully for the sake of clarity.
[ Brackets ] will surround secondary information like tips, tricks, and details that are totally OK to skip your first time through this. Then, if you end up actually doing this Instructable, I think you’ll find the content in those brackets worth reading.
I Won’t Micromanage Your Soldering Tip
I built this candle around various things I had available. Notably, the vase. Chances are, my vase is a different size than your vase. Therefore, I’m not going to tell you exactly how to lay out the components and where to solder what. But I will give you clear Fritzing diagrams so you have a clear idea of what connections you need to make.
[Hopefully this helps keep this content insightful while reducing the inapplicable.]See the brackets? You would have been totally OK skipping over that.
You Like Videos? Me too.
I uploaded this 12-minute video to YouTube as a supplement to this Instructable: Be sure to check it out.
Additional Resources
KeithsTestGarage.com – additional details will be posted here over time.
Step 1: Three Milestones
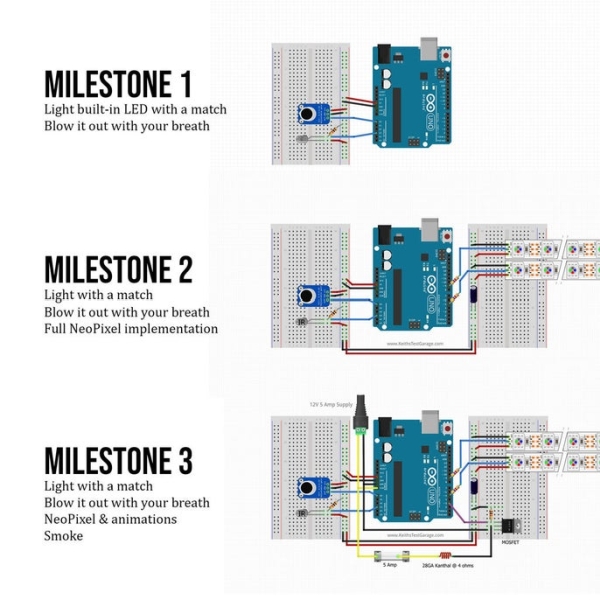
The whole project is pretty big. I’m splitting it into 3 bite-sized milestones as is very natural, as well as providing a Fritzing diagram and full code for each one. This should be less daunting for both of us.
Milestone 1: Built-In LED
- Lighting with a match
- Blowing out with your breath
Milestone 2: + NeoPixels
- Lighting with a match
- Blowing out with your breath
- Full NeoPixel implementation
Milestone 3: + Smoke
- Lighting with a match
- Blowing out with your breath
- Full NeoPixel implementation
- Smoke
Step 2: Gather Parts
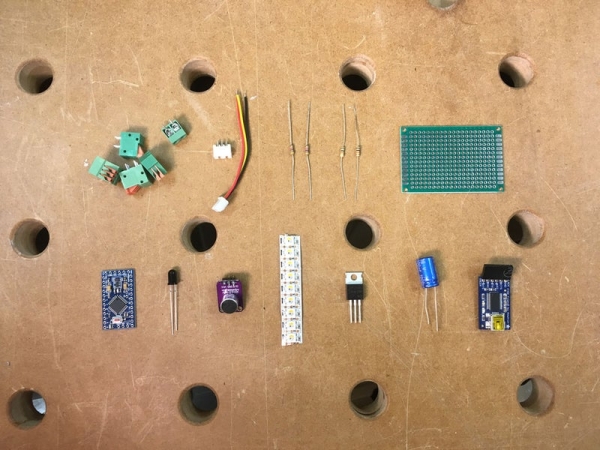
Core Parts
I figure you have a lot of parts on hand, and I’m having trouble trying to figure out how granular to be with my parts list. I think rather than trying to psychoanalyze you from afar, I’ll just post links to the items I bought. Then, you can decide what you need, what you don’t, and where to deviate from my list.
Milestone 1
- Arduino * Uno (or Pro Mini + FTDI Friend)
- 5mm Infrared sensor
- Microphone MAX4466
- 10k resistor
Milestone 2
- RGBWW NeoPixel Strip (cut 2 segments of 3 pixels, save the rest for another project)
- 2x 4.7k resistors
- 1000uF capacitor
Milestone 3
- 12v 5A AC/DC power supply
- 5.5 x 2.1 Pigtail connector w/ decent wire gauge (I have these 18ga ones)
- Kanthal wire
- 5A Fuse and holder (here’s an inexpensive kit w/ both)
- Small glass container for holding wick & solution
- Tiki torch wick
- Candle stick (some sort of candle to chop and melt)
- Vegetable glycerin (cheaper at the pharmacy)
- Thief oil
- Large glass jar
- Clips, or something similar
- 18ga or larger wire
- Syringe
- 10k resistor
- MOSFET Power Transistor P30N06LE **
Project Etc.
- Fiberglass PCB boards. I like this variety kit. Good range of sizes and cheap enough to use them without worrying too much about the cost.
- Connectors – I used a mixture of connectors, but, in the future, I’d definitely only use spring terminals for everything. They pull apart and combine into longer strips. (that would have saved me a lot of desoldering.)
[** I used a IRFZ44N in the pics/video, which seems to work great, but it’s not ideal. Get the P30N06LE instead.]
[Notice: I use affiliate links. Here is my stance on how I will and won’t use them. In a nutshell, I’m not going to let affiliate revenue dictate what content I create. Any revenue from your clicks will go towards an oscilloscope, because I can’t seem to rationalize pulling $500 out of our regular envelopes for one.]Step 3: Milestone 1: Simple Test
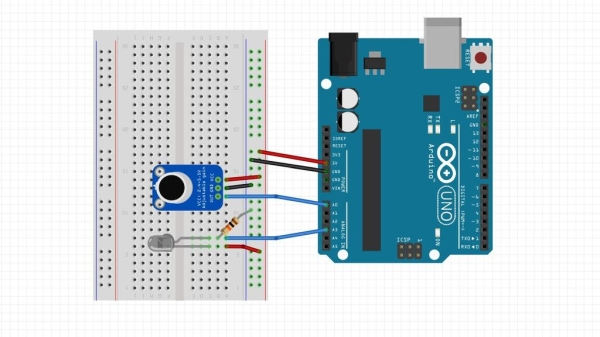
This is a simple step to help you configure the IR and microphone sensors. Once done, you’ll be toggling on and off that built-in LED in style.
Note for Newbies
I expect this project to be for more advanced users, so I don’t plan on giving entry level advice about how to use an Arduino. But, this step is pretty straightforward, so if you’re here for the fun, I’d recommend going through this guide first: https://www.arduino.cc/en/Guide/ArduinoUno.
Then, come on back!
The Code
[ View prettier code at: https://github.com/keith204/KeithsLEDCandle ]I’ve attached this file to this Instructable.
<p>// FIRST TEST OF MIC AND FLAME SENSOR<br>// Keith Kelly 2019-03-04 <a href="http://www.KeithsTestGarage.com"> www.KeithsTestGarage.com
</a>
// Milestone 1 of 3</p><p>#define MIC_PIN A1   // Microphone Pin
#define FLAME_PIN A3 // IR Sensor Pin</p><p>#define FLAME_DURATION 2000 // millis- duration of flame before lighting candle
#define FLAME_THRESHOLD 800 // 0...1023 - analog reading of FLAME value to detect
#define MIC_THRESHOLD 950 // 0...1023 - analog reading of MIC value to detect</p><p>// Vars to keep track of things
bool smoking = false;
bool flaming = false;</p><p>bool lit = false;
int flame_val = 0;
int mic_val = 0;</p><p>// Vars for tracking pseudo-async times
unsigned long previousMillis = 0;        // will store last time LED was updated
unsigned long flameStartedMillis = 0;    // will store last time LED was updated</p><p>void setup(){</p><p>    Serial.begin(9600); // uncomment this to figure sensor readings.</p><p>    // initialize pins
    pinMode(FLAME_PIN, INPUT);
    pinMode(MIC_PIN, INPUT);
    pinMode(LED_BUILTIN, OUTPUT); </p><p>    digitalWrite(LED_BUILTIN, LOW); // Turn OFF built-in LED</p><p>    blowOutCandle();  // Make sure candle is off (but don't smoke)</p><p>}</p><p>void loop(){
    checkSensors(); // Check for fire and strong winds
}</p><p>// Checks for fire and strong winds every 50 milliseconds
void checkSensors(){
  unsigned long currentMillis = millis();
  if (currentMillis - previousMillis >= 50) { // only check every 50ms
    flame_val = analogRead( FLAME_PIN );
    mic_val = analogRead( MIC_PIN );
    previousMillis = currentMillis;

    //  Uncomment below to check sensor readings.
    Serial.print(mic_val);
    Serial.print(" : ");
    Serial.println(flame_val);
  }</p><p>  if (lit && mic_val > MIC_THRESHOLD){ // MIC REGISTERED SOUND.  BLOW OUT.
    blowOutCandle(); // Turn off light (and start SMOKING!)
    lit = false;
  }</p><p>  if (!lit){ // if candle isn't lit
    if (flame_val > FLAME_THRESHOLD)  { // if flame is detected

        // record the starting time (if flame not yet detected)
        if (!flaming){  // if not flaming
          flaming = true;
          flameStartedMillis = millis();  // record time that flaming begins
        }
        else if (checkFlame()){ // has flame been flaming long enough?
          lightCandle(); // ok finally light it up.
          lit = true;
        }
    }
    else{ // no flame detected
      flaming = false;
    }
  }
}</p><p>// Check if flame has been detected long enough.
bool checkFlame(){
  unsigned long currentMillis = millis(); // get current time
  if (currentMillis - flameStartedMillis >= FLAME_DURATION) {
    return true;
  }
  else
    return false;
}</p><p>// (pseudo)ASYNC light the candle by starting the animations
void lightCandle(){
    digitalWrite(LED_BUILTIN, HIGH);
}</p><p>void blowOutCandle(){
  digitalWrite(LED_BUILTIN, LOW);
}</p>
Open Serial Monitor and Adjust Thresholds
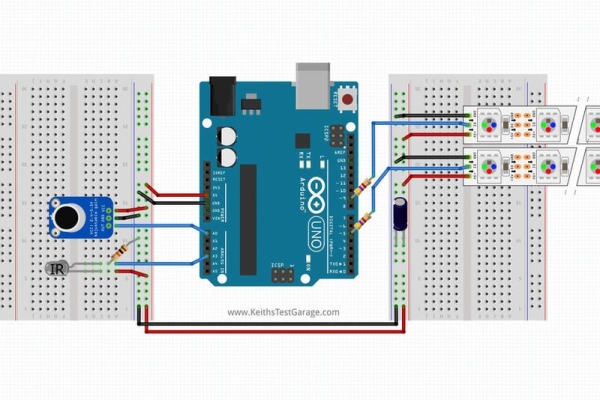
Once you have everything hooked up according to the Fritzing diagram and the code uploaded, open up Serial Monitor and play with some wind & fire.
Your sensors may read different values than mine. Adjust thresholds at the top of the code file where necessary.
That’s it. Wire everything up using the Fritzing diagram above. Nothing special here.
Step 4: Milestone 2: Full Candle W/o Smoke
For The Non-Smokers…
The candle is still really cool without the smoke. That may be all you want. Power with USB or whatever you’d like. Here’s the Fritzing diagram and code for that.
Changes since Milestone 1:
- No longer using the built-in LED
- Full NeoPixel functionality included
- NeoPatterns.h file now included
Note: Now that you’re using NeoPixels, you need to install a Library from within your Arduino IDE’s library manager. The library is: Adafruit_NeoPixel.
Wiring
As you can see in the Fritzing diagram, the right side is new. I don’t think there’s anything notable to say about the wiring at this stage. Follow the diagram and you’ll be good to go.
Code
View code at: https://github.com/keith204/KeithsLEDCandle. I’ve also attached the code to this Instructable.
KeithsCandle_M2_NoSmoke.ino
To keep things simple, I’ve included a bunch of comments in the code to avoid having to explain much here.
// Using technique from here  https://learn.adafruit.com/multi-tasking-the-ardu...//    see link above for a good tutorial on this multi-task-ish way of doing things.// Flicker Realistic Candle
// Keith Kelly 2019-03-04  www.KeithsTestGarage.com

// Milestone 2 of 3#ifdef __AVR__
#include
#endif// NeoPatterns will require the Adafruit NeoPixel library.  Be sure to install that.
#include "NeoPatterns.h"#define NEO_PIN 5    // First RGBW Strip Pin
#define NEO2_PIN 9   // Second RGBW Strip Pin
#define NEO_COUNT 3  // First RGBW Strip Count
#define NEO2_COUNT 3 // Second RGBW Strip Count
#define MIC_PIN A1   // Microphone Pin
#define FLAME_PIN A3 // IR Sensor Pin#define FLAME_DURATION 2000 // millis- duration of flame before lighting candle
#define FLAME_THRESHOLD 800 // 0...1023 - analog reading of FLAME value to detect
#define MIC_THRESHOLD 950 // 0...1023 - analog reading of MIC value to detectvoid Strip1Complete();
void Strip2Complete();NeoPatterns Strip1(NEO_COUNT, NEO_PIN, NEO_RGBW + NEO_KHZ800, &Strip1Complete);
NeoPatterns Strip2(NEO_COUNT, NEO2_PIN, NEO_RGBW + NEO_KHZ800, &Strip2Complete);uint32_t baseColor; // What is the ON resting color?
uint32_t offColor;  // What is the OFF resting color?// Vars to keep track of things
bool flaming = false;bool lit = false;
int flame_val = 0;
int mic_val = 0;
byte rnd = 0;// Vars for tracking pseudo-async times
unsigned long previousMillis = 0;        // will store last time LED was updated
unsigned long flameStartedMillis = 0;        // will store last time LED was updatedvoid setup(){    //Serial.begin(9600); // uncomment this to figure sensor readings.    // initialize pins
    pinMode(FLAME_PIN, INPUT);
    pinMode(MIC_PIN, INPUT);
    pinMode(LED_BUILTIN, OUTPUT);     // Make sure the following pins are OFF
    digitalWrite(LED_BUILTIN, LOW);     // Initialize NeoPixel Strip 1
    Strip1.begin();
    Strip1.show();
    baseColor = Strip1.Color(2, 110, 0, 100);// GRBW
    Strip1.Color1 = baseColor;    // Initialize NeoPixel Strip 2
    Strip2.begin();
    Strip2.show();
    baseColor = Strip2.Color(2, 110, 0, 100);// GRBW
    Strip2.Color1 = baseColor;

    blowOutCandle();  // Make sure candle is off
}void loop(){
    checkSensors(); // Check for fire and strong winds
    Strip1.Update();
    Strip2.Update();
}// Checks for fire and strong winds every 50 milliseconds
void checkSensors(){
  unsigned long currentMillis = millis();
  if (currentMillis - previousMillis >= 50) { // only check every 50ms
    flame_val = analogRead( FLAME_PIN );
    mic_val = analogRead( MIC_PIN );
    previousMillis = currentMillis;

    //  Uncomment below to check sensor readings.
    //    Serial.print(mic_val);
    //    Serial.print(" : ");
    //    Serial.println(flame_val);
  }  if (lit && mic_val > MIC_THRESHOLD){ // MIC REGISTERED SOUND.  BLOW OUT.
    blowOutCandle(); // Turn off light
    lit = false;
  }  if (!lit){ // if candle isn't lit
    if (flame_val > FLAME_THRESHOLD)  { // if flame is detected

        // record the starting time (if flame not yet detected)
        if (!flaming){  // if not flaming
          flaming = true;
          flameStartedMillis = millis();  // record time that flaming begins
        }
        else if (checkFlame()){ // has flame been flaming long enough?
          lightCandle(); // ok finally light it up.
          lit = true;
        }
    }
    else{ // no flame detected
      flaming = false;
    }

  }
}// Check if flame has been detected long enough.
bool checkFlame(){
  unsigned long currentMillis = millis(); // get current time
  if (currentMillis - flameStartedMillis >= FLAME_DURATION) {
    return true;
  }
  else
    return false;
}//------------------------------------------------------------
//Completion Routines - get called on completion of a pattern
//------------------------------------------------------------// The below configuration routines are the same except for the strip
// being used.  I kept them separate so the strips can be configured
// with different ranges if desired.void Strip1Complete(){
    Strip1.Reverse();    if (Strip1.Direction == REVERSE){ // go back down
        Strip1.Interval = random(5,22); // choose random speed in range
    }
    else{  // pattern ended.  Stop, then trigger re-flicker

        /*  This needs an explanation:

              rnd = random(random(45,55),random(80,255));
            You'd think that we could just do random(45,255), right?
            Selecting the low and high randoms first helps make sure that
            the ending random number is *more likely* to fall within a limited range.
            When observing the flickering of a real candle, the flame generally bounces
            around in a certain range.  But, every once in a while, it spikes high or low.
            This random(random, random) solves that problem!  #proudnerddadmoment
        */
        rnd = random(random(45,55),random(80,255));         Strip1.Pixel = random(0,Strip1.numPixels()); // pick a random Pixel
        Strip1.Interval = 1;
        Strip1.Color2 = Strip1.Color(2,rnd,0,rnd-10); //GRBW random red and random white-10
    }
}void Strip2Complete(){
    Strip2.Reverse();    if (Strip2.Direction == REVERSE){ // go back down
        Strip2.Interval = random(5,22); // choose random speed in range
    }
    else{  // pattern ended.  Stop, then trigger re-flicker
        rnd = random(random(45,55),random(80,255)); // see explanation in Strip1Complete().
        Strip2.Pixel = random(0,Strip2.numPixels()); // pick a random Pixel
        Strip2.Interval = 1;
        Strip2.Color2 = Strip2.Color(2,rnd,0,rnd-10); //GRBW random red and random white-10
    }
}// (pseudo)ASYNC light the candle by starting the animations
void lightCandle(){
    Strip1.Flicker(Strip1.Color1, Strip1.Color2, 20, 5);
    Strip2.Flicker(Strip2.Color1, Strip2.Color2, 20, 5);
}void blowOutCandle(){
  cWipe(offColor, 10); // synchronously turn the candle off.  // We don't want no stinking patterns.
  Strip1.ActivePattern = NONE;
  Strip2.ActivePattern = NONE;
}// synchronous color wipe
void cWipe(uint32_t c, uint8_t wait) {
  for (uint16_t i = 0; i < Strip1.numPixels(); i++) {
    Strip1.setPixelColor(i, c);
    Strip1.show();
    delay(wait);
  }
  for (uint16_t i = 0; i < Strip2.numPixels(); i++) {
    Strip2.setPixelColor(i, c);
    Strip2.show();
    delay(wait);
  }
}
NeoPatterns.h
This has a few patterns in it from Adafruit, so I’ve omitted most of that content. Grab the file that’s attached or in the GitHub repo for the full version.
Source: LED Candle – Lights, Flickers, Blows Out, Smokes, and Smells