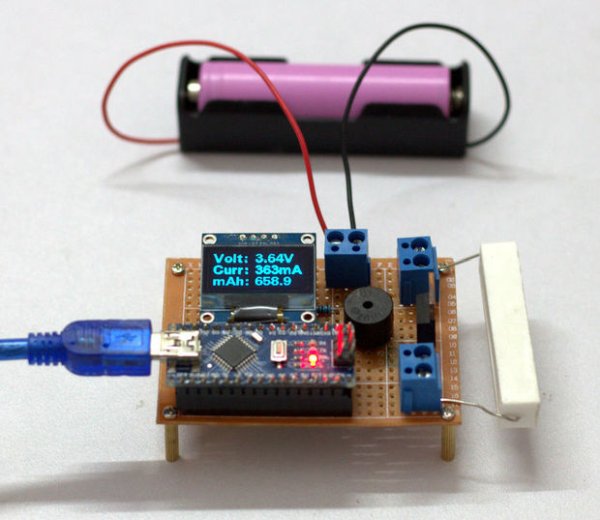
Summary of DIY Arduino Battery Capacity Tester
This project describes a simple Arduino Nano–based 18650 battery capacity tester for salvaged laptop cells. Using a MOSFET and a power resistor as a load, the tester measures discharge behavior and estimates relative cell capacity via Ohm’s Law. It includes an OLED display, buzzer, and battery holder; accuracy is reasonable for comparing cells though not perfect. The author warns about Li-ion dangers and suggests improvements for future versions.
Parts used in the DIY Arduino Battery Capacity Tester:
- Arduino Nano
- 0.96 inch OLED Display
- MOSFET IRLZ44
- Resistors (4 x 10K, 1/4W)
- Power Resistor (10 ohm, 10W)
- Screw Terminals (3 nos)
- Buzzer
- Prototype Board
- 18650 Battery Holder
- 18650 Battery
- Spacers
I have salvaged so many old lap-top batteries ( 18650 ) to reuse them in my solar projects.It is very difficult to identify the good cells in battery pack.Earlier in one of my Power Bank Instructable I have told, how to identify good cells by measuring their voltages, but this method is not at all reliable.So I really wanted a way to measure each cell exact capacity instead of their voltages.
Few week ago, I have started the project from the basics.This version is really simple one,which is based on Ohms Law.The accuracy of the tester won’t be 100% perfect, but it does give reasonable results that can be used and compared with other battery, so you can easily identify good cells in a old battery pack.
During my work I realised, their are lot of things which can be improved.In future I will try to implement those things. But for the time being I am happy with it.I hope this little tester will be useful, so I am sharing it with you all.
Note : Please dispose the bad batteries properly.
Disclaimer: Please note that you are working with Li Ion battery which is highly explosive and dangerous . I cannot be held responsible for any loss of property, damage, or loss of life if it comes to that. This tutorial was written for those who have knowledge on rechargeable lithium ion technology.Please do not attempt this if you are novice. Stay Safe.
Step 1: Parts and Tools Required :
Parts Required :
1. Arduino Nano (Gear Best )
2. 0.96″ OLED Display ( Amazon )
3. MOSFET – IRLZ44 ( Amazon )
4.Resistors ( 4 x 10K , 1/4W ) ( Amazon )
5. Power Resistor ( 10R, 10W ) ( Amazon )
6. Screw Terminals ( 3 Nos) ( Amazon )
7.Buzzer ( Amazon )
8.Prototype Board ( Amazon )
9. 18650 Battery Holder ( Amazon )
10. 18650 Battery ( GearBest )
11. Spacers ( Amazon )
Tools Required :
1. Wire Cutter / Stripper ( Gear Best )
2.Soldering Iron ( Amazon )
Instrument Used :
IMAX Balance Charger ( Gearbest )
Infrared Thermometer Gun ( Amazon /Gearbest)
Read more: DIY Arduino Battery Capacity Tester
- What is the tester based on?
The tester is based on Ohms Law and uses a controlled load to estimate battery capacity. - Which microcontroller is used in the project?
The project uses an Arduino Nano. - How is the battery loaded during testing?
The battery is discharged through a power resistor with a MOSFET controlling the load. - What display is used to show results?
A 0.96 inch OLED display is used to present measurements. - Is this method perfectly accurate?
No, the accuracy is not 100% but it provides reasonable results for comparing cells. - What safety warnings are provided?
The author warns that Li-ion batteries are dangerous and the tutorial is for those knowledgeable about rechargeable lithium ion technology. - What components indicate test completion or alerts?
A buzzer is included to provide alerts or indications. - What tools are required to build the tester?
Required tools include a wire cutter/stripper and a soldering iron.