Summary of Imitation Fireplace Using Cool Mist and LEDs
This project creates a convincing artificial fireplace using NeoPixel LEDs, an Arduino UNO, and a cool mist module, combined with a fan, battery power, 3D-printed parts, and natural fire logs to simulate flames and smoke. It involves soldering NeoPixel leads, wiring to the Arduino (GND, 5V, and data pin 6), installing the NeoPixel library, and uploading a custom fire-effect sketch. The mist module and fan add realistic movement and vapor, while a 3D-printed motherboard and wooden stand hold the assembly together.
Parts used in the Imitation Fireplace:
- Ultrasonic Mist Module
- Computer Fan
- 4 x AA battery holder
- Arduino Uno
- Portable Arduino Power Supply
- NeoPixel Stick
- 3D Printed Motherboard
- Fire Logs (found in local forest)
- Scraps of wood to build a stand (found in local scrap heap)
Build a convincing artificial fire effect for the holiday season using NeoPixel LEDs, an Arduino UNO, and a cool mist module.
Story
This is a project I’ve had on the backburner for almost exactly 1 calendar year. The seed was planted when I toured the Harry Potter Studios last year and saw a fake fireplace effect being used quite extensively.
I am also an avid watcher of the “Fireplace for your Home” Netflix channel, so I eventually realized I needed one of these imitation fires of my own. So here we are now!
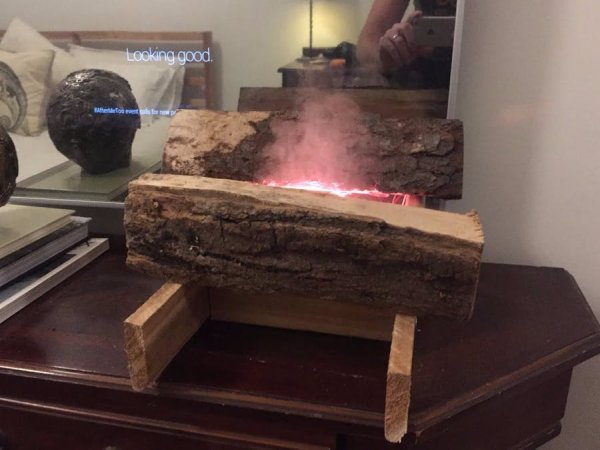
Take a look at what I put together, and if that curiosity is still burning keep reading for instructions to reproduce this project yourself.
Materials
- Ultrasonic Mist Module
- Computer Fan
- 4 x AA battery holder
- Arduino Uno
- Portable Arduino Power Supply
- NeoPixel Stick
- Fire Logs (found in local forest)
- Scraps of wood to build a stand (found in local scrap heap)
Instructions
The instructions for this are actually pretty simple, basically you just need to get the materials, and put them all together. The only technical part is soldering the wires onto the NeoPixel stick, and uploading the code to the Arduino. So let’s start with the NeoPixel LEDs.
Step 1: Get the LEDs Working
Start by downloading and installing the NeoPixel Arduino Library found here. Prepare your NeoPixel stick to plug into the Arduino by soldering wires to the GND, DIN, and VIN leads located at the bottom of the stick.
Now plug GND into the GND pin on your Arduino, VIN into the 5V pin, and DIN to Pin 6 on the Arduino. If you run the example sketches included in the NeoPixel library, you should the lights working as expect.
Now you can upload the fire specific code I wrote found here. If you’ve plugged the NeoPixel into Pin 6, GND, and +5V, you should now get some bright orange lights.
Read more: Imitation Fireplace Using Cool Mist and LEDs
- How do I connect the NeoPixel stick to the Arduino?
Solder wires to the NeoPixel GND, DIN, and VIN leads, then connect GND to Arduino GND, VIN to 5V, and DIN to pin 6. - What software is needed to run the LEDs?
Install the NeoPixel Arduino Library and run example sketches or the provided fire-specific sketch. - Where should the NeoPixel data pin be connected?
The NeoPixel DIN should be connected to Arduino digital pin 6 as described. - Do I need to solder anything for the NeoPixel stick?
Yes, you need to solder wires onto the GND, DIN, and VIN leads at the bottom of the stick. - How is the mist effect created?
The project uses an ultrasonic mist module to produce vapor that simulates smoke. - What provides airflow for flame movement?
A computer fan is used to create airflow and motion in the mist and LEDs. - What holds the components together?
A 3D-printed motherboard and a wooden stand made from scrap wood support the assembly. - Can natural logs be used for decoration?
Yes, fire logs found in a local forest were used in the project for realism.