
Summary of $1.50 Arduino TV Annoyer
This project describes a low-cost Arduino device that toggles TV power by simulating infrared signals. The creator, an experienced hobbyist, built this as a contest entry and potential gag gift for under $1.50 (excluding the Arduino). The build involves wiring an IR detector to receive signals and IR LEDs controlled by a transistor to send commands, all assembled on a breadboard using standard electronics tools.
Parts used in the Arduino TV Annoyer:
- Infrared Detector
- Wide angle Infrared LED
- Narrow angle Infrared LED
- 2N3904 PNP transistor
- 10 Ohm resistor
- 47 Ohm resistor
- Arduino Uno
- Solid-core wire
- USB A-B cable
- Soldering Iron
- Solder
- Solderless breadboard
- Computer
- Arduino IDE
Hey Arduino fans! Here is an ‘ible for making a device that turns TVs on when you want them off, and off then you want them on! If you hide it in something inconspicuous, it would make a great April Fools joke or gag gift.
And the best part is that the total parts cost is less than $1.50!! (Assuming that you already have an Arduino and the tools)
This is a contest entry for the LED Contest with Elemental LED, so if you like it, please tell your friends and rate it up! Thanks!
I know this is my first Instructable, but believe me, I have been working with electronics practically my whole life. I started up with Arduino about 6 months ago, and I’ve made at least 150-200 different projects, and I’ve also created a ton of other original things with Arduino and other microcontrollers. I even built my own computer, so you know I’m not messing around. 🙂
Step 1: Parts list
Here are the things you will need for this project. I have included the Mouser link and the price next to the item.
Components
1x Infrared Detector ($0.78) http://goo.gl/6sSN6
1x Wide angle Infrared LED ($0.23) http://goo.gl/5PFlS
1x Narrow angle Infrared LED ($0.23) http://goo.gl/67sCf
1x 2N3904 PNP transistor (or equivalent) ($0.08) http://goo.gl/XD3jI
1x 10 Ohm resistor (Brown, Black, Black, Gold) ($0.05) http://goo.gl/UiKDs
1x 47 Ohm resistor (Yellow, Purple, Black, Gold) ($0.10) http://goo.gl/89jXQ
1x Arduino Uno (or equivalent) ($25.00) http://goo.gl/p9wVs
Some wire (preferably solid-core, 22 gauge or so) (About $7-$8 at your local hardware/electronics store)
Tools
1x USB A-B cable (for programming the Arduino) ($2.95) http://goo.gl/3f6rx
1x Soldering Iron (Optional) (About $15-$25 at your local hardware/electronics store)
1x Spool of thin solder (About $10 at your local hardware/electronics store)
1x Solderless breadboard (About $5-$6 at your local electronics store)
1x Computer (I would hope you know where to get one of these)
1x Arduino IDE (can be downloaded here)
Step 2: Wiring

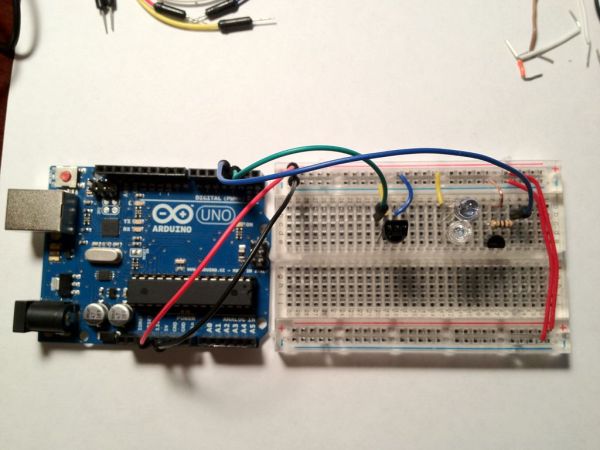
Time to assemble! I will be doing this on a solderless breadboard.
1.) Plug in IR Detector. Make sure the dome on it is facing you.
2.) Connect the leftmost pin of the detector to Arduino Digital pin 2, the middle pin to Ground, and the rightmost pin to +3.3V.
3.) Plug in the 2N3904 NPN transistor. Make sure the flat side is facing you.
4.) Connect the leftmost pin of the transistor to the 47 Ohm resistor, the middle pin through the 10 Ohm resistor to Arduino Digital pin 3 (PWM), and the rightmost pin to Ground.
5.) Connect the cathodes (negative, has a shorter leg, and the side is marked with a flat part to indicate the cathode) to the other end of the 47 Ohm resistor, and the anodes (longer lead, not the cathode) to +3.3V.
1x Wide angle Infrared LED
1x 47 Ohm resistor
1x Arduino Uno
For more detail: $1.50 Arduino TV Annoyer
- How much does the total parts cost?
The total parts cost is less than $1.50. - Can I use an equivalent to the Arduino Uno?
Yes, the article states you can use an equivalent board. - Does the project require a soldering iron?
No, the soldering iron is listed as optional because the assembly is done on a solderless breadboard. - What is the specific gauge of wire recommended?
Solid-core wire around 22 gauge is preferred. - How do I connect the IR detector pins?
Connect the leftmost pin to Digital pin 2, the middle pin to Ground, and the rightmost pin to +3.3V. - Which transistor is used in the circuit?
A 2N3904 PNP transistor or equivalent is used. - Where can I download the necessary software?
The Arduino IDE can be downloaded from the provided link in the text. - What is the primary purpose of this device?
The device turns TVs on when you want them off and off when you want them on.
