This project used the Si470x FM radio receiver and an ardurino to make an over the counter kitchen radio. These parts had been purchased for a different build that unfortunately met a premature end.
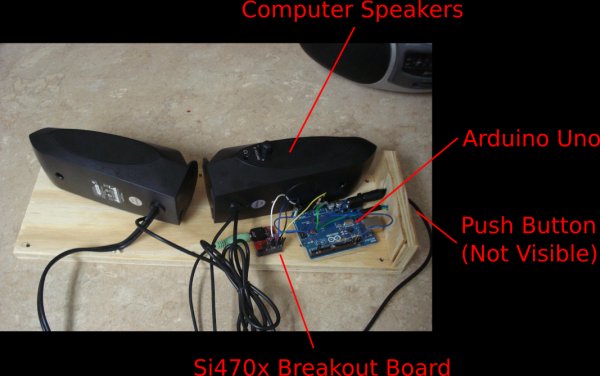
The concept for this project is simple. Play my favorite news and music radio stations while having a form factor that does not take up space on the kitchen counter. I have a small push button that toggles between pre-selected news and music stations built into the side of the radio.
Electrical Connections (Arduino/Si470x)
- 3.3V / Vcc
- GND / GND
- A5 / SCLK
- A4 / SDIO
- D2 / RST
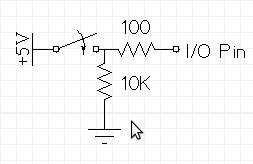
Electrical connections for the push button that toggles through the different radio stations is shown in the figure below. The I/O pin is connected to arduino D7.
All of the components were hot glued to a small piece of 1/2″ plywood.
The project was completed by mounting the plywood to the under side of the kitchen cabinets. I used a paper template to lay out the hole pattern on the under side of the cabinets. The final result can barely be seen when standing in the kitchen.
Here is the arduino code that makes it all tick.
/*
Modified by Ryan Lowe y12m05d26

1-6-2011
Spark Fun Electronics 2011
Nathan Seidle

This code is public domain but you buy me a beer if you use this and we meet someday (Beerware license).

To use this code, connect the following 5 wires:
Arduino : Si470x board
3.3V : VCC
GND : GND
A5 : SCLK
A4 : SDIO
D2 : RST
A0 : Trimpot (optional)

Look for serial output at 57600bps.

The Si4703 ACKs the first byte, and NACKs the 2nd byte of a read.

1/18 - after much hacking, I suggest NEVER write to a register without first reading the contents of a chip.
ie, don't updateRegisters without first readRegisters.

If anyone manages to get this datasheet downloaded

http://wenku.baidu.com/view/d6f0e6ee5ef7ba0d4a733b61.html

Please let us know. It seem to be the latest version of the programming guide. It had a change on page 12 (write 0x8100 to 0x07)
that allowed me to get the chip working..
Parts List
- Arduino Uno
- Si470x breakout board
- Logitech computer speakers
- 5V wall wart power supply
- Scrap plywood
For more detail: Over the Counter Kitchen Radio using Arduino