Summary of Motion Triggered Fog Machine using an Arduino
This article details a project to create a motion-triggered fog machine controlled by an Arduino. Using a distance sensor as a digital tripwire, the fog machine activates only when someone approaches the door. Key components include a relay to switch the fog machine on/off, a transistor and diode to protect the Arduino, and various wiring and connectors for assembly. A fog machine with a corded remote is modified to work with this system. The article provides links for all parts and tools needed, including soldering equipment and a project box.
Parts used in the Motion Triggered Fog Machine Project:
- Relay (12vDC/125vAC)
- HC-SR04 Distance Sensor
- Transistor (2N7052 NPN)
- Diode (1N4003)
- 220 OHM Resistor
- Battery Connector
- Project Box (2x3'')
- Shrink Tubing
- Copper Clad PerfBoard
- Stranded Hookup Wire
- Solid Core Hookup Wire
- Fog Machine with Corded Remote
- Arduino UNO
- Soldering Iron (Tool)
- Multi-Meter (Tool)
- Dremel (Tool)
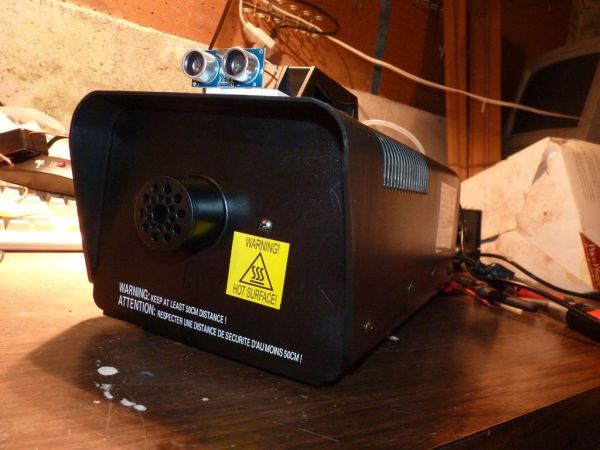
Fog machines can be unruly beasts. Especially the non-professional models you buy for halloween. With low duty cycles, causing massive amounts of fog when you don’t need it, and no fog when you do. Wouldn’t it be nice to have fog only when people come up to your house? Yeah, I thought so too. Here we are going to make a motion triggered fog machine that will turn on when ever someone comes up to your door.
Step 1: The Parts
Here is what you are going to need to complete this Instructable.
Everything linked here is the exact same part I used but you can always substitute comparable parts.
*A Relay
($4.99)
I used a 12vDC/125vAC relay from RadioShack. (I’m sure you can find a similar one somewhere else for cheaper) You can use what ever you like as long as the reed switch is rated for current up to 120vAC. Although this one says the coil requires 12vdc you should be able to get away with using a 9v battery.
http://www.radioshack.com/product/index.jsp?productId=2062482&filterName=Category
http://www.newark.com/nte-electronics/r73-5d10-12/power-relay-spdt-12vdc-10a-pc-board/dp/02H7519 (This one should work exactly the same)
http://www.newark.com/jsp/search/productdetail.jsp?sku=94C2790 (Your 9v batteries probably wont last long in the 12v relay so you may want to try a 6v one)
*A Distance Sensor
($13)
This is the HC-SR04 Distance Sensor. We will use it as a digital tripwire. This one is cheaper than the “Ping” sensor and just as easy to use. I will provide the appropriate libraries later on so you don’t unnecessarily rip out your hair.
*A Transistor
($0.25)
You are going to need something to control the 9v power supply. If you decide to use a 5v relay you should still use a transistor to protect your Arduino from the relay.
http://www.newark.com/fairchild-semiconductor/2n7052/bipolar-transistor-npn-100v/dp/18C9246?Ntt=2N7052
*A Diode
($0.04)
The diode is to keep you from ruining your transistor. Admittedly I didn’t use a diode for my first version of this and it worked fine but after reading more it started looking like a better idea.
http://www.newark.com/vishay-general-semiconductor/1n4003-e3-54/standard-diode-1a-200v-do-204al/dp/05R5981
*A Resistor
($0.03)
The resistor is for a little added protection for your Arduino from the 9v battery and the relay. I used a 220OHM resistor.
http://www.newark.com/multicomp/mccfr0w4j0221a50/resistor-carbon-film-220ohm-250mw/dp/58K5029?Ntt=58K5029
*A Battery Connector
($2.99 for 5)
You need to connect to your battery some how dont you?
http://www.radioshack.com/product/index.jsp?productId=2062219
*A Project Box
($2.69)
I used a 2×3” project box from radio shack but you should probably look elsewhere to get a better price.
http://www.radioshack.com/product/index.jsp?productId=2062279
*Shrink Tubing
You want your wires to stay neat and tidy dont you?
*Copper Clad PerfBoard
To put your project on. I cut mine to about 1 1/2” x 1 3/4”
http://www.radioshack.com/product/index.jsp?productId=2102843&filterName=Price&filterValue=under+%243.99
*Stranded Hookup wire
You need stranded wire to go from the remote to the project box. Use stranded wire for this because it can handle the constant movement this wire will endure. It also must be able to handle the AC current.
http://www.radioshack.com/product/index.jsp?productId=2049745
*Solid Core Hookup Wire
This wire is used for hooking up your circuitry and for connecting to the Arduino.
http://www.radioshack.com/product/index.jsp?productId=2036274
*A Fog Machine WITH A REMOTE!
(I paid $30 for mine but you may find them at better prices depending what time of year it is)
You need to make sure you get a fog machine with a corded remote with a switch or else trying to follow this intractable could get tricky. (if you like tricky then go ahead and get one with a different style remote) We are going to modify the remote so the whole fog machine will not be turned off completely and it will not need to heat up again every time you want fog.
(This is the one I bought but they are sold out for now so I have another one listed aswell)http://www.partycity.com/product/fog+machine+400+with+remote.do?sortby=ourPicks&size=all&from=Search&navSet=fog
http://www.halloweensuperstore.us/Foggie_400_Watt_Fog_Machine_W_Remote_p/v-915.htm
——-TOOLS——
*Soldering Iron
Do I really need to go into why you need this?
http://www.sparkfun.com/products/9672
*Multi-Meeter
To Check continuity and for shorts.
http://www.sparkfun.com/products/9141
*A Dremel
You are going to use it to cut holes in your project box
http://tinyurl.com/43mbpyt
And I suppose thats it.
Oh and an Arduino!
Step 2: Schematic
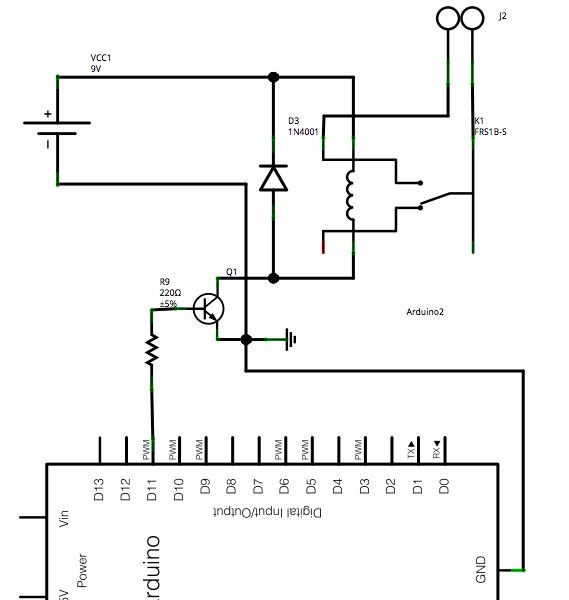
Follow the schematic and everything will turn out fine ^_^
Step 3: The Relay
Our relay is a little different than the one used in the schematic. Our coil pins are right next to each other.
Check the data sheet for your specific relay to make sure you are connecting to the right pins.
Tack down one pin of the relay then you can continue to solder on the other components.
A Distance Sensor
A Transistor
An Arduino
For more detail: Motion Triggered Fog Machine using an Arduino