A few weeks ago we showed you how to control your arduino over serial. Well this week are going to do the same thing. Only this time instead of using the serial monitor to send the commands, we will be using the Innovations ID line RFID reader.
RFID, or Radio Frequency Identification, is basically a wireless barcode, and in this implementation works by a reader sending out a signal that powers a “tag”, the RFID tag then responds with a unique 12 digit hex serial number. Because each tag sends back a unique number, it can be used as a semi-secure key system, or used to track individual objects.
The company Innovations, while they may have one of the worst sites I have seen in a while, makes some really easy-to-use and inexpensive RFID readers that are easily incorporated into your microcontroller project. The Innovations ID series of RFID readers come in 3 versions, the ID-2, ID-12, and ID-20. All 3 versions have the same pinout and work exactly the same. They all operate with common 125kHz Tags. In fact, the only difference is the antenna. The 2, has no antenna and requires an external one to work, the 12, a smaller antenna, and the 20, a larger antenna. While many other RFID readers offer USB connections, these require no computer to operate and simply send their data via 9600 baud serial which is easily read by your Arduino.
Operation
Hooking this guy is pretty simple, but note that the pins on these readers are not spaced properly for use with breadboard. Sparkfun does sell a board that will give you the .1in spacing needed to work with breadboard. If you do use the adapter board, just note that it changes the placement/ orientation of the pins, so it won’t match the look of the illustration.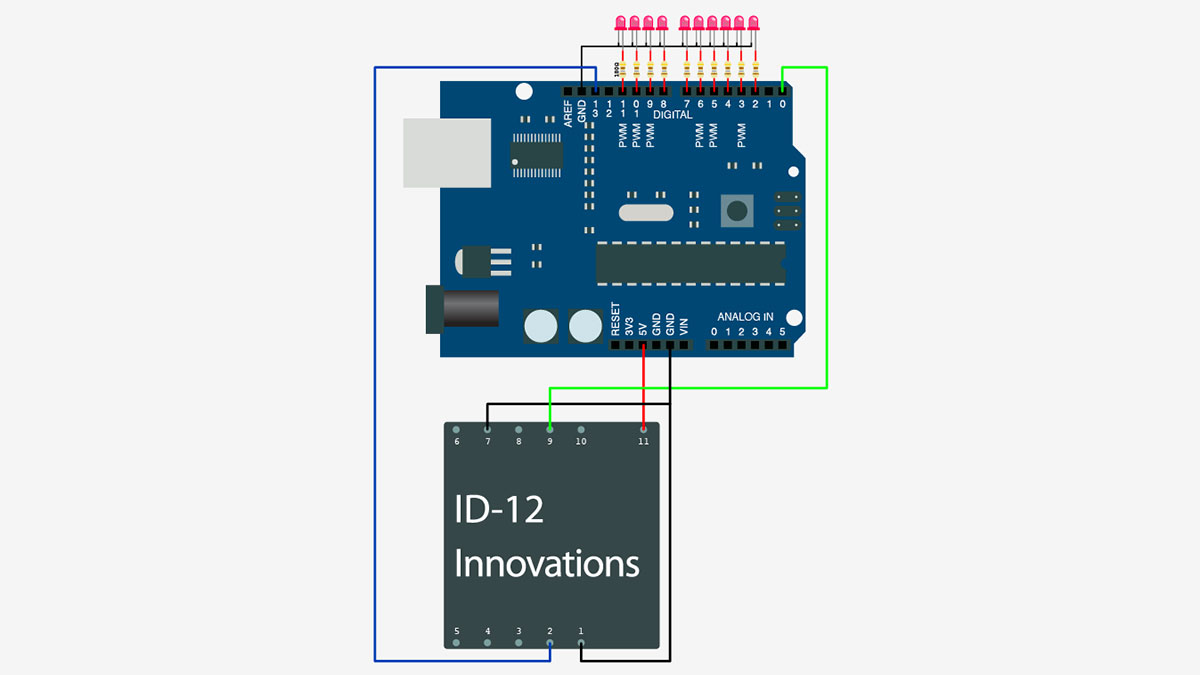
The readers also support connecting an LED or buzzer that will light/buzz when a tag is read (pin 10).
Sensing Tag Presence
With the way the reader is hooked up in the product’s spec sheet, the reader will only scan a tag once, and will not rescan until the tag is moved out of, then back into range (watch the video below). But a lot of what I do with these requires knowing when a tag is present, not just when it was scanned. We can detect tag presence by connecting the reset pin (2) to the Arduino. Taking the reset pin LOW, then HIGH for at least 150ms will force the reader to rescan and re-post if a tag is present. So you can set a timer for 250ms, or so, and if the tag is not scanned during that time, you know the tag has been removed.
For more detail: Can You ID This? ID-20 RFID Reader + Arduino