
Summary of Writing a python module to simulate a LCD
The article describes creating a Python module called "mlcd" to simulate a 16x2 LCD screen on a computer monitor, allowing developers to test game logic without physical hardware. This approach enables coding on a laptop and simplifies the workflow by replacing the simulator with actual LCD control code once development is complete.
Parts used in Mock LCD Simulator:
- Raspberry Pi
- 16x2 character LCD screen
- Computer monitor
- Laptop
- Python programming language
- Pygame library
- "mlcd" folder
- "__init__.py" file
So recently I got a Raspberry pi and a 16×2 character LCD screen , I thought , lets make a simple game that can be played on the lcd. my first instinct was to code directly for the lcd on the pi , but as I started coding I realized that the clutter of having the lcd connected wasn’t really necessary while i am programming the game’s logic .
I decided to make a python module that gives me the lcd output on my monitor , this way i no longer need to work with my lcd connected and can even code the game on my laptop and test the results quickly . Moreover once im done with the coding , i can simply replace the module code , for the lcd control code , and my game is ready to deploy.
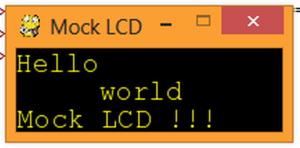
The game shall have a post for itself, for now , lets focus on the module.
Here’s how to make a really simple python LCD simulator module.
- We begin by creating a folder , I shall name this folder “mlcd” (for mock lcd)
- Then we create a python file called “__init__.py”
- The “__init__.py” is the file where our module code is going to be.
so let us look at the code .
mlcd Module :
- import pygame
- def init(chars,lines):
- global screen
- global myfont
- pygame.init()
- size = [12*chars,20*lines]
- screen= pygame.display.set_mode(size)
- pygame.display.set_caption(“Mock LCD”)
- myfont = pygame.font.SysFont(“monospace”, 20)
- def draw(args):
- i=0;
- global screen
- global myfont
- screen.fill((0,0,0))#erase screen contents
- while(i < len(args))
- line= myfont.render(args[i], 2, (255,255,0))
- screen.blit(line, (0, 20*i))
- i+=1
- pygame.display.flip()
- init(chars,lines)
to initialize a display that is “chars” characters wide and “lines” lines in height
this only needs to be run once.this code is designed to work with only one display
,however should one require multiple displays , the module can be modified to use classes
For More Details: Writing a python module to simulate a LCD
-
Why create a Python module for LCD simulation?
To avoid clutter from connecting the LCD while programming game logic and to allow testing results quickly on a laptop. -
How do I set up the folder structure for the module?
Create a folder named mlcd and add a python file inside it called __init__.py where the module code resides. -
What library does the mlcd module use to render output?
The module uses pygame to render the output on the monitor. -
What are the two main functions provided by the module?
The module provides init to initialize the display and draw to render text arguments on the screen. -
How do you initialize the display dimensions in the module?
You run the init function with parameters for characters wide and lines high to set the size. -
Can this module handle multiple displays simultaneously?
The current code is designed for only one display, but it can be modified to use classes for multiple displays. -
How do you switch from simulation to the real hardware?
Once coding is done, you simply replace the module code with the actual LCD control code to deploy the game.
