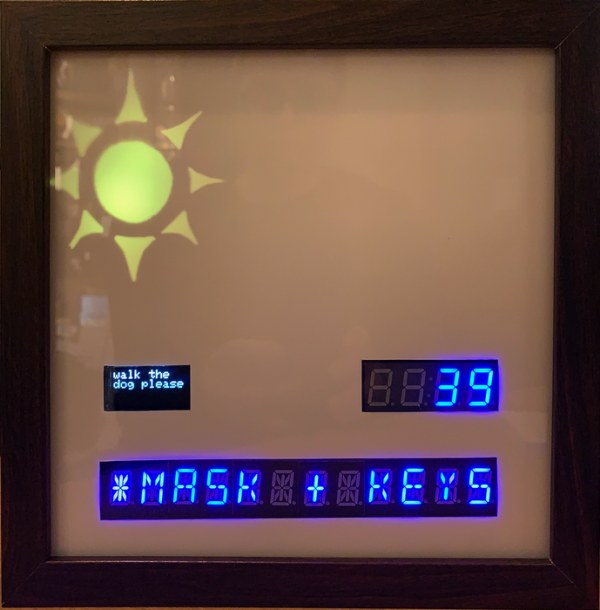
This is a combination weather station and reminder. We can all check the weather on our phones, but sometimes and especially when one is trying to get out the door all that is needed is a quick way to the weather conditions. This weather station supplies a quick visual of current conditions: sunny, cloudy, rainy or snowing, the temperature and a brief note. Additionally, a motion-activated sensor triggers a scrolling display that offers up a helpful message: “mask + keys”
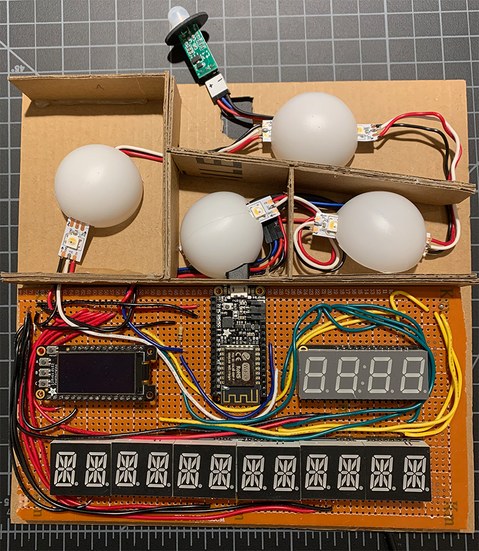
Description: This station is built in Arduino and combines IoT (Internet of Things) feeds and triggers. There are four main displays and one motion sensor.
Display 1: Weather conditions light up neopixels behind a stencil of a sun, clouds, rain drops and snowflakes. This is a purely visual display.
Display 2: high temperature for the day on a 7 segment display.
Display 3: brief note from Remember the Milk (ex. “we need dog food”) on an OLED display
Display 4: motion triggered reminder not to forget mask and keys across 3 alphanumeric displays.
Supplies
Materials/Tools List (note the majority of the links are to Adafruit in the U.S., but these parts are available from other sellers. This project is based on the esp8266 wifi arduino board. While this project uses the Adafruit version of the esp8266 board — the Adafruit Feather Huzzah board, the NodeMCU board may be substituted, but the physical location of the pins will be different. Links to tools are for reference. Budget may dictate which model of the tool is purchased.)
(1) Feather Huzzah board adafruit part 2821
(1) 7 segment feather matrix Adafruit part 3106
(3) quad alphanumeric featherwing displays – blue Adafruit part 3128
(1) OLED feather display 128×64 Adafruit part 4650
(1) Mini PIR motion sensor SR 505 amazon PIR S505 and data sheet
(1) 10k Ohm resistor adafruit part 2748
(4-5) solid core wire — recommend minimum of four colours, recommend this set: Adafruit part 1311
(multi) breadboard wires(male-male) adafruit part 153
(3) breadboard wires (female-female) adafruit part 1919
(1) breadboard: jameco solderless breadboard
(2) headers (for OLED display) https://www.adafruit.com/product/1311
(1) male header pin – minimum 3 header pins adafruit part 3002
(1) a/c adaptor 5.25vdc 1A adafruit part 1994
(1) usb micro B to usb A cable (note must not be just power only) adafruit part 23791
(optional) USB cable with Switch adafruit part 620
(1) 1 meter neopixel RGBW strip adafruit part 2842
(1) paper printed circuit board 10x22cm amazon perf board
(1) 8×8 shadow box shadow box
60/40 lead rosin-core solder adafruit part 145
solder wick adafruit part 149
soldering iron adafruit part 1204
helping hands soldering stand adafruit part 3529
wire snips amazon snips
wire strippers adafruit part 527
(multi) heat shrink tubing adafruit. part 4559
glue gun amazon glue gun
Dremel tool amazon Dremel tool
(various) cardboard, paper, ping pong balls and translucent materials to diffuse the neopixels. black core matboard or black construction paper
additional tools to gather: ruler, hobby knife, cutting mat, safety glasses, rugged snips (like kitchen shears).
optional:
multimeter Adafruit part 308
precision flat pliers adafruit part 1368
Step 1: IoT Accounts, Adafruit IO Feeds, IFTTT Applets and Zapier Zap
For directions on how to set up Adafruit IO and IFTTT got https://www.instructables.com/Software-Setup/.
Also set up IoT accounts at Zapier and Remember the Milk. Record usernames and API for each.
Identify 2.4G SSID on your wifi and have SSID name and password for this SSID.
Set up Feeds in Adafruit IO (these can be named anything but it helps to have these names be descriptive. Here are the names assigned in the Arduino code.)
hightemp
precipitation
textnote
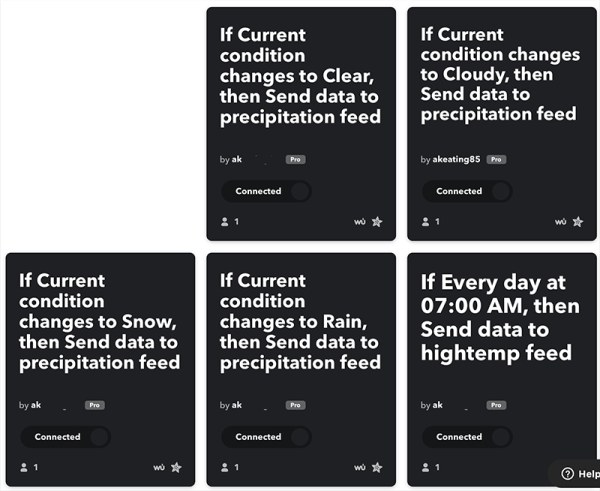
Go to IFTTT and set up 4 applets and connect them to Adafruit IO feeds.
Every day at 7 am send high temp — connect to hightemp feed at Adafruit IO
If current condition changes to sunny — connect to precipitation feed at Adafruit IO
If current condition changes to cloudy — connect to precipitation feed at Adafruit IO
If current condition changes to rain — connect to precipitation feed at Adafruit IO
If current condition changes to snow — connect to precipitation feed at Adafruit IO
Go to Zapier and create one Zap and connect this between Remember the Milk and the textnote Adafruit IO feed.
Step 2: Setup Arduino Code
If you have not done so already, review and set up the Arduino software and make sure it is set up for the esp8266 board. Here is a link to instructions on how to do this: https://www.instructables.com/Software-Setup/
Once you’ve done setting up Arduino, copy or download these files
config.h
weathernote.ino
There are two files — the main weathernote.ino file and the config.h file
The config.h file holds your API and wifi access password. This is the only file you need to change.
However, in order for this code to run you will need to install these Arduino libraries. (If you have not installed libraries before see: https://learn.adafruit.com/adafruit-all-about-ard…
Wire Adafruit GFX
Adafruit LEDBackpack
Adafruit NeoPixel
ESP8266 WiFi
AdafruitIO
Adafruit MQTT
SPI
Adafruit SH110X
Step 4: Prep the Displays
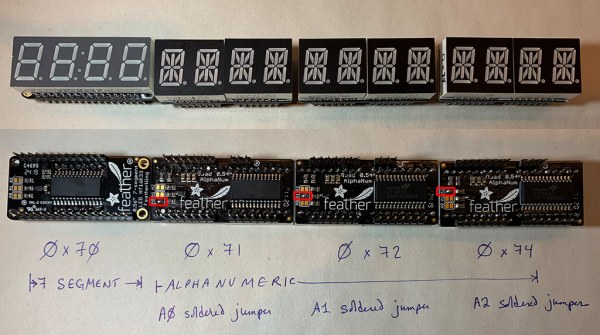
Assemble and solder all headers on OLED, 7-segment and three alphanumeric displays.
Note: the following jumpers need to be soldered on your alphanumeric display so each display has these unique addresses:
0x71
0x72
0x74
links to Adafruit tutorials:
OLED at https://learn.adafruit.com/adafruit-oled-featherw…
7 Segment display at https://learn.adafruit.com/adafruit-7-segment-led…
alphanumeric display https://learn.adafruit.com/14-segment-alpha-numeri…
solder these jumpers https://learn.adafruit.com/14-segment-alpha-numer… — bottom of the page: “Address Jumpers”
Step 5: Breadboard Dry Run Assembly
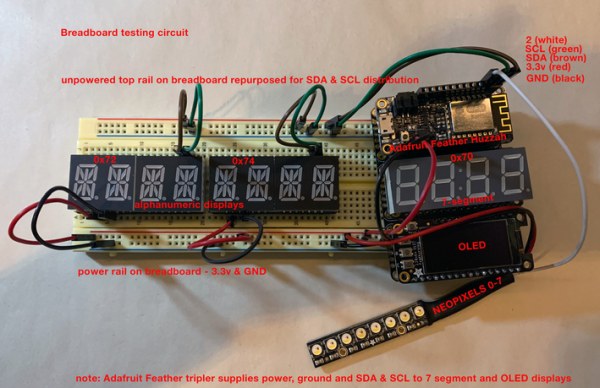
It’s recommended that all these components be dry-fitted on a breadboard with breadboard wires and tested with the Arduino code before final assembly.
Here are the pins on the Adafruit Feather Huzzah board that are used on this project
14 PIR
2 Neopixels
5 SCL four displays
4 SDA four displays
GND four displays and PIR
3.3v four displays and PIR
Step 6: Soldering the Final Circuit
Cut down your perfboard to slightly less than 8″ wide. (Wear safety glasses, the bakelite chips can fly.) Take photos of your project on the breadboard with attention to connections. Then move your project from the breadboard to the perfboard. Use wire wrapping to solder parts and connections to the perfboard — ideally the wires should touch the header pins on your parts for reliable continuity. Note: OLED screens don’t last forever, so recommend this part be mounted on headers (also, the headers help lift the OLED screen so it’s on the same plane as the 7-segment and alphanumeric displays and that will make it easier to see the display when the project is completed).
The 4 strips of 3 neopixels can be soldered separately and then soldered to the perfboard.
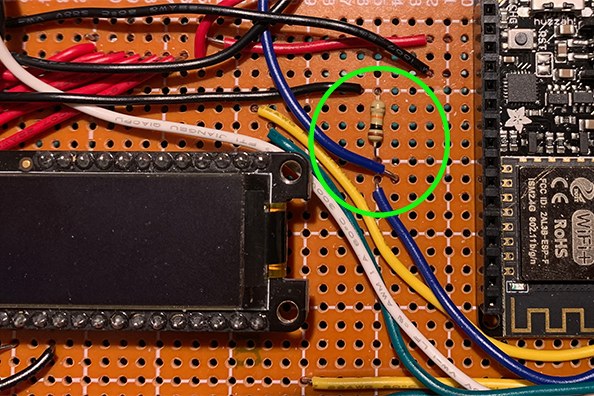
The 3 wires and resistor for the PIR can be soldered to the perfboard with enough allowance to trim later. The final step will be to take the 3 female-female breadboard wires and a small piece of the off cut from your perfboard and solder a 3 pin male header pin and then the three wires of the PIR wiring coming from the board (this will make the “connector” for the PIR.)
Step 7: Shadow Box Assembly
Most of this is straightforward, but the PIR won’t work through glass and will therefore need to be routed outside the shadowbox. A dremel tool can be used to make the appropriate opening in the top of the frame to feed the PIR through. Also make a hole in the back lower corner to route the power cord.
Cardboard can be used to section off the neopixels so light from each strand does not bleed over into another section. Get creative with diffusion and personalize the face with your own stencils.
Source: Weather Note