
Summary of Convert Your Mini Maglite to LED
This article guides users through converting a Mini Maglite flashlight to an LED using a conversion kit. The project requires intermediate skills and approximately two hours of assembly time, emphasizing the need for surface-mount soldering experience. Key steps include dismantling the original bulb, identifying components like capacitors and diodes using a multimeter or magnifying glass, and assembling the new LED circuit.
Parts used in the Mini Maglite LED Conversion Kit:
- Mini Maglite Flashlight
- Fine Tip Soldering Iron
- Solder Paste or Liquid Flux
- Tweezers
- Pliers
- PCB Holder
- Voltmeter
- Magnifying Glass
- Tapered Reamer or #12 (4.8mm) Drill Bit and Drill Motor
- Mini Maglite LED Conversion Kit
Description: Mini Maglite LED Conversion Kit
Assembly Time: 2 hours
Skill Level: Intermediate
Designer: Waltx
Flashlights are always useful especially if you like to camp like me. Out in the woods, when you are away from your iPhone flashlight, a Mini Maglite comes in real handy. Now, what if you hate its yellow color and carrying extra batteries? What if you want a white color for your flashlight and a longer battery life? Sound exciting? Let’s make one.
Required Tools:
Mini Maglite Flashlight
Fine Tip Soldering Iron
Solder Paste or Liquid Flux
Tweezers
Pliers
PCB Holder
Voltmeter
Magnifying Glass
Tapered Reamer or #12 (4.8mm) Drill Bit and Drill Motor
Purchase the Mini Maglite LED Conversion Kit.
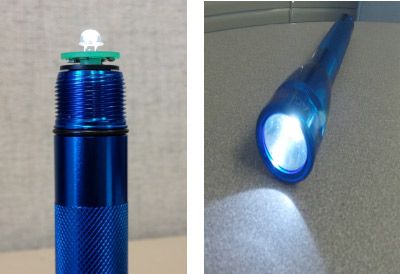
Building the Kit
My experience building the kit will help guide you as you build the kit. Though this kit may look small and quick to finish, it requires SMT soldering skills and quite a bit of patience to build it.
If you have not done surface mount soldering before, don’t jump into building this kit. Practice surface mount soldering first, then try this kit. It took me a bit longer to solder as I didn’t use all the proper equipment for SMT soldering.
To get started, dismantle the head of the Mini Maglite and pull off the bulb by applying some force as it might be stiffly mounted.
Parts
Make sure you have all the parts of the kit with you as well as additional tools.
Once you have all the parts with you, figure out the capacitance of C1 and C2 using a multimeter. When distinguishing parts, keep in mind the resistor, inductor and IC are very distinct. Figuring out the terminals of the diode could be challenging though. You could either use the multimeter to determine the terminals of the diode or simply use a magnifying glass – just find the faint silver line on the diode, which should be the cathode, or the negative terminal.
For more detail: Convert Your Mini Maglite to LED
- What is the estimated assembly time for this project?
The assembly time is 2 hours. - Can I build this kit without prior surface mount soldering experience?
No, you should practice surface mount soldering first before attempting this kit. - How do I identify the cathode terminal on the diode?
You can find the faint silver line on the diode which indicates the cathode or negative terminal. - What tool is needed to dismantle the head of the Mini Maglite?
You must apply force to pull off the bulb as it might be stiffly mounted. - Which tools are required to distinguish between resistors, inductors, and ICs?
A multimeter or a magnifying glass can help distinguish these distinct parts. - Does this conversion kit change the color of the light?
Yes, the kit allows you to get a white color instead of the original yellow. - What skill level is recommended for this project?
The skill level required is Intermediate. - Why is a voltmeter listed in the required tools?
A voltmeter is used to figure out the capacitance of C1 and C2.
