Summary of Washing machine countdown timer using Arduino
This project details a DIY washing machine countdown timer using an Arduino microcontroller. The goal is to delay the start time to utilize off-peak electricity rates and ensure laundry finishes by morning. The author demonstrates modifying a Miele W310 machine by interfacing with its start button via a reed relay, while displaying the remaining time on a 7-segment display. Safety precautions regarding mains electricity are emphasized throughout the guide.
Parts used in the Washing Machine Countdown Timer:
- Arduino or Arduino compatible micro controller (Leostick)
- Reed Relay
- 7805 Voltage regulator
- 7 segment display (including a dot/decimal point)
- Capacitors (1 x 100nf monolithic, 1 x 1uF electrolytic)
- Resistors (1 x 330Ohm, 2 x 10kOhm)
- Small perforated PCB
- Solder
- Epoxy - Araldite
- Wire - various colours
Hello, and welcome to my instructable for a washing machine countdown timer. The timer is operated with the very popular Arduino micro controller. See here for more information. Arduino Home Page
Aim
The aim of this project is to be able to delay the start of the washing machine by a few hours. This is to provide a cost saving and a convenience.
Purpose
1) To be able to take advantage of off peak electricity.
The electricity supply to my home is via a “Time of Use” or ToU meter. This means that I am charged in 3 different bands which are “Peak”, “Shoulder” and “off Peak” The details are as follows:
Peak = 2pm to 8pm Mon-Fri 51c/kWh
Shoulder = 7am-2pm & 8pm to 10pm Mon-Fri & 7am to 10pm weekends 20/kWh
Off Peak = all other times 11/kWh
These are prices effective from 15th Sept 2014 for Origin Energy supplied via AusGrid. The prices are in Australian cents and include tax.
As you can see it is considerably more expensive to use “Peak” electricity as opposed to “Off Peak”. This project is fairly useless if you are still on the old style of ‘whirling disc’ single tariff meters. However, each year there are less and less of those types and ToU metering will become ubiquitous over time. FYI and comparison if you are still on an old style meter then the current tariff is 25c/kWh all day every day.
2) To be able a load of washing to be completed by the time I get up in the morning.
Rather that having the wet clothes sitting in the washing machine for several hours, a delay timer allows the machine to come on, say at 5am and be finished by the time your up.
Whilst my instructable has been applied to the machine that I own (a Miele W310) I believe that many modern electronic machines rely on a ‘start’ button to energise the machine programme so it should be transportable to your own washing machine with a few modifications.
Please watch the video to show how it works in practice. Comments and advice are always welcome.
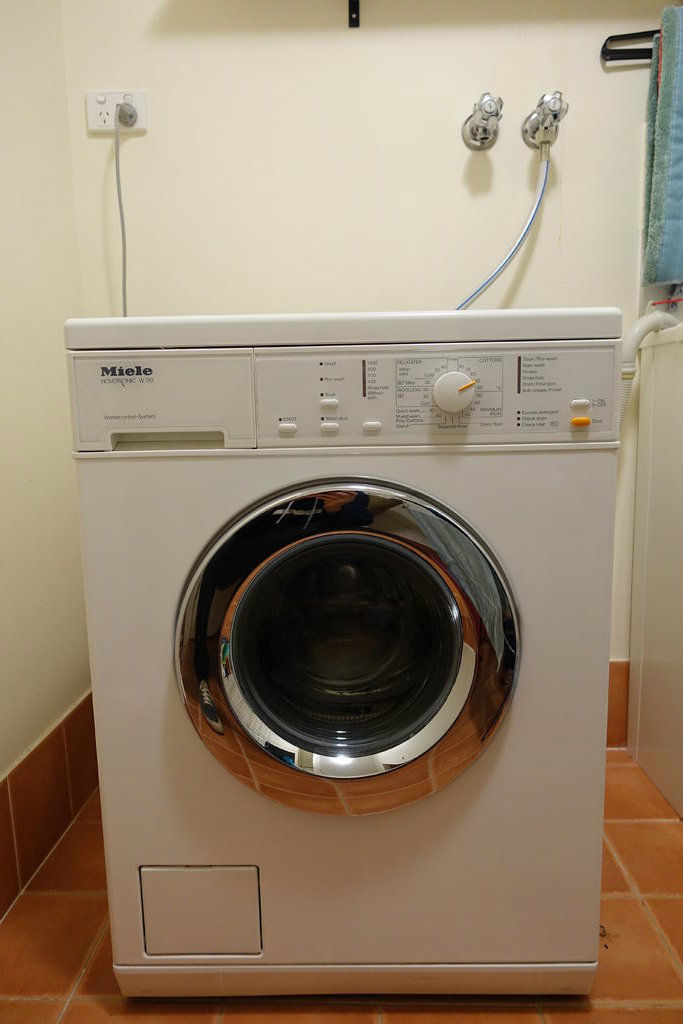
Step 1: The unmodified washing machine
Here is the unmodified ‘before’ photo!
My machine is a Miele Novotronic W310. It is about 12 years old so is well out of warranty! I was worried about ‘frying’ a perfectly good machine and would urge you to take caution if you decide on a similar conversion of your own machine.
The documentation says it uses 0.55kWh for a standard 40DegC cotton wash. This wash takes just under 2hours to run. If you do a more energy intensive 60DegC wash it is 1.00kWh and 1.75kWh for a 95Deg wash.
Step 2: Safety
Mains electricity is dangerous….period
This Instructable concerns modifications to a washing machine powered off the main AC supply. Please do not attempt any modification of you are not confident and or competent!
However, having said this it should be possible to modify many machines without as much interfacing as I have described here. Essentially you could make your own battery powered control box and simply “parallel in” to the start button.
To be safe, always remove power before going inside such a machine. If you need to test the main board as I did then take your time and think carefully about what you are doing before doing it.
Step 3: Tools
The tools and skills required to take on this project are:
Tools
1) Torx bit (for getting into my Miele washing machine)
2) Soldering iron and wire preparation tools.
3) Multimeter
3) PC with Arduino IDE software on it.
Programming skills – not really required if you just download my pre prepared program. However the more familiar you are with Arduino the easier this instructable will be to understand.
Step 4: Parts required
Parts required are as follows:
1) Arduino or Arduino compatible micro controller. I used a Leostick from Freetronics I think most boards would run this project.
It is the 1st time I’ve used this product and I like the idea it has a piezo buzzer already installed on the board. I picked one up from the Sydney maker faire last Saturday.
If you really want to keep costs down you could try making your own clone by following the instructions here:
Freetronics also sell the ATmega controller (with bootloader) as a separate leaded chip.
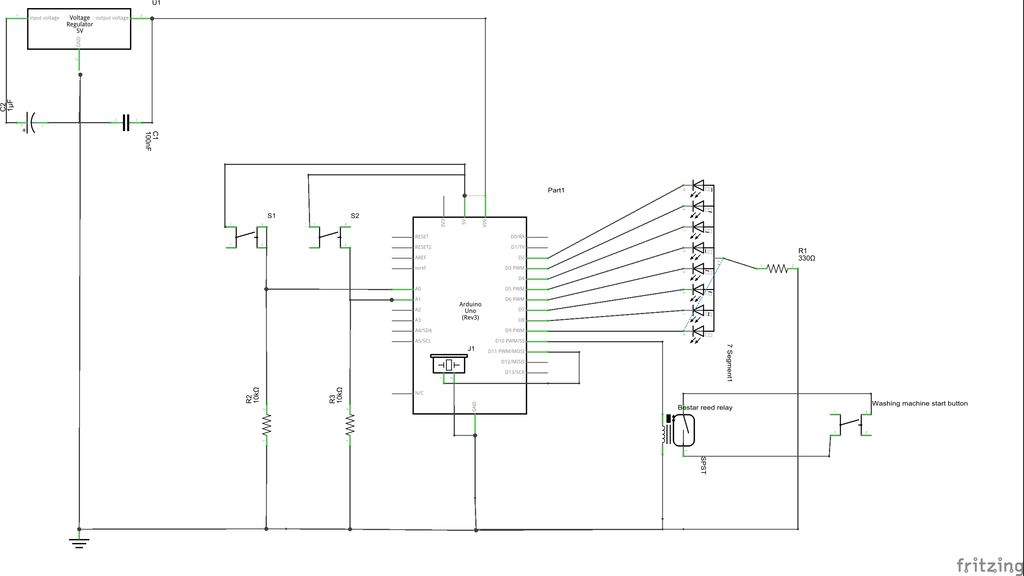
2) Reed Relay
I used a tiny reed relay to ‘parallel in’ to the start switch. This ensures that from an electrical perspective I am not altering the function of the start button, I am merely duplicating it. The relay has a 500Ohm coil so should draw 5/500 Amps = 0.01A = 10mA which is fine for an Arduino output.
Attached is the manufacturers pdf and here is where I bought it.
3) 7805 Voltage regulator
To provide a 5VDC supply for the project. See attached data sheet and the following link to Jaycar.
4) A 7 segment display (including a dot/decimal point) also bought from Jaycar.
5) Capacitors
1 x 100nf monolithic
1 x 1uF electrolytic
these smooth out the input and output of the voltage regulator.
5) Resistors
1 x 330Ohm for the 7 segment common cathode display
2 x 10kOhm for each of the 2 push buttons to ‘pull’ the inputs to ground.
Miscellaneous items.
Small perforated PCB
Solder
Epoxy – Araldite
Wire – various colours
 5V regulator LM7512C.pdf147 KB
Step 5: Take a break….
Ok so this step is NOTHING to do with the project and you can skip over it…..
….but I thought I’d just let you know where I’ve been recently…..The beautiful Lord Howe Island. The island is 700km off the Australian NSW coast and if you ever in this part of the world its well worth a visit.
Here are a couple of links if you want to see more details….
http://www.visitnsw.com/destinations/lord-howe-isl…
http://en.wikipedia.org/wiki/Lord_Howe_Island
..and the best place to stay..
Step 6: Getting into the machine
I firstly need to get into the machine to make an assessment to see:
1) How accessible the start push button was and if I could solder some connections so as to piggy back on it
2) Whether the display and push buttons and/or the control board could be fitted into the machine or whether I would need to add a separate box on the outside of the machine
In my case the Miele is easy to get into.
1) Just remove/pry the plastic caps covering 2 torx screws 1 on each side of the machine. Fully remove both torx screws
2) The whole lid then hinges up and is removable (no more screws to remove)
Step 7: Remove front panel
1) Grasp selector knob and pull.
2) The front panel can now be pried off using a small flat blade screwdriver. Start at the top right hand side as shown
For more detail: Washing machine countdown timer using Arduino
- How does this project save money?
The timer allows users to take advantage of off peak electricity bands which are significantly cheaper than peak times. - What is the main purpose of the device?
The aim is to delay the start of the washing machine to save costs and have clothes finished by morning. - Can I use any washing machine for this project?
The author believes it works on modern electronic machines that rely on a start button but advises caution and modifications. - Does the project require programming skills?
Programming skills are not really required if you download the pre prepared program provided. - What tool is needed to open the specific Miele machine mentioned?
A Torx bit is required to remove the screws covering the sides of the Miele Novotronic W310. - Why was a reed relay chosen for the circuit?
The relay is used to parallel in to the start switch without altering the function of the original button. - What voltage supply is provided by the 7805 regulator?
The 7805 regulator provides a 5VDC supply for the project components. - Is this project suitable for single tariff meters?
The project is fairly useless if you are still on the old style of whirling disc single tariff meters.