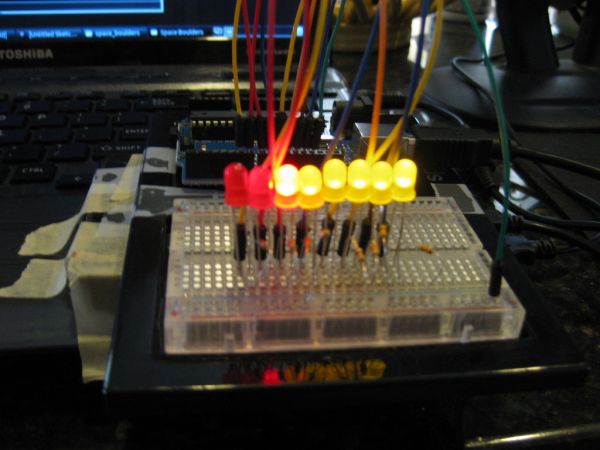
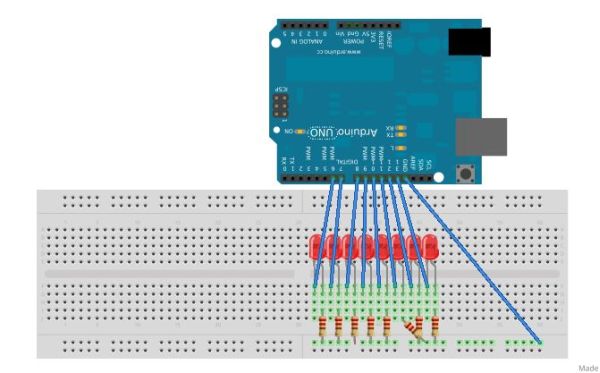
Have you ever wanted to, without going out of your way to clock your processor, see how much stress your computer is under? With this project you will have a simple bar graph that constantly shows how much stress your computer is under. If the graph reads 0, your computer isn’t working too much. If it reads 8, the highest, your computer is working very hard, and you probably should give it any more of a load. This tutorial is remotely easy, meaning a beginner should be able to follow it fairly well. After all, I am beginner myself.

This tutorial is interned for Unix users. If I am correct, small tweaking should allow it to work on Windows. Maybe some day I’ll re-write it for Windows users.
Step 1: How it works
1. A perl script clocks the processor.
2. The script uses that number to come up with a number from 1-9.
3. The script throws that number to the Arduino, using Serial connection.
4. The script get repeated over and over, for an infinite amount of time.
5. Each time the Arduino receives ten numbers, it averages them, and shows the average on the bar graph.
It’s as easy as that!
Step 2: What you’ll need
Here is the list of supplies:
An Arduino
A breadboard
8 leds Or an actual bar graph unit
8 330 ohm resistors
Wire
Perl
Unix::Processors A perl module
Device::SerialPort Also a perl module
Math::Round Yet another perl module
All perl modules can be downloaded from cpan.
Step 3: Set up the perl script
Here is where you will create the main perl script. Let’s begin:
#!/usr/bin/perl
This would be the location of your perl interpreter. More code:
use Unix::Processors;
use Device::SerialPort;
use Math::Round;
All of these are libraries you need. The first allows you to clock the processor. The next allows you to write to the Serial port, and the last allows you to round numbers.
Now, add:
my $arduino = Device::SerialPort->new(“/dev/ttyACM0”); #Should be the port your Arduino is on
$arduino->databits(8);
$arduino->baudrate(9600); #Should be your Arduino’s baud rate
$arduino->parity(“none”);
$arduino->stopbits(1);
All of these things initialize the connection with the Arduino. You should change what needs to be changed to make it fit your needs.
my $processor = new Unix::Processors; #Your processor
$overallspeed = $processor->max_clock; #Clocks it
$send = ((($overallspeed – 800) / 175.125) + 1); # 800 = minimum clock speed. 175.125 = max clock speed / number of leds
This chunk of code clocks the processor and puts it on a scale between 1 and 7. Some things need to be changed, such as your processors minimum clock speed, and your max divided by the number of leds. For this project, there is 8 leds.
Finally, add:

$arduino->write(round($send)); #Rounds the number, and sends it to your Arduino
This code is in charge of sending it to the Arduino.
Save all that code as clockandsend.pl
Now, this will only clock and send one number. You want to create another script to run this one over, and over again. For example:
A breadboard
8 leds
8 330 ohm resistors
Wire
Perl
Unix::Processors
Device::SerialPort
Math::Round
For more detail: Visual Computer Stress Meter using an Arduino
