
Summary of Virtual Color Mixer using Arduino
This article demonstrates sending multiple sensor values from an Arduino to a computer using ASCII encoding. Three analog sensors control the red, green, and blue components of a background color in Processing or Max/MSP software. The circuit uses voltage dividers with force-sensing resistors or potentiometers connected to analog pins 0, 1, and 2.
Parts used in the Virtual Color Mixer:
- Arduino Board
- Three Analog Sensors (potentiometer, photocell, FSR, etc.)
- Three 10K ohm resistors
- Breadboard
- Hook-up wire
This example demonstrates how to send multiple values from the Arduino board to the computer. The readings from three potentiometers are used to set the red, green, and blue components of the background color of a Processing sketch or Max/MSP patch.

Software Required
Circuit
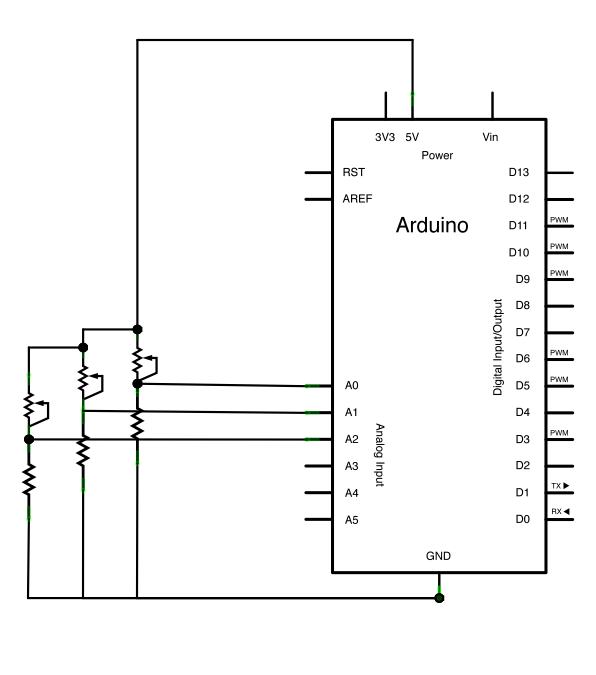
Connect analog sensors to analog input pins 0, 1, and 2.
This circuit uses three voltage divider sub-circuits to generate analog voltages from the force-sensing resistors. a voltage divider has two resistors in series, dividing the voltage proportionally to their values.
image developed using Fritzing. For more circuit examples, see the Fritzing project page
Schematic
Code
The sensor values are sent from the Arduino to the computer as ASCII-encoded decimal numbers. This means that each number is sent using the ASCII characters “0” through “9”. For the value “234” for example, three bytes are sent: ASCII “2” (binary value 50), ASCII “3” (binary value 51), and ASCII “4” (binary value 52).
This example reads three analog sensors (potentiometers are easiest)
and sends their values serially. The Processing and Max/MSP programs at the bottom
take those three values and use them to change the background color of the screen.
The circuit:
* potentiometers attached to analog inputs 0, 1, and 2
http://www.arduino.cc/en/Tutorial/VirtualColorMixer
created 2 Dec 2006
by David A. Mellis
modified 30 Aug 2011
by Tom Igoe and Scott Fitzgerald
This example code is in the public domain.
*/
const int redPin = A0; // sensor to control red color
const int greenPin = A1; // sensor to control green color
const int bluePin = A2; // sensor to control blue color
void setup()
{
Serial.begin(9600);
}
void loop()
{
Serial.print(analogRead(redPin));
Serial.print(“,”);
Serial.print(analogRead(greenPin));
Serial.print(“,”);
Serial.println(analogRead(bluePin));
}
Hardware Required
- Arduino Board
- (3) Analog Sensors (potentiometer, photocell, FSR, etc.)
- (3) 10K ohm resistors
- breadboard
- hook-up wire
- How are sensor values sent from the Arduino?
The sensor values are sent as ASCII-encoded decimal numbers. - Which software is required for this project?
Processing or Max/MSP version 5 is required. - What do the three analog sensors control?
They set the red, green, and blue components of the background color. - Where should the analog sensors be connected?
Connect them to analog input pins 0, 1, and 2. - What type of sub-circuits generate the analog voltages?
Voltage divider sub-circuits are used to generate analog voltages. - How many bytes are sent for the value 234?
Three bytes are sent representing the characters 2, 3, and 4. - Can I use photocells instead of potentiometers?
Yes, photocells or FSRs can be used as the analog sensors. - What is the purpose of the 10K ohm resistors?
They are part of the voltage divider circuits used with the sensors.
