Summary of Ultrasonic Mapmaker Using Arduino and MatLab
This article details a project to give robots vision using an ultrasonic sensor and servo motor. The system scans a 180-degree field of view by rotating the sensor, collecting distance data, and visualizing it via MATLAB. It explains the theoretical basis of sound wave measurement, lists necessary hardware and software components, describes mechanical assembly steps, and outlines the Arduino code logic for averaging readings and transmitting data.
Parts used in the Ultrasonic Mapmaker:
- Arduino Uno/Yun
- Arduino Prototyping Shield
- HC-04 Ultrasonic Sensor
- Servo motor (Tower Pro SG90)
- General purpose PCB
- Double sided tape
Vision is one of the most exciting senses you can endow on your robot. The ability to perceive obstacles allows a robot to make an educated decision regarding further movements.
However, it is also not the easiest senses to implement for a few reasons. Firstly, vision can be abstracted to a two-dimensional vector when it comes to computing, as opposed to a single dimensional scalar such as, say, temperature. Secondly, it is an analog value like many other senses, so it requires a certain degree of digitization and processing for it to make sense to a computer. Finally, though this is not strictly a problem, is visualization. Vision data cannot be represented as mere numbers to humans. Although that is how computers process data, it makes no sense for a human to decode digits. However, with the help of modern technology, and basic knowledge of physics and math, we will be able to endow our robot with the gift of sight!
Step 1: Theory
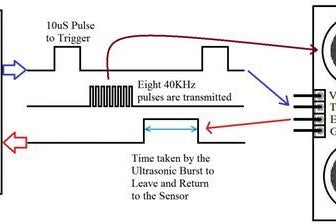
In this project, we are using an ultrasonic Distance sensor. It generates sound waves beyond the scope of human hearing and measures distance by calculating the time required by these waves to hit an obstacle and travel back. This is similar to the principle used by bats.
Another component that we are going to use is a servo motor. It differs from the usual DC motor in that it can turn very precisely to a given angular position and hold its state there. When a servo motor is given pulses of a specific duration, it moves to the corresponding angular position.
We will be using both these components to get a 180 degree field of view for our robot.
Step 2: Collecting Materials
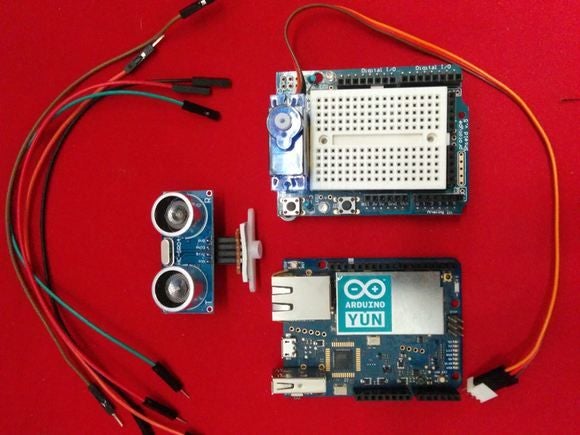
This project uses the following hardware
- Arduino Uno/Yun (Please note that any Arduino footprint board can be used in place of the Uno or Yun)
- Arduino Prototyping Shield
- An HC-04 Ultrasonic Sensor
- A servo motor (I’ve used the Tower Pro SG90 because its very compact)
On the software side we are using the following programs
- The Arduino IDE to upload control code to the Arduino to rotate the servo and get distance data from the ultrasonic sensor and also push it to the serial port.
- Mathworks MatLab to receive data from the serial line, process it and visualize it to a graph.
Step 3: Mechanical Assembly
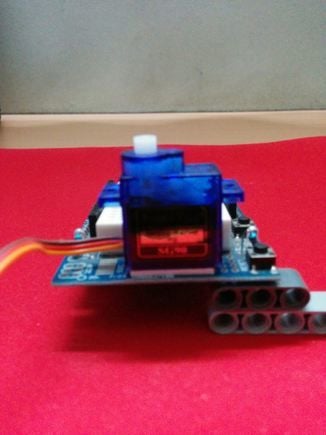
Using a small piece of general purpose PCB, make a small header for the HC-04, and attach it to a servo horn using a piece of double sided tape.
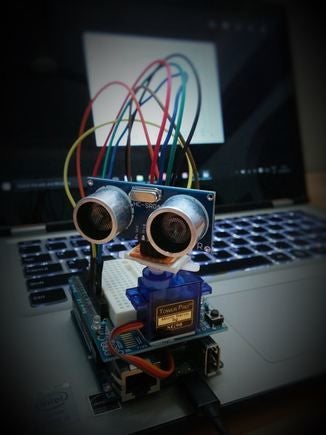
This step is optional, but to make the system more compact, I’ve attached the servo to the jutting part of the protoboard shield using double sided tape as well.
The final result should look like Wall-E’s abdomen.
Step 4: The Arduino Code
The Arduino code controls the motion of the servo motor, and when the readings from the ultrasonic sensor are captured and how frequently. It also pushes the sensor data to the serial port.
- Import libraries
- Initialize variables and pins.
- Initialize servo object
- Initialize serial communication
- Wait for 3 seconds
- Initialize counters to 0
- Rotate servo by 1 degree
- Get ultrasonic sensor data 10 times (set by default)
- Average the data
- Send the average to serial port
- Return to step 7
Read more: Ultrasonic Mapmaker Using Arduino and MatLab
- How does the ultrasonic sensor measure distance?
It generates sound waves beyond human hearing and measures distance by calculating the time required for these waves to hit an obstacle and travel back. - What is the difference between a servo motor and a DC motor?
A servo motor can turn very precisely to a given angular position and hold its state there, unlike a usual DC motor. - What field of view does this robot setup provide?
The combination of the ultrasonic sensor and servo motor provides a 180 degree field of view. - Which software is used to visualize the data on a graph?
Mathworks MatLab is used to receive data from the serial line, process it, and visualize it to a graph. - Can other Arduino boards be used instead of the Uno or Yun?
Yes, any Arduino footprint board can be used in place of the Uno or Yun. - How many times is the sensor data captured before sending it?
The system gets ultrasonic sensor data 10 times and then sends the average to the serial port. - Why is visualization considered a challenge for vision data?
Vision data cannot be represented as mere numbers to humans, making it difficult for people to decode digits without modern technology. - What principle is similar to how bats perceive their surroundings?
The ultrasonic sensor uses a similar principle to bats by generating sound waves and measuring the return time to calculate distance.