A really fun project sent into us by Thomas Meghe. He’s translated it all from his native French, which is a technical achievement itself. If you’d like to see the original, you can find it here.
Bored of your favorite Twitter client ? No problem, here’s the solution ! In this post we are going to explain how to control the awesome WowWee Robosapien with a wirelessly connected Arduino to trigger some actions on the robot through a specific Twitter hashtag.
Goals
- Hack the Robosapien with Arduino
- Deploy an app on Heroku allowing it to be available 24/24
- Use the Twitter streaming API to watch new tweets posted on the #tweetosapien hashtag
- Use websockets with Pusher to send events to Arduino
- The Robosapien is well engineered and quite easy to hack. Documentation is easily findable on the web. Here are the steps to follow to control our robot with Arduino.
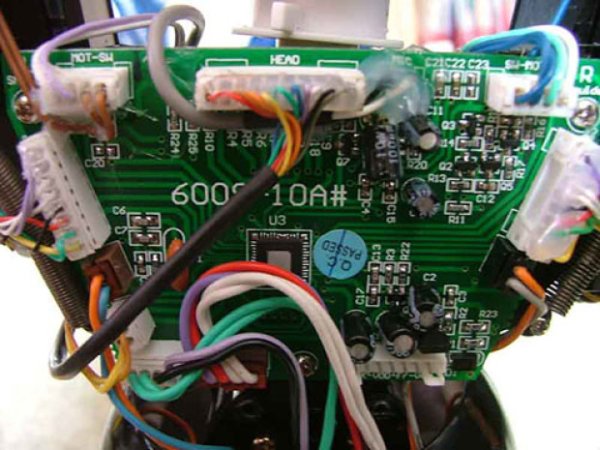
- Unscrew the 4 screws at the back of the Robosapien (2 behind the shoulders and 2 behind the hips) to access the PCB.
- Spot the head connector at the bottom of the PCB (above picture)
- Remove the ribbons to disassemble the PCB.
- Spot the black and white wires on the head connector. The black is the GND and the white is for the IR-OUT.)
- Turn back the PCB and solder a black wire on the existing soldering point. Do the same with the white one.
- Next, solder your brand new white wire to the central pin of a toggle switch 3-Pin then add another white wire to one of the other pin. This trick will allow us to switch the Robosapien in remote or Arduino mode.
- Drill a hole somewhere on the robot to mount the switch on. I chose to put it on the back (bottom picture).
- Reassemble it!
Step #2: Arduino
- The original code on which is based the program to fake the remote and send data to Arduino is available on this page. Arduino allows us to fake the remote and communicate with the robot the «serial way». Before powering on the robot, I advice you to switch the robot in remote mode. When it’s done, you can power the robot on and switch back on Arduino mode. Then, you can plug the white wire on the Arduino 6 PIN and the black one on the GND. You can optionally add a LED on the 13 PIN. Upload the code on the Arduino. If everything is working well, you should hear your Robosapien burping, the link between the controller and the robot is fine.
/*
Tweetosapien
[email protected] / May, 2013Thanks to RobosapienRu - test Robosapien hackspace.ru
*/

#include

volatile int viRobsapienCmd = -1;  // A robosapien command sent over the UART request

//////////////////////////////////////////////////////////////////
// Begin Robosapien specific variable deinitions
//////////////////////////////////////////////////////////////////

// Some but not all RS commands are defined
#define RSTurnRight       0x80
#define RSRightArmUp      0x81
#define RSRightArmOut     0x82
#define RSTiltBodyRight   0x83
#define RSRightArmDown    0x84
#define RSRightArmIn      0x85
#define RSWalkForward     0x86
#define RSWalkBackward    0x87
#define RSTurnLeft        0x88
#define RSLeftArmUp       0x89
#define RSLeftArmOut      0x8A
#define RSTiltBodyLeft    0x8B
#define RSLeftArmDown     0x8C
#define RSLeftArmIn       0x8D
#define RSStop            0x8E
#define RSWakeUp          0xB1
#define RSBurp            0xC2
#define RSRightHandStrike 0xC0
#define RSNoOp            0xEF

//
#define RSRightHandSweep  0xC1
#define RSRightHandStrike2 0xC3
#define RSHigh5           0xC4
#define RSFart            0xC7
#define RSLeftHandStrike  0xC8
#define RSLeftHandSweep  0xC9

#define RSWhistle         0xCA
#define RSRoar            0xCE

int command, buff[]={
0x80, 0x81, 0x82, 0x83, 0x84, 0x85,
0x86, 0x87, 0x88, 0x89, 0x8A, 0x8B, 0x8C, 0x8D, 0x8E, 0xB1,
0xC2, 0xC0, 0xEF, 0xC1, 0xC3, 0xC4, 0xC7, 0xC8, 0xC9};

int LedControl = 13;     // Show when control on
int IROut= 6;            // Where the echoed command will be sent from
int bitTime=516;          // Bit time (Theoretically 833 but 516)
// works for transmission and is faster
int last;                 // Previous command from IR

//////////////////////////////////////////////////////////////////
// Begin Robosapien specific code
//////////////////////////////////////////////////////////////////
// send the command 8 bits
void RSSendCommand(int command) {
digitalWrite(IROut,LOW);
delayMicroseconds(8*bitTime);
for (int i=0;i<8;i++) {
digitalWrite(IROut,HIGH);
delayMicroseconds(bitTime);
if ((command & 128) !=0) delayMicroseconds(3*bitTime);
digitalWrite(IROut,LOW);
delayMicroseconds(bitTime);
command <<= 1;
}
digitalWrite(IROut,HIGH);
delay(250); // Give a 1/4 sec before next
}

// Set up Robosapien functionality
void RSSetup()
{
pinMode(IROut, OUTPUT);
pinMode(LedControl,OUTPUT);
digitalWrite(IROut,HIGH);

// Make robot burp to indicate setup is complete
RSSendCommand(RSBurp);
}

void setup()
{
Serial.begin(9600);
Serial.println("RobSapien Start");

RSSetup();
}

void loop()
{

}
Step #3: Deploy an app on Heroku
- CLI, Git, SSH Keys, push, pull… Don’t panic! The aim of the next part is to explain how to deploy an app in the cloud on a PaaS like Heroku. Your app will be available 24/24 ! Go on Heroku to create an account. I don’t remember exactly what are the steps to follow but everything is well explained. When your account is ready, you need to install Heroku Toolbelt downloadable here.
Major Components in Project
Arduino
For more detail: Tweetosapien: Hack a Robosapien With Arduino to React to Tweets