It is common for parents to feel concern for their children when they are apart. Questions arise around whether the kids made it safely to school, if they are alone at home, or playing with friends at the park. Ensuring a child’s well-being when away creates worry that is familiar to caregivers worldwide. The natural protective instincts of parents lead to pondering scenarios like: Did my son get on the bus okay? Is my daughter by herself right now? Who is watching over my kids at recess? Not knowing can stir unease until reuniting or confirming all is well.
To help address parental concerns over children’s whereabouts, today we will create a smart tracking device. The goal is to have a way to keep tabs on a child when apart. Additionally, this tracker could be used to monitor the location of vehicles or other possessions.
By building this system, it aims to provide peace of mind for caregivers. Knowing a child is safe and accounted for should help lessen worries. The same concept applies to tracking vehicles or valued items.
Let’s get started on constructing this innovative location tracker. The end result will be a tool to offer reassurance over what matters most when out of sight. Now we can begin the process of designing and putting together this helpful monitoring solution.
Components
- GPS Module
- Arduino Nano
- SIM800L
- 2G SIM card
- OLED Display
- Small 3V battery
- Wires
Prerequisites
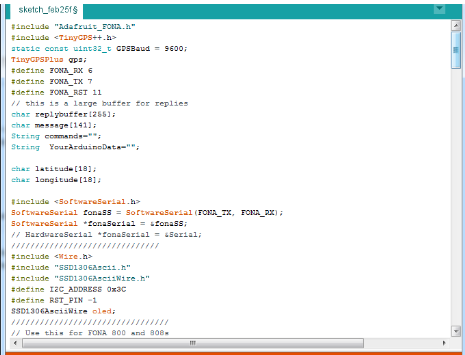
The first step is to prepare the Arduino integrated development environment (IDE) by installing necessary libraries. We will need the ‘Tiny GPS++’ and ‘FONA’ libraries to interface with the GPS and cellular modules.
To acquire these, go to the Tools menu in the Arduino IDE. Select Library Manager from the dropdown. This will open the library installation window.
Enter “Tiny GPS++” in the search bar to find the first library. Click install to add it to your Arduino library folder. Then search for and install “FONA” in the same manner.
Having the proper libraries loaded into the IDE is crucial, as our code will reference functions and files from them. Taking a few minutes upfront to add these via the Library Manager saves trouble down the road.
With the libraries now incorporated, the Arduino is prepared to communicate with the key components for our tracking project. Let’s proceed to the next steps of assembly.
Coding
To begin programming the tracker, we first need to initialize the required libraries at the top of the code.
Below that, declare the necessary variables which will hold the critical data like the SMS message content, GPS location coordinates, and other information.
Following this, define the pin mappings that connect the Arduino to the GPS and cellular modules. These associate the physical pins to the virtual pin numbers used in code.
Next is the setup function, where initialization tasks occur. Here we set the baud rates for serial communication with each module. The SIM800L cellular board is set to 4800 baud, while the GPS module is configured for 9600 baud.
Proper baud rate selection is important for reliable transmission between the microcontroller and external devices. With the libraries included, variables declared, pin mappings defined and baud rates configured, we have laid the groundwork for the remaining code functionality.
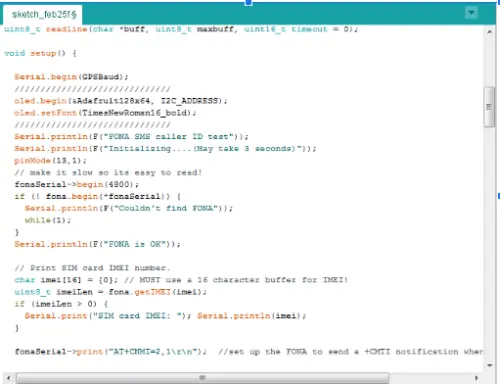
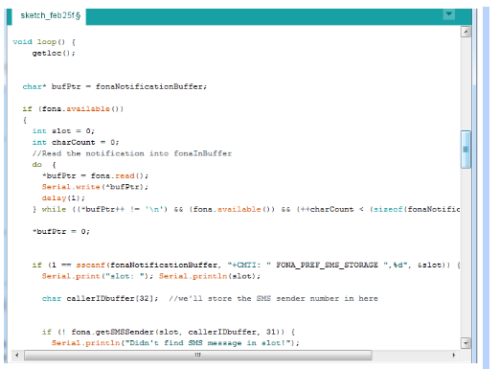
The main program logic will be contained within a loop function. Here we will continuously check if the SIM800L cellular module has received any incoming messages.
If a message is present, it will be converted from bytes into a string that can be easily read and understood. The string will then be examined for a “get location” command.
Upon detecting this command, the get_location() function will be called. This separate function is dedicated to acquiring and returning the latest GPS data from the GPS module.
Back in the main loop, if the command was issued, the GPS location results retrieved from get_location() will be sent as a reply SMS back to the originating device.
In this way, any authorized user can trigger a remote location update simply by texting the tracker. The loop function continuously monitors for requests, while get_location() focuses solely on updating from the GPS module.
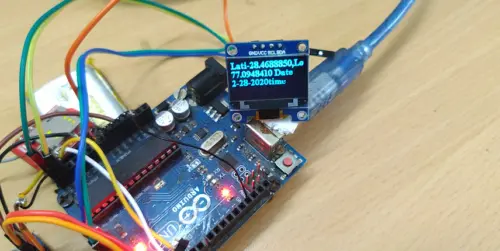
Connection
Now connect the components as shown in the pic below:
