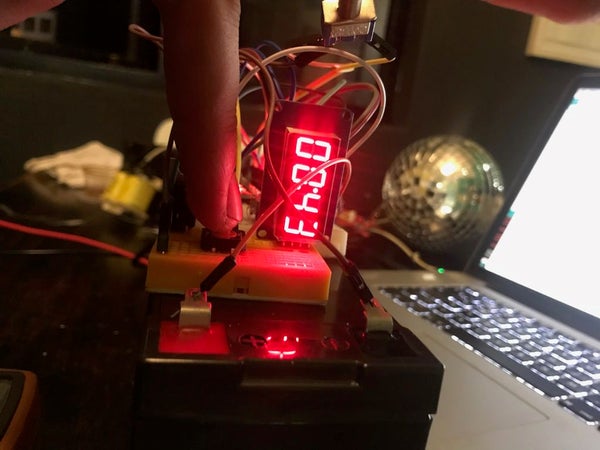
Note from the author: In an effort to get this ready in time for the safe and secure challenge, I have had to make a few compromises to my box, but that doesn’t mean you have to! I have left my original ambitions in the text, as inspiration for you to make the best Time Delay Lockbox you can think of.

I was teaching myself to weld and thought I’d make something useful.
The Premise
Were you the kid who ate a single marshmallow now instead of waiting for X minutes and getting two marshmallows?
Imagine you could have put the marshmallow in a box with a timer. Not only would you be certain of the marshmallow’s presence and safety, but you would only need to have the instantaneous willpower to box the marshmallow up, instead of the delayed gratification mechanism required to wait out the clock.
Introducing the time delay lockbox!
To overcome your lack of willpower you decide to make such a box. Henceforth the proverbial marshmallow shall be referred to as the payload.
Features
When open, you would be able to:
- Set a timer before which you can not open the box
- Insert a payload
- Close the box
Let’s also assume you have no willpower whatsoever and will do anything to get at said payload, therefore we want to make this lockbox ridiculously secure… I mean unhackable and unbreakable (within reason). Therefore, I propose that when closed, you would be able to:
- Press a button requesting that the box open
…. that is it. If the box is in a state such that you should be able to gain access, pressing the button would unlock the box. Should the timer not have run out yet, you will just have to wait.
But I’m clever, so I’m sure I can get into the box
In that case, we are going to have to put in some serious measures to prevent you from gaining access.
Regarding form factor we need to aim to remove, minimise or compartmentalise all physical vulnerabilities. Physical vulnerabilities would include:
- exterior hinges that you could remove the bolt from – therefore mine shan’t have exterior hinges. I haven’t decided yet, but I think a slide open door is my most viable option.
- holes into the box, including the one for the button and countdown timer display that you could break out to get at the payload – therefore my screen and exterior button (UI) will be separated from everything else with a steel plate. This is what I mean by compartmentalising vulnerabilities.
- any box that’s too easy to break open – therefore mine shall be made of steel, to compensate for my willpower or lack thereof. I shall also attempt to create my box in such a way as to minimise the possibility that I could force it open using force and leverage.
Physical vulnerabilities could be rendered moot by adding tamper protection mechanisms. Perhaps I’ll do something of the sort in my box.
Other vulnerabilities:
We would also need to consider that you may have some epic hacking skills. Therefore once closed you would want to limit your ability to override the system. So apart from that button and screen, there must be no access to the electronics (compartmentalisation).
Could you send a power surge through these exposed components to surge your microcontroller (I’ll be using an Arduino Nano)? Perhaps, but will it help you get into the box? debatable/implausible.
I’ll be using a solenoid lock for my box, which in its natural state is in a locked position and only opens when enough current at appropriate voltage is sent through. It will need to be inaccessible through the aforementioned physical vulnerabilities.
This solenoid lock poses a theoretical override mechanism… It is the only vulnerability I have been able to identify thus far.
Solenoids work by using an induced electromagnetic field in a coil to push/pull a rod. So could I create a coil, placing it alongside the box and induce a current (as seen in a common transformer) in the coil of the solenoid, that would cause it to unlock?! I’m not sure. My google searches have turned up no results to indicate that this is anything other than theoretical. Regardless, precautions will be taken to limit the viability of such a hack, by distancing and or insulating the solenoid from the case exterior.
Backup power is obviously a must, so you don’t just reset it. For my box, I’ll be limiting vulnerabilities once more by making battery power contained within the box, the only power source. To ensure the power source doesn’t die out on me before the clock runs down, I’ll be using a large battery source.
If you come up with a hack for your box, patch that vulnerability.
Features could pose vulnerabilities!
I wanted to add USB ports for charging devices and stuff, but this could introduce further vulnerabilities. Also, it extends beyond the scope of this Instructables, so let’s begin.
Step 1: Gathering Materials and Tools

The box
Mine shall be made of square steel plates. They came as 150mm x 150mm and are 3mm thick. For a single wall structure you would need at least 6 obviously. Compartmentalising would require more material.
For additional structural integrity, I’ll be creating a frame for them from 40mm angle iron, mine looks to be slightly thicker than the plating. I didn’t manage to complete the frame, However the box is pretty bloody sturdy as it is.
You may adapt this to your needs. If you think a wooden box will do, go for it. If you think you need something stronger, go for it. I’m sure after building this, I’ll be too heavily invested to attempt to destroy my steel box just to get at the payload.
The electronics
I’m using this Arduino Nano, but you may control this using any Arduino or even just do something like this using just an ATmega328 micro controller.
A display of sorts. I was using a straight up 7 segment LED display, but there are too many wires for my liking, so I’ll be picking up something like this tomorrow, which has onboard circuitry, requires just 4 cables, and has 4 digits. You can use whatever you wish though, even a single LED could provide the information by blinking X times to represent X hours.
A few buttons, and or other inputs. I’ll be using a couple buttons along side a switch like this to set the state (Set timer/Unlockable/Armed), a potentiometer (*Edit – I’ve chosen a rotary encoder rather, but you could use a potentiometer) to select the digit value, and a button suitable for attaching to the case – note that I’d prefer the lock nut thing to be on the inside so I don’t attempt any shenanigans by simply screwing loose the button.
A locking mechanism. I’m using a 12v Solenoid Lock.
An N-type MOSFET to act as a switch to supply the high current power to the solenoid, without running it through the microcontroller. You could also use a relay. Anything that will act as a switch when the microcontroller tells the solenoid to activate.
Some diodes won’t hurt either to protect your micro controller from inevitable reverse current or something (a new concept to me, but I’ve burned out a couple pins on a couple Arduinos now, and it seems it may have been avoided with appropriately placed diodes)
The power supply etc.
Many hours I have deliberated on this. I considered using a small battery power supply to save on weight and integrating some capacitors to store enough current/voltage for the solenoid. This is a perfectly acceptable design solution.
However, my current design utilises a capable battery instead.
I’ve chosen a 12v 1.4Ah lead acid battery because it has a large capacity (Ah), can deliver the necessary current to power my solenoid and is rechargeable. It’s also pretty cheap, and seeing as it’s main drawback is weight, I think I decided this wasn’t a consideration when I decided to make the box out of steel. I will be using voltage regulators with this to ensure I don’t supply too much voltage to any components. Voltage regulators are less power efficient and you should rather use a step down transformer. I didn’t manage to procure one in time to submit this Instructables for the Safe and Secure challenge, but I recommend you do. — and with just a few hours left in the competition, my Arduino just went pop and appears dead, so really…. get a dc dc step down.
Tools etc.
Should your box be made of metal:
- Welding machine
- SAFETY EQUIPMENT! Gloves, welding mask etc. Please view welding instructions elsewhere if you aren’t sure how and what.
- Set square type magnetic clamp and or other square type clamp/jig (I’ve used both so far)
- Angle grinder
- Cutting disc for angle grinder
- Sanding disc to clean up welding
Solder iron (unless you want to just use breadboards and jumper cables)
Multimeter (for testing and troubleshooting)
An LED (completely optional for testing. I use it as I code to test that signals are being sent when they should be)
All set? Let’s do this!
Source: Time Delay Lock Box
