
Summary of Better LED as light sensor
This article details a project using an Arduino to detect light changes by repurposing an LED as a sensor. When the sensor LED is covered, blocking light, it triggers a second connected LED to turn on. The author notes that green and red LEDs work best for sensing, though any LED can function. The setup requires only an Arduino board, two LEDs, a computer with Arduino software, and a USB cable, needing no additional tools.
Parts used in the Better LED as Light Sensor:
- Arduino board (Uno, Duemilanove, or similar)
- Two LEDs
- Computer with Arduino software installed
- USB-cable
As a result of the questions from lekirst on this ible of my hand: LED-as-lightsensor-on-the-arduino/ and the cleaner code made by hansc44 at: Arduino-Use-LED-as-a-light-sensor/ it was time to come with a better Ible. So here it is. (I didn’t solve lekirst’s problems yet so she probably is open for suggestions)
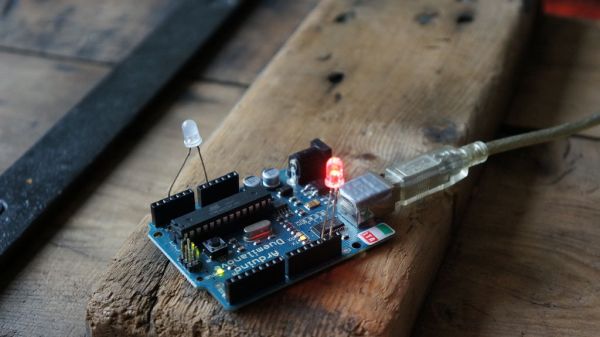
What is the idea?
You might know that a LED emits light when you put the right amount of volts on the right leads. The funny thing is that it also works the other way around. Not the leads, it doesn’t work when you put the leads the other way around. But what does work is that when you shine light on a LED it will GIVE current. It is a very small current but just enough for an Arduino to detect.
What will it do?
When you darken the sensor led, for instance by covering it with your hand, it will turn on the other LED.
Does this work with any LED?
As far as I know, it works with any LED, but not with any LED as good.
green and red LEDs seem to work best.
If trough experimenting you find out that other colors even work better, let me know.
Does it work with any light?
This sketch works very reliable with normal daylight. It is not fully tested in dark rooms or bright sunlight yet.
Step 1: You will need
You will need
- an Arduino board (Uno, Duemilanove or something like that)
- two LEDs
And really that’s it! (you could even do it with just one LED and use the SMD-LED on the Arduino board as the second LED)
You will need no tools.
You do need a computer with the Arduino software installed and a USB-cable to connect the Arduino board. (But if you have an Arduino board, you probably have that sorted already)
Step 2: Setting everything up
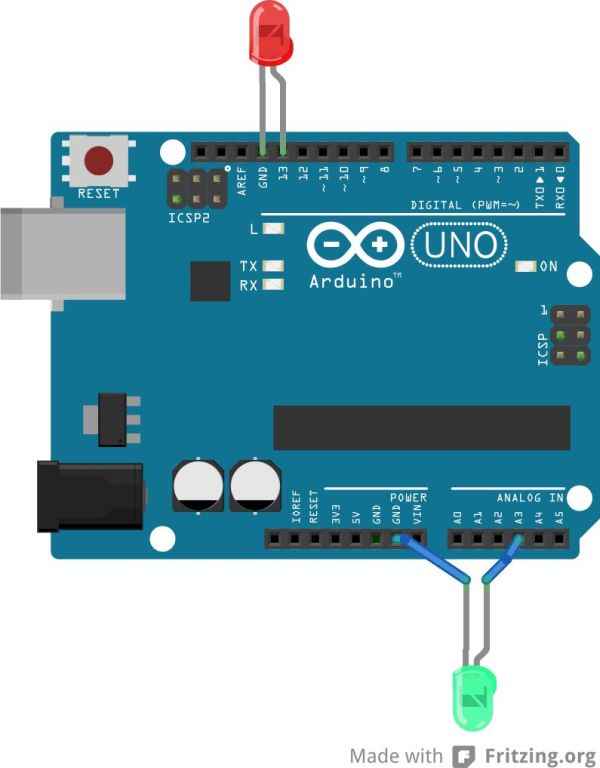
To set this project up, you just need to put the two LED’s in the Arduino.
- Put the LED that you want to use as the sensor with the long lead (this is the anode and positive lead) in pin analog 3 in the Arduino. This could also be an other analog pin, but then you need to change this in the sketch later on.
Put the other, short lead in the GND. - Put the other LED with the long lead in pin (digital) 13 in the Arduino. Put the short lead in the GND that is next to pin 13.
Now you just need to hook up the Arduino board with the computer and the fun can begin.
For more detail: Better LED as light sensor
- How does an LED work as a light sensor?
When light shines on an LED, it generates a small current that an Arduino can detect. - Which colors of LEDs work best for this project?
Green and red LEDs seem to work best according to the author. - Does the orientation of the LED leads matter for sensing?
Yes, you must put the long lead in the analog pin and the short lead in GND; reversing them will not work. - What happens when the sensor LED is darkened?
When the sensor LED is darkened, such as by covering it with a hand, the other connected LED turns on. - Can I use just one LED for this project?
Yes, you could use just one LED and use the SMD-LED on the Arduino board as the second LED. - Are any tools required to build this circuit?
No, you do not need any tools to set up this project. - Which digital pin should be used for the output LED?
The output LED should be placed with its long lead in digital pin 13. - Is this method tested in bright sunlight?
The sketch has not been fully tested in bright sunlight yet.
