The dryer in our house is in an out-of-the-way corner where it’s hard to hear the buzzer. When we miss it, the clothes sit in the dryer getting wrinkly, so we start the dryer again, don’t hear the buzzer again … it’s an endless cycle. After what seemed like the thousandth time, my wife quipped, “I wish the dryer could just tell us when it’s done.”

I had just started playing with Arduino, so I thought a Dryer Messenger would be a good first project. When I ran the idea by my wife, she was enthusiastic but didn’t want me disassembling the dryer or voiding its warranty, since it was only months old. We decided to use SMS since our phones are usually nearby. Fast-forward a week or two and the dryer was texting us like a household assistant. We haven’t forgotten a load of laundry since.
Downloadable Files
Step #1: Overview
- The Dryer Messenger consists of 3 main components: a current sensor, the Arduino Pro Mini, and a Wi-Fi module. The current sensor is clipped around a power wire on the back of the dryer where, by electromagnetic induction, it outputs a low current that’s a small fraction of the current from the dryer. A burden resistor is needed across the terminals of the sensor to obtain a voltage that can be sampled by the Arduino; the sensor I used has this burden resistor built in.
- Since the dryer runs on AC, current flows in both directions, causing the voltage to swing positive and negative. The Arduino can only sample positive voltages, so I used a voltage divider to bias the sensor’s output. The volt- age divider uses two 10K resistors (R1 and R2) to obtain 1.65V from the 3.3V supply.
- The current sensor has a fairly linear output up to 1V at 30A, which means the Arduino will read 0.65V or 2.65V when the sensor sees 30A. Capacitor C1 goes between the sensor and the Arduino to filter out noise.
- The Arduino monitors the dryer’s current consumption and sends notification messages when it has determined the dryer has finished a cycle.
- Since the Arduino Pro Mini has only one hardware serial port for both programming and debugging at 115,200 baud, I connected the Wi-Fi module to the Arduino digital pins and used the SoftwareSerial and WiFlySerial libraries to emulate a serial port and talk to the WiFly at 9,600 baud.
- The Wi-Fi module connects to the local wireless network and sends notifications as tweets using NeoCat’s Twitter Library for Arduino. The dryer has a Twitter account both my wife and I follow, and by activating mobile notifications for the dryer’s tweets we can receive its updates as text messages on our phones.
Step #2: Build the circuit.
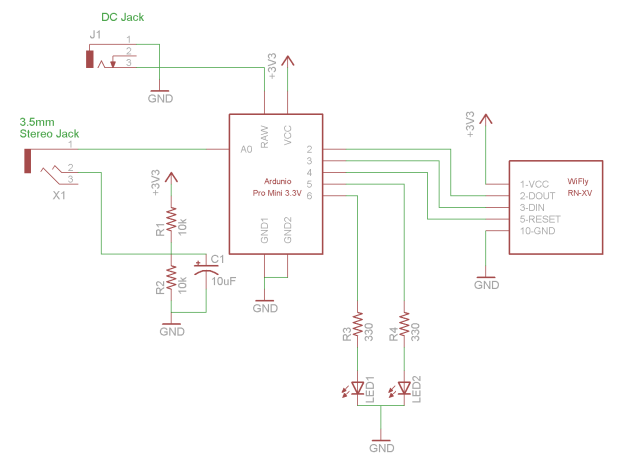
- Solder the circuit shown in the schematic diagram on a protoboard. LED1 is green, LED2 is red. My board had a copper pour on the back that I was able to use as a ground plane.
- Since the Wi-Fi module has 2mm headers, it can’t be directly mounted on the protoboard. Use the breakout board to adapt it to the protoboard’s 0.1″ grid. The image shows how I arranged the components on my protoboard.
- Plug the Wi-Fi module into the breakout board, and then mount the protoboard in your enclosure.
Materials and tools
- Non-invasive current sensor, 30a YHDC model SCT-013-030
- microcontroller, arduino Pro mini 328, 3.3V, 8mHz SparkFun Electronics #DEV-11114, sparkfun.com
- Wi-Fi module, Roving Networks WiFly RN-XV
- Breakout board for XBee module SparkFun #BOB-08276
- XBee sockets, 2mm, 10-pin (2) SparkFun #PRT-08272
- Protoboard
- enclosure Digi-Key #HM1068- ND, digikey.com
- Capacitor, 10μF
- Resistors: 330Ω (2), 10kΩ (2)
- Leds: green (1), red (1)
- Headers, 40-pin breakaway, 0.1″ spacing (2) SparkFun #PRT-00116
- stereo jack, 3.5mm SparkFun #PRT-08032 has pins with breadboard spacing.
- dC barrel jack, 5mm×2.1mm SparkFun #PRT-10811 has pins with breadboard spacing.
- Hookup wire
- Wall adapter, 9V 650ma
- Computer with arduino ide software free from arduino.cc
- FTdi programmer such as FTDI Friend, Maker Shed #MKAD22, makershed.com, or FTDI Basic Breakout 3.3V, SparkFun #DEV-09873
- soldering iron and solder
For more detail: The Dryer Messenger using Arduino