
Do you know the German music band Deichkind? Well, I am a big fan of them and have been to several concerts. As part of their stage shows this band wears tetrahedral hats, full of LEDs. Already at the first concert more than 10 years ago I knew I need such a hat!
Unfortunately I didn’t have the necessary knowledge to make such one. But about half a year ago, I discovered Arduinos, and so it began…
The hat is made of black, opaque and as well transparent plexiglass. I searched for useful pictures of the helmets in the web and tried to make it as as close to the original as possible.
Unfortunately I made less pictures while building the hat. So this instruction contains more drawings 🙂
For the power supply I used a 10.000mAh powerbank. The LEDs are WS2812b to get all imaginable colors. It is controlled by Arduino Nano with HC06 module and android app. Various programs can be played via the app. Everything is possible here. I will provide my arduino code as well as the android apk within the next weeks. But it is still uncommented and partly chaotic, because parts of it were simply copied from the web. As soon as it has a reasonable state, I will upload it here for your free disposal.
Step 1: Getting the Plexiglas Into Shape
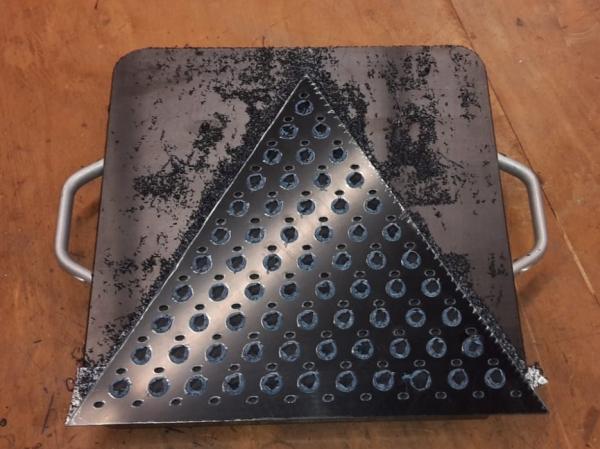
The helmet consists of three black plexiglass triangles, two of which must be provided with holes to see through and cutouts for the LEDs. I bought a plexiglass plate with the dimensions 850x370x2mm for it.I cut it with the cutter knife into the three equilateral triangles.Do the same with the transparent plexiglass/foil, same size.
Each of the black triangles I worked on the milling machine. Therefore I fixed the triangle with double-sided adhesive tape on the machine table. The edges of all three triangles were milled off to get a clean edge.
For two of the triangles, I milled the slotted holes for the LEDs (slotted holes because the LED is a square with 5x5mm) with a 5mm milling cutter and the circular pockets to see through. Because the plates are only attached to the machine table with adhesive tape, you should be careful not to mill into the table. Work your way down layer by layer.
If you do not have a milling machine, you can alternatively try a drilling machine by hand. But be very exact with the positioning of the holes of the LEDs, because the LEDs on the strip have exactly the distance of 3,33cm. Maybe I would use a drill bit that is 0.5mm thicker than the LED on your strip in the diagonal.
If you have ordered the plates ready cut, congratulations 🙂 Then this step is void. Money simplifies a lot 😉
Step 2: Mount the LED-stripes and Solder Them
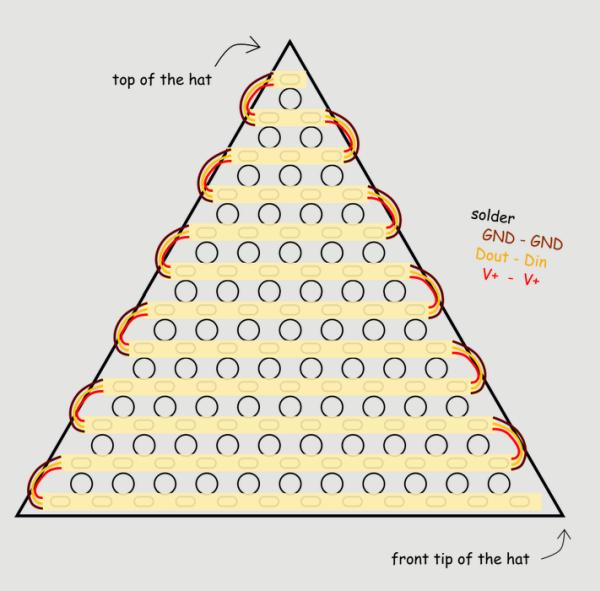
I arranged the LEDs in a row from bottom to topin an S-pattern, starting at the front tip of the hat. For this I cut 24 strips:
- 2x 12 LEDs
- 2x 11 LEDs
- 2x 10 LEDs
- …
- 2x 1 LED
You can cut the LED strips into single pieces without destroying them. Use scissors to cut at the designated places. Make sure to cut such that the entire soldering pad is exposed on both parts (because they are already so small to begin with).
When you have milled the plates, the LEDs on the strip should now fit neatly into the holes provided and already stick in them a little. Bottom row of the strips with 12 LEDs, above that with 11, etc.
If you have drilled the holes by hand, you can now see how exactly you have worked. You might have to make some corrections. To keep the LEDs in the plate and in place I would tape them with some tape. Just enough so that they won’t fall out. (Don’t worry, they’ll be glued later.)
Do that with both triangles full of holes.
Now the soldering part:
At the cuts of the LED strips are 3 contacts where you have to solder them together again. GND, 5V+ (or Vcc or similar depending on the version) and Din/Dout.
Now connect the stripes in an S-pattern; GND with GND, 5V+ with 5V+ and Dout with Din as shown in the drawing. Attention: Data out (Dout) must be connected with Data in (Din)!
This will take a time, because the contacts were pretty small and you have 132 soldering joints 🙂 Have fun!
When you finished – double check them! You don’t want to solder them again when they broke and your helmet ist already finished. Trust me.
Step 3: Assemble the Tetrahedral
Now we need the two triangles with the mounted LEDs on and the two transparent triangles. For the transparent triangles you can use another plexiglass plate, or a thick foil. I used a foil, because it is lighter then a plexiglass panel.
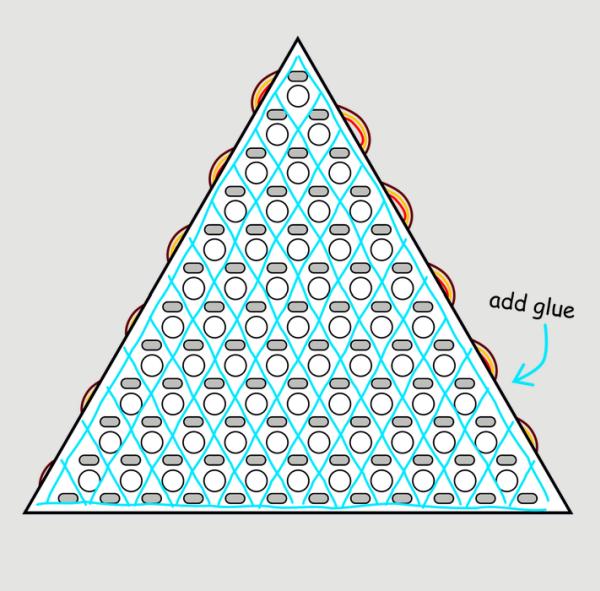
Take a underlay (carton), lay the the LED-triangles on it with the LEDs to the ground, and than put some liquid glue to it. Keep attention to make it in a regulary distance. Then, lay the transparent triangles on it and glue them together. Make sure you have no bubbles between the plates. If the liquid glue flows to the LED – perfect! Because then the LED is glued and fixed and will not fall out.
Tip: not every glue matches with every kind of plastics. Make a sample glue with some garbage pieces of the foil / plexiglass.
Depending to your glue, it takes now some time to dry. In my case, I covered the glued triangles with carton, weighted it and let it dry one night.
Afterwards, you have one plane black triangle without LEDs or transparent cover, and two black triangles with holes and LEDs in it, covered with the transparent plane. Now you need some painters tape, and a strong glue for plastics. Put the three triangles together as a tetrahedral. Keep attention to your soldered wires, bend them a little bit up. To keep every triangle in place, use the painters tape! When the taped tetrahedral is ready, add the plastic glue on the edges, outside an as good as possible inside. Let it dry.
Tip: If you want to make it more stable, take transparent package adhesive tape and tape the glued edges with it. The tape is nearly invisible if you worked accurately.
Then you have your Tetrahedral-LED-Hat. Time for light it up!
Step 4: The Microcontroler Part
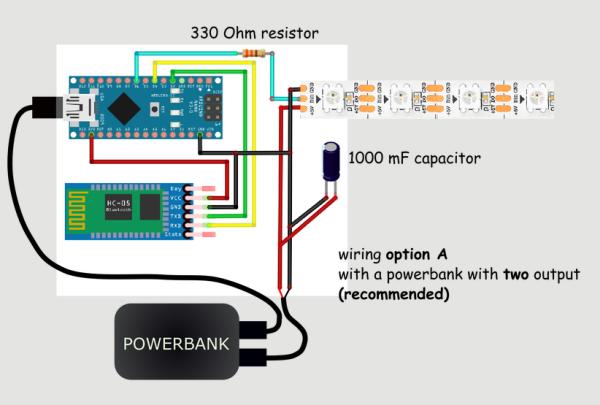
For controling the lights I took an Arduino Nano and for communication with the android App I decided to use the Bluetooth module HC06. There are two ways to supply the system with power, see the attached pictures.
Power Option A (recommended):
For this option you need a powerbank with two USB outputs, which can work simultaneously. To power up the arduino, just use a USB-A to mini-USB wire. The LEDs will be powered with the second USB wire. Take a USB wire you don’t need anymore and cut it off. Strip it off at the end, you will see four wires: A little stronger black and red, and two little thinner colored (mostly green and white) wires. We need the black and red, these are ground and V+. Connect the red V+ with the 5V+ of the LED stripe at the front tip of the hat (on both triangles). Connect the black ground to the GND of the LED stripe at the front tip of the hat (on both triangles) AND connect it to the GND of the Arduino.
This option is recommended as it allows the Arduino for controlling and the lights to have separate power supplies. This is not the case with option B, which may cause the Arduino to reset when all LEDs are turned on at once and the voltage drops.
Power Option B (not recommended):
This should be only your choice when you don’t want to use a powerbank with two outputs, because you still have a powerbank but it only has one output and you are to stingy to buy a new one with two outputs 😉
Proceed as described in option A, but connect the red wire from the USB wire not just with the LED stripe, but also with the Vin pin of the Arduino.
When you light up all LEDs at once, maybe the voltage drops too far, and the arduino will be reset. It will not be damaged, but it is not the best behaviour for your items.
Important: It’s very important NOT to connect a USB cable in this setup, because your Arduino board is already powered!
Data:
For telling the LEDs how they should behave, the Arduino musst send some data to the first Din pin of the LED strip in the front tip of the hat. It is important to use a PWM pin of the Arduino Nano. PWM pins at Arduino Nano are Pin no. 3, 5, 6, 9, 10, 11. In the attached picture you can see I used pin no. 6 for data transmission.
In total there are three wires, going to the front tip of the hat: GND and V+ for the LEDs, and the third is the data send from the Arduino. You can lay three seperate wires, or doing it like me and use the rest of the cut off USB wire. It already includes four wires (one of it could be ignored).
I soldered all components together instead of using plugged jumper wires, because the soldering is more stable.
If you have a 3D-printer, you can print a small case for your components which you can glue in the hat. I used a small box I already had at home with good dimensions for the electrical components. If you dont have a box or a printer… just use Gaffatape 🙂 Not kidding! Just wrap enough Gaffa around your electrical components and tape it inside your hat on the back triangle.Disadvantage: if a soldering gets broke… have fun to unwrap, find and solve the problem 😉
Coding:
As already mentioned, I will provide my source code of the arduino within the next few weeks. At the moment it is to chaotic to show it to someone 🙂
You can now start coding your App and your Arduino code for App communication and as well for the light shows.
For the android App I used the online MIT appinventor 2. To be honest, I
don’t like programming with building blocks, but for a small app like this one, this was the fastest way.
For the Arduino code, I suggest the FastLED.h library. It comes with a lot of useful functions, there are plenty of examples in the web, and the documentation for it is great.
Important: When you have chosen Option B as not recommended for powering up, then you always have to unplugg the power from the Powerbank when you connect the Arduino to your computer to write data on it.
It’s very important NOT to connect a USB cable in setup B the same time with the powerbank, because your Arduino board is already powered!
Step 5: Final Assembly
Powerbank:
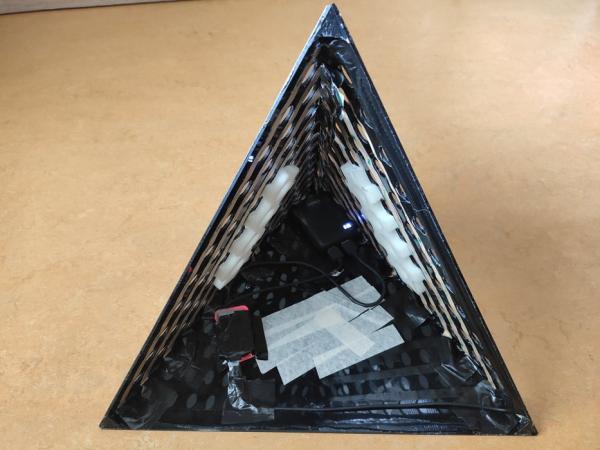
I myself bought the powerbank exclusively for this hat. Therefore I glued it into the helmet with the super plastic glue. If you don’t want to have the powerbank in your hat for the rest of your life, you can tape it with gaffatape on the back of the hat. I recommend the tip because your head doesn’t stick in that far and it’s out of the way up there. Keep attention that all outputs and inputs are still reachable!
Arduino:
If you already assembled it in a small box like I did, just glue or tape it on the back of the hat. Not right in the middle, because there should be your head later on. If you don’t have a box, just tape it somewhere near a edge.
Wires:
For fixing the wires on their place, I just used black Gaffatape. In my opinion, the easiest way.
Foam padding:
For making the wearing more comfortable, I decided to add foam on the LED triangles. I took scissors to cut holes in the foam and bring it in shape. Afterwards, it is just fixed by double sided adhesive tape (also cut in shape).
(The white tape at the back:)
When I wore the hat for the first time, I noticed that the back of the hat was slippery and the grip was not very good. I didn’t want to put some foam there too, because then the helm would be to tiny for my huge head 😉 So I decided to put some rough painter’s tape at the back of the hat. It works perfectly!
Source: Tetrahedral LED Hat (Deichkind Style) V1
