Summary of Study Better With a Smart Desk Lamp – IDC2018IOT
This article describes a smart desk lamp project designed to improve study habits and reduce sedentary behavior. The system uses sensors to detect sitting and motion, controlling LED lights and phone settings via an app. It features Pomodoro timers, ambient lighting, and interactive color changes based on sitting duration to encourage breaks.
Parts used in the Smart Desk Lamp:
- NodeMCU Board with Wifi connection
- Ultrasonic Sensor HC-SR04
- PIR Motion Sensor
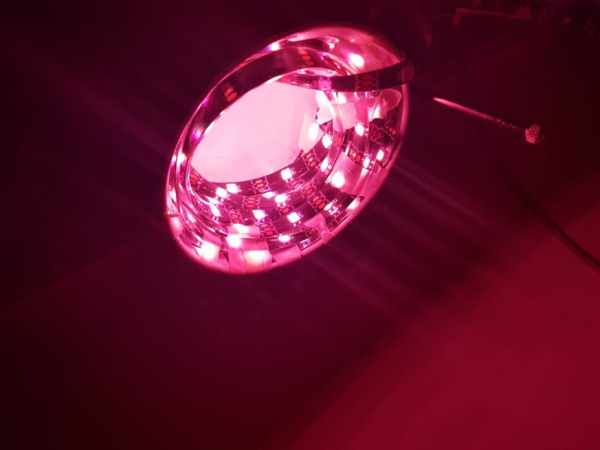
- 5m RGB LED Strip
- A desk lamp with a light bulb mount
- Blynk application
- IFTTT services
- External 5v power source (such as a mobile USB charger)
People in the western world spend a lot of time sitting. At the desk, driving around, watching TV and more. Sometimes, sitting too much can harm your body and harm your focusing abilities. Walking and standing up after a given time is crucial to perform better in life.
As students we spend a lot of time studying. Trying to come up with a cool project, we thought about the pains that we have in the studying process. We believed that there must be a better way to manage studying habbits in a nicer way than only through apps and notifications.
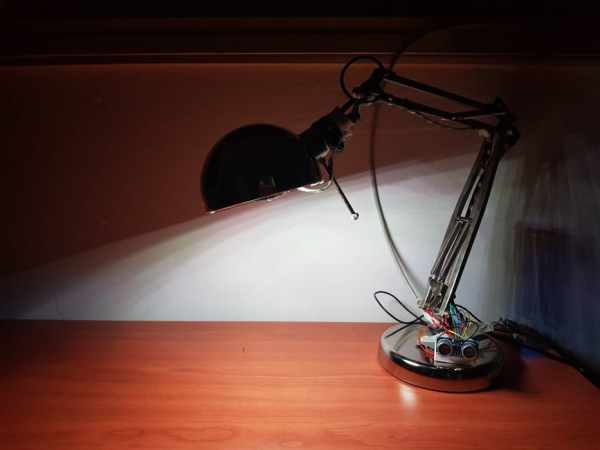
We came up with an idea of creating a smart desk lamp which could help you schedual your time, be aware of how much you’ve studied, and schedule your breaks. The smart lamp comes with colorful LED colors which change according to the state. Our lamp contains three option:
1. Pomodoro mode
The pomodoro technique is a productivity study technique for maximizing effiecieny while studying.
You can read more about the technique here
The user defines the length of the study and break time, with defaults of 25/5 minutes study/break time.
During study mode, the lamp will provide strong warm-white light and puts your phone on silence mode.
After the defined time has passed, the phone will be unmuted and the lamp will show red color which indicates that it is break time. We chose red because it’s not a peasant study light, encouraging you to stand up and leave your desk 🙂
2. Chill mode
The lamp is colored in a pleasant and comfortable light to create a nice ambient lighting.
3. Interactive timer lighting
The lamp starts at a starting color and changes color the longer you sit at your desk. This is a nice indication when people sit for 1-2 hours and more and dont want to time themselves with Pomodoro. It’s a nice and different alternative to looking at your watch 🙂
Additional Features
– Daily sitting time measurement
The app gives you the overall time you’ve spent at your desk
– Energy saving based on motion
A motion sensor detects movement, turning the lamp off after a given time of absence.
– Muting and unmuting your phone.
A feature to help you concentrate in pomodoro mode.
Challenges and limitations
When we can to think about the project, we found it very confusing to find an object or another means of conveying the message. We wanted to use lighting as a way of interaction, but weren’t sure as to where should we place it.
We though of creating a room lighting, maybe to mount the LED strip on the desk, but these options turned out to be a bit cheesy and ineffective. Additionaly, we thought of creating a cute figure or a pretty object to be the light feedback, but ended up using a desk lamp, which is quite logical decision 🙂
Another limitiatin the wiring. We are using a PIR sensor and an ultrasonic sensor, both are communicating via wires with the NodeMCU board. This creates a quite cumbersome look to the whole system. A future improvement is to create a case where the board and the ultrasonic sensors are already mounted in the lamp, and the PIR sensor communicates via Bluetooth, without having to strech a long cable up the wall.
The sytem is currently limited to supporting only Android users with muting an unmuting the phone, as Apple doesnt provide such a service via IFTTT.
Step 1: Components

Hardware
– NodeMCU Board with Wifi connection
Used as the main board for the system. We used this board as it has easy Wifi connection to be used with Blynk
We use the sensor to know whether you’re sitting at your desk. The sensor is aimed at the chair, so that when someone is sitting we can detect it by his distance from the sensor
The motion sensor is hung above the desk, to know whether someone is in the room. If no movement has been detected for X minutes, we turn off the LEDs to save energy
Used as a light source, taped inside the lamp head mount.
– A desk lamp with a light bulb mount
We need a lamp where the LED strip can be mounted inside. usually, old desk lamp that use light bulbs are a perfect fit.
UI
– Blynk application
Used as the controlling app for the system. Chosen for its ease of use and fast ramp up
Services
– IFTTT
Used to mute and unmute your phone with Webhooks and Android services.
Step 2: Connecting the Sensors
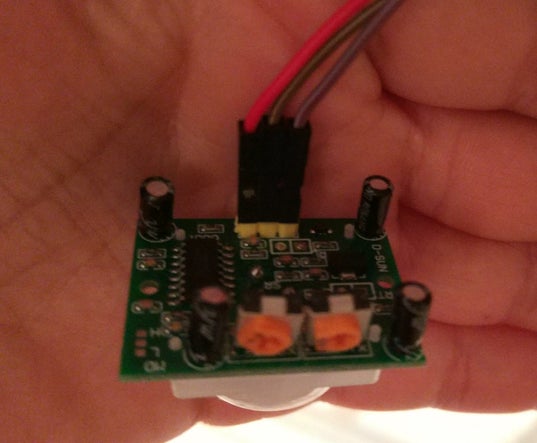
PIR Sensor
The three wires with female connectors.
Connect the PIR sensor to 5v VCC, ground and a middle wire as the data wire.
Connect the data wire to pin D5 in NodeMCU
Ultrasonic sensor
Connect the ultrasonic sensor to a small matrix and connect the left most pin to ground and right most pin to 5v vcc.
Connect the trigger pin to D1 and the echo pin to D2 in NodeMCU.
Step 3: Connecting the Led Strip
We took a 3 meters led strip.
First we need to connect the led strip wires. The led strip has two different connectors.
One goes to the ESP and one to external auxiliary power source.Take a 5v power source (a mobile USB charger is a great option). Solder the two Vcc and Ground wires to the external power source cable.
Connect to the board the data cable (the middle one) to pin D4. Then, connect the other ground wire to ground.
We remain with an unused power cable, that’s ok.
Next we need to elegantly wrap the LED strip inside using the glue the LED strips comes with originally. If needed you could tape it with an extra tape as we did.
Step 4: Mounting Everything Together
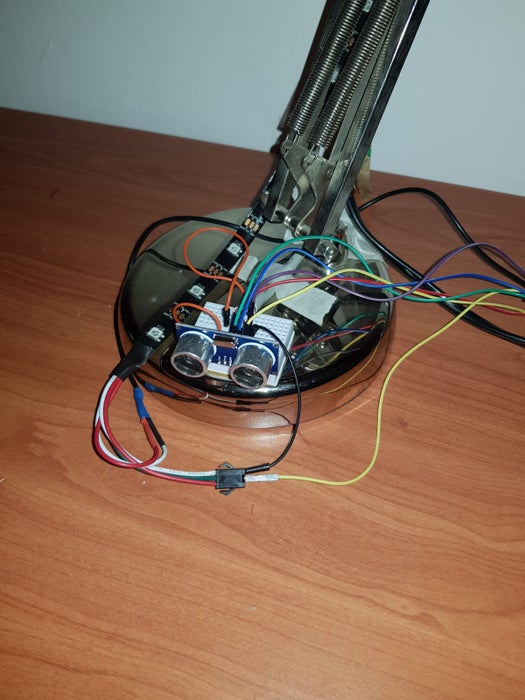
Place the PIR sensor so that it faces the whole room. If needed you could use an unused ethernet cable internal wires. We soldered the 3 cables going through the sensor to the Ethernet cable.
Set the ultrasonic sensor on the lamp so it faces the chair and could see if someone is sitting at the chair or not.
Connect the LED strip auxliary power.
Step 5: The Code
The Top level .ino file is final_project.ino
Open it with the Arduino editor, and the rest will open in different tabs, just make sure they are in the same folder.
Attached are also the arduino editor definitions.
Parameters you might want to change:
#define MAX_DISTANCE 80
The distance in cm between the sensor and the person sitting. Below this number the system will consider it sitting.
// Blynk Wifi and Auth Details
char auth[] = “2b183af4b6b742918d14ab766fbae229”;
char ssid[] = “NETWORK_NAME”; char pass[] = “PASSWORD”;
Source: Study Better With a Smart Desk Lamp – IDC2018IOT
- How does the lamp indicate break time?
The lamp shows red color after the defined study time passes to encourage standing up. - Can this system work with Apple devices?
No, the system is currently limited to Android users because Apple does not provide mute/unmute services via IFTTT. - What is the default study and break time in Pomodoro mode?
The default settings are 25 minutes for study time and 5 minutes for break time. - How does the system save energy when no one is present?
A PIR motion sensor detects movement and turns off the LEDs if no movement is detected for a set time. - What happens to the phone during study mode?
The phone is automatically put into silence mode to help the user concentrate. - Which application controls the system interface?
The Blynk application is used as the controlling app for the system due to its ease of use. - What color light is provided during study mode?
The lamp provides strong warm-white light during study mode. - How does the Interactive timer lighting work?
The lamp starts at a starting color and changes color the longer you sit at your desk to indicate time passed.