This is my first post on Instructable and I am super excited to share my knowledge!
My original robot post is here: Spryo SpoonTail which is just my robot showing some tricks but with a tethered control.
In this Instructable I am going to show you how to make a quadrapod of your own and using speech recognition via Bluetooth to control your bot.
Gotta thank Oddbot for introducing me to robotics and helping me on a lot of projects. I am gonna reference his Instructable in certain stages to make this one shorter (with his permission of course!).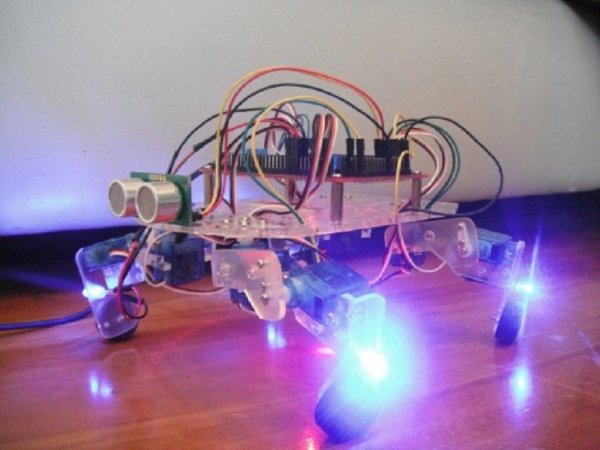
Step 1: Understanding The Project
This project is not simple, in fact if you haven’t worked with Arduino and python, this project would be quite challenging, but trust me the end product is completely worth it. Additionally, you will discover how simple and powerful both Arduino and python really are.
It is worth mentioning that the main reason I am making this Instructable is to show that remote control via Bluetooth using speech recognition is quite possible and ain’t that hard. Also if you already have a robot of your own or even an RC car you have hacked, you can use this tutorial just for the speech recognition – control part.
Acknowledgements:
Step 2: Getting Started
Hardware Required:
- Dagu Quadbot Chassis Kit
- Dagu Spider Controller
- Mini USB Cable
- Jumper wires (loads of em)
- Bluetooth Module HC-06
- Batteries (LiPo 7V-30V recommended)
- SRF05 Ultrasonic Sensor (optional)
- Bluetooth USB module (if your PC doesn’t come with an inbuilt Bluetooth, like in my case)
- LEDs (come on who doesn’t like LEDs on their projects, however it is optional)
Software Required:
- Arduino – programming the quadropod
- Python 3.4 – communication
- Eclipse or Geany – python interface
- Bitvoicer ($5) – speech recognition or Google Speech Recognition via python (free but involves more coding)
Skills Recommended:
- Arduino knowledge
- Python language
- Patience (a lot required)
Note: I am not advertising anything here, I am just linking you the products that I have used for my project, you are free to use tools/software/products of your liking or even make some on your own (think 3D printing).
Step 3: Chassis Assembly
If you choose to use your own robot like an RC car, teddy bear or even a home automation device, feel free to skip this step.
Remember Oddbot who I mentioned before? He’s basically my virtual mentor. What you are going to do now is follow steps 1 to 7 from his Instructable – Playful Puppy Robot or you could use this PDF Manual to assemble to chassis of the quadrapod.
That’s it for this step.
Step 4: Wiring
Lets connect the servos first, they go in like this:
- Front Left Hip servo – pin 46
- Front Right Hip servo – pin 52
- Rear Left Hip servo – pin 28
- Rear Right Hip servo – pin 13
- Front Left Knee servo – pin 47
- Front Right Knee servo – pin 53
- Rear Left Knee servo – pin 29
- Rear Right Knee servo – pin 12
Note: The servos can be connected to which ever pins you find convenient, you just have to change the code to correspond to that changed pin.
Then the HC-06 Bluetooth module (figure 4):
- GND – GND
- VCC – +5V
- TXD – RX0 / D0 (Signal)
- RXD – TX0 / D1 (Signal)
Figure 1: Shows the layout of the majestic DAGU Spider Board (note I drew the GND, 5V and Signal regions on the board for those of you who are slightly lazy to go through the manuals which I anyway really really recommend you to do).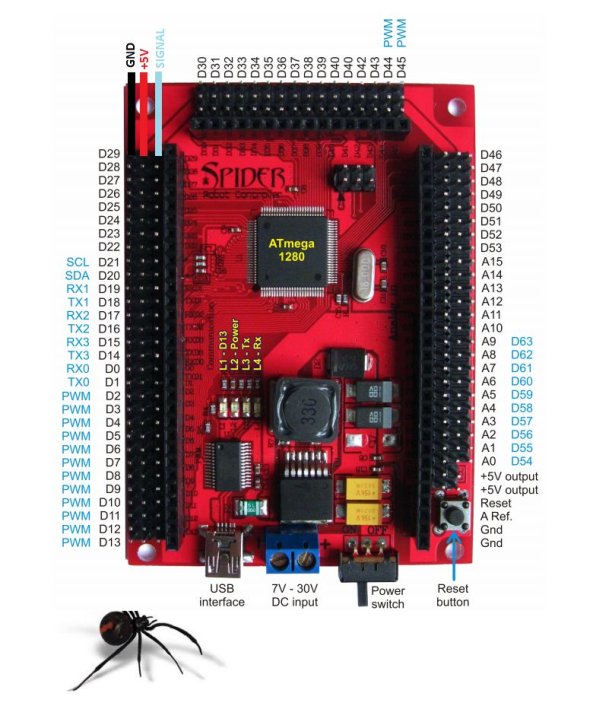
Figure 2: Shows the splendid HC 06 Bluetooth module which will be our “RC” for this project. For this specific project, we will only be using the module to receive messages.
Figure 3: Wiring of the HC 06 to an Arduino UNO (in cause you just want to test it with an UNO or similar board for your specific project).
Figure 4: Plugging the HC 06 module to the Spider Board (GND and VCC connections are upto you as long as they are in that same line).
Figure 5: What it should kind of look like with everything plugged it (don’t worry about the shinny two ‘eyes’ in the front part of my bot, its just for show, and the servo on the back is for controlling his tail but the tail broke 🙁 will fix it soon).
For more detail: Build A Speech Controlled Quadropod Using Arduino