Summary of soundie: a musical touch-sensitive light-up hoodie using Arduino
This tutorial guides users in creating a touch-sensitive hoodie that lights up and plays music based on conductivity. By using sewable electronics like the LilyPad Arduino, conductive thread, and iron-on fabric, the garment detects when hands complete a circuit on specific areas like arms or shoulders. The project emphasizes careful layout planning to avoid short circuits and ensure proper power delivery to the microcontroller.
Parts used in the Musical Touch-Sensitive Light-Up Hoodie:
- LilyPad Arduino main board
- LilyPad USB Link
- mini USB cable
- LilyPad power supply
- 12 LilyPad LEDs
- speaker
- 4-ply conductive thread
- conductive fabric
- digital multimeter
- piece of clothing (hoodie)
- needle
- fabric marker or chalk
- fabric glue
- scissors
- iron
- nail polish
This tutorial will show you how to create a garment that changes its behavior depending on how conductive you are. It detects conductivity through iron-on conductive fabric that we will use, and it will light up and sing different notes depending on how you touch the conductive fabric. We’ll be using sewable electronics (the LilyPad arduino module) and conductive threads and fabrics so that your garment will be soft and washable.
Step 2: Design and layout
Plan the layout of your garment.
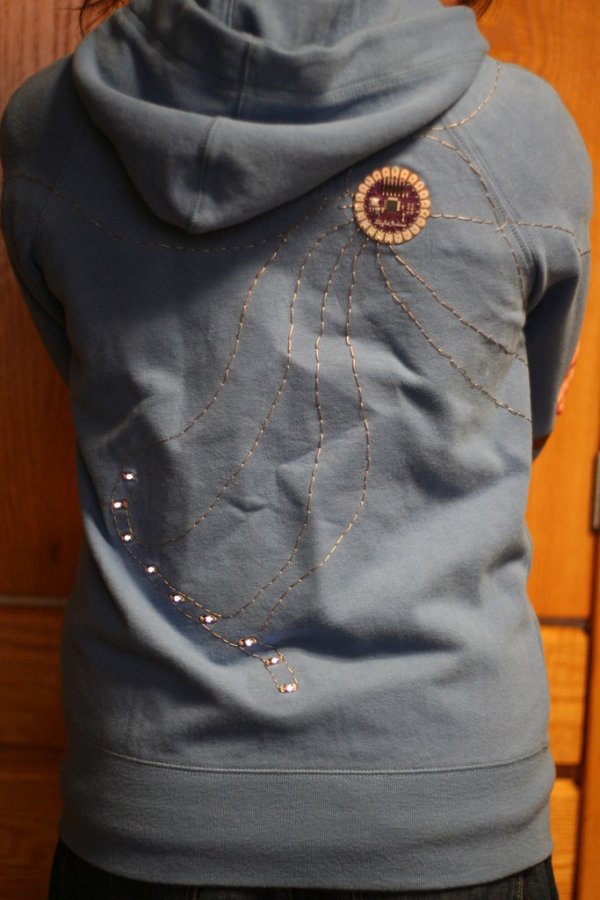
When you place your hands on the conductive fabric of your garment, the program will detect that the circuit has been completed, and the LEDs and speaker will turn on. I laid out the conductive fabric on my hoodie in convenient places (arms, elbows, shoulder) that my hands might rest into naturally, so that placing my hands to complete the circuit does not cause strain.
Lay out what you want your garment to look like, and make a sketch (I’ve included mine below). Try not to plan too many overlapping conductive thread traces – the more overlaps you have, the more potential shorts you’ll encounter in the circuit. In my sketch, I’ve circled every spot where there’s an overlap with a blue pen.
Be sure to keep your power supply close to your LilyPad main board.
Conductive thread has nontrivial resistance. Leah Buechley has a nice explanation of what this does to the voltage at your LilyPad here. The general idea is that more resistance (that is, longer lengths of conductive thread) between your LilyPad and its power supply results in a lower voltage at your LilyPad. If the voltage is too low (generally below 3.3 V for the LilyPad), the LilyPad doesn’t get enough power and stops working.
In my design, the power supply and the LilyPad are actually too far away from each other. We will see how to remedy this in the next step.
Locate your power supply.
Consider where you want to place your power supply. The power supply is the heaviest and bulkiest piece of everything you’ll be placing onto your garment, so it’s nice to place the power supply somewhere that is unobtrusive and not delicate. For instance, you wouldn’t want to put it in the crook of your elbow, because then you wouldn’t be able to bend your arm. I placed it near my lapel, so that it’s both out of the way and at a spot with sturdy fabric.
For a larger image of my sketches below, click for the front and the back.
Step 3: Transfer your sketch to the garment
Mark up your garment.
Use double-sided tape (or roll single-sided tape back onto itself to create an essentially double-sided tape) to attach your LilyPad pieces to the garment where the sketch says they should be. Be aware of what directions the + and – parts of the pieces should be facing (especially the LEDs – otherwise they won’t work!).
Then use chalk or fabric pencils to transfer your sketch to your garment. Be sure to be precise about how your lines look – you’ll be sewing over these same lines later on (it’s hard to change the path while you’re sewing). Also, make sure you match the lines to the holes on the LilyPad pieces – you’ll be sewing through those holes later on.
Next, cut out the shapes you want for your conductive fabric. Tape or pin the conductive fabric pieces to your garment. We’ll be ironing these on in the next step.
I often find it helpful to attach tape to spots where your traces overlap, so that you remember not to actually overlap the conductive threads. There’ll be more instructions on what to do at overlap junctions later in the tutorial in step 7.
Supplies
You will need:
— LilyPad Arduino main board
— LilyPad USB Link
— mini USB cable
— LilyPad power supply
— 12 LilyPad LEDs
— speaker
— a spool of 4-ply conductive thread
— conductive fabric
— a digital multimeter
— a piece of clothing (I used a hoodie)
— a needle
— a fabric marker or piece of chalk, a bottle of fabric glue
(Available at your local fabric shop or Joann Stores.)
— a pair of scissors
— an iron
— nail polish
For more detail: soundie: a musical touch-sensitive light-up hoodie using Arduino
- How does the garment detect conductivity?
The program detects conductivity when you place your hands on the conductive fabric, completing the circuit. - What happens when the circuit is completed?
The LEDs light up and the speaker sings different notes. - Can the garment be washed?
Yes, using sewable electronics and conductive threads ensures the garment remains soft and washable. - Where should I place the power supply?
Place the power supply in an unobtrusive spot with sturdy fabric, such as near the lapel, rather than delicate areas like the crook of the elbow. - Why must the power supply be close to the LilyPad main board?
Conductive thread has resistance, and longer lengths between the board and power supply can drop voltage below 3.3 V, causing the LilyPad to stop working. - What should I do about overlapping conductive thread traces?
You should try not to plan too many overlaps to avoid potential shorts, and use tape to mark spots where traces overlap so you remember not to actually overlap the threads. - How do I transfer the sketch to the garment?
Use double-sided tape to attach pieces and chalk or fabric pencils to transfer the sketch precisely, matching lines to the holes on the LilyPad pieces. - Which tools are needed to prepare the conductive fabric?
You need an iron to iron on the conductive fabric and scissors to cut out the desired shapes.