Summary of Solar Powered WiFi Weather Station V2.0
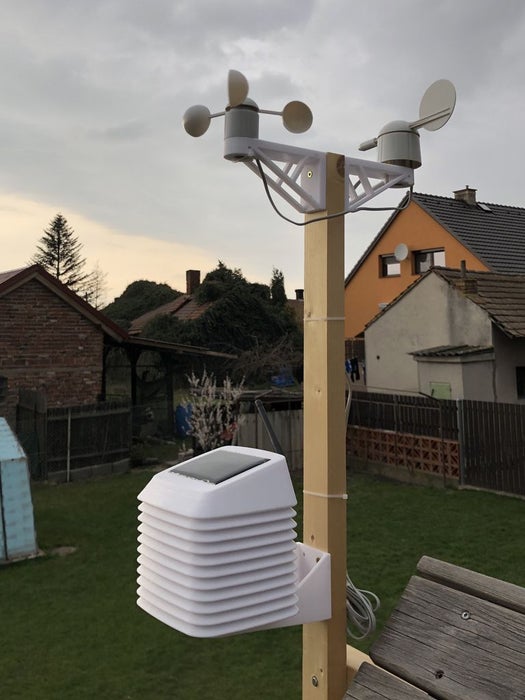
This article details a solar-powered WiFi weather station V2.0, an upgraded version of a previous project featuring a custom PCB for easy assembly. It monitors temperature, pressure, humidity, altitude, and UV levels while uploading data to Blynk and ThingSpeak. The system runs independently using a 18650 battery charged by a solar panel, making it ideal for remote locations.
Parts used in the Weather Station V2.0:
- Wemos D1 Mini Pro
- TP4056 Charging Board
- BME280 Sensor
- BMP280 Sensor
- DS18B20 Sensor
- Switch
- Screw Terminals
- PCB Standoffs
- 18650 Battery
- 18650 Battery Holder
- Solar Panel
- Straight Headers Pin
- 22 AWG Wire
- Weather Station V2.0 PCB
- Super Glue
- 3D Printing Filament PLA
- GY-1145 Sensor (Optional)
- HDC1080 Sensor (Optional)
This Instructable is a continuation of my earlier weather station project. It was quite popular on the web, people around the globe made their own by following it and given valuable feedback for improvement. By taking consideration of the comments and Q&A section of my earlier project, I decided to make this new version Weather Station. I also made a custom PCB for this project, so anyone with little knowledge on electronics circuit can be made this project. My V-2.0 PCB can also be used for any application in the Arduino platform. Following are the salient features of the new weather station.
This project is also an entry in Hackaday Prize 2019. Please like, follow and share. It will be helpful to me.
Features:
1. Connect to Wi-Fi, and upload the data to the web ( Blynk App and Thingspeak)
2. Monitoring Weather parameters like Temperature, Pressure, Humidity, altitude and UV level, etc.
3. Extra ports to add more sensors
4. Remote Battery Status Monitoring
5. Uses a powerful Li-Ion Battery ( 3400 mAh ) and Solar Panel (1W)
6. Independence from the external power source
7.Can be installed in remote sites or geographically challenging environments
8. Being Solar powered, it is an environment-friendly device.
Step 1: Components and Tools Required
Update 05.08.2019
Now you can buy the PCB and all the components in a single Kit from PCBway.
Note:Battery and 3D printed enclosure is not included in the kit
Components Used :
1. Wemos D1 Mini Pro (Banggood / Amazon )
2. TP 4056 Charging Board (Banggood / Amazon )
3. BME 280 sensor ( Amazon / Bangood )
4. BMP280 ( Banggood / Amazon )
5. DS18B20 Sensor ( Banggood / Amazon )
6. Switch ( Banggood / Amazon)
7. Screw Terminals ( Banggood)
8. PCB standoffs ( Banggood / Amazon )
9. 18650 Battery ( Aliexpress)
10.18650 Battery Holder ( Banggood / Amazon)
11. Solar Panel ( Banggood )
12. Straight Headers Pin ( Banggood / Amazon )
13. 22 AWG wire ( Banggood / Amazon )
14. Weather Station V2.0 PCB ( PCBWay )
15. Super Glue ( Amazon )
16. 3D printing filament -PLA ( GearBest )
Tools Used :
1. 3D Printer ( Creality CR-10S)
2. Soldering Iron ( Amazon )
3. Glue Gun ( Amazon )
4. Wire Stripper ( Amazon )
5. Wire Cutter ( Amazon )
Step 2: Power Supply
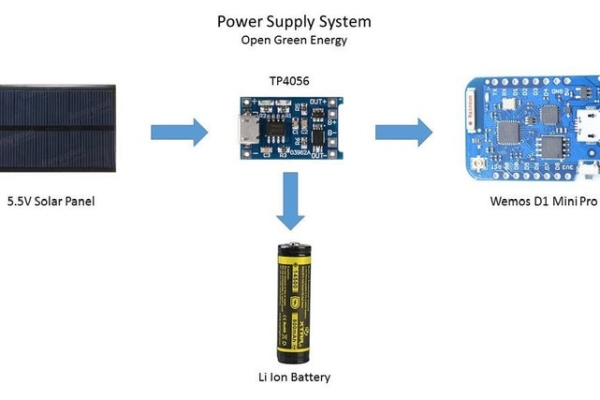
My plan is to deploy the Weather station at a remote place ( my farmhouse).To run the Weather Station continuously, there must be a continuous power supply otherwise the system will not work. The best way to provide continuous power to the circuit is by using a battery. But after some days the battery juice will run out, and it is a really difficult job to go there and charge it. So a solar charging circuit was proposed to user free energy from the sun to charge the batteries and to power the Wemos board. I have used a 18650 Li-Ion battery.
The battery is charged from a Solar panel through a TP4056 charging module. The TP4056 module comes with battery protection chip or without the protection chip. I will recommend buying a module which has a battery protection chip included.
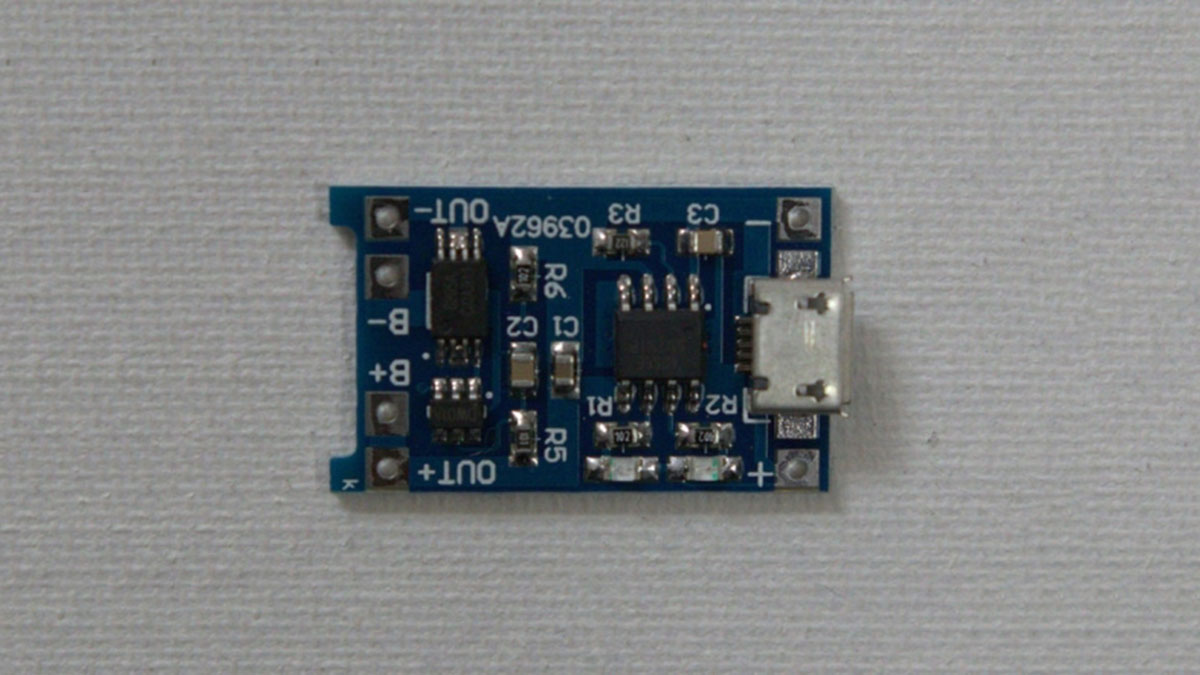
About the TP4056 Battery Charger
The TP4056 module is perfect for charging single cell 3.7V 1 Ah or higher LiPo cells. Based around the TP4056 charger IC and DW01 battery protection IC this module will offer 1000 mA charge current then cut off when charging is finished. Furthermore, when the battery voltage drops below 2.4V the protection IC will cut off the load to protect the cell from under voltage. It also protects against overvoltage and reverse polarity connection.
Step 3: Monitoring Temperature and Humidity by BMP/E280
In the earlier days, weather parameters like ambient temperature, humidity, and barometric pressure were measured with separate analog instruments: thermometer, hygrometer, and barometer. But today the market is flooded with cheap and efficient digital sensors that can be used to measure a variety of environmental parameters. The best examples are sensors like DHT11, DHT 22, BMP180, BMP/E280, etc.
In this project, we will use BMP280 / BME280 sensor.
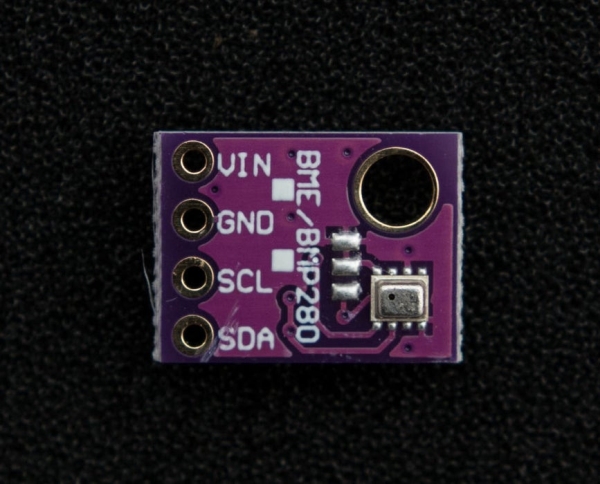
BMP 280 :
BMP280 is a sophisticated sensor that very accurately measures barometric pressure and temperature with reasonable accuracy. The BME280 is the next-generation of sensors from Bosch and is the upgrade to the BMP085/BMP180/BMP183 – with a low altitude noise of 0.25m and the same fast conversion time. The advantage of this sensor is that it can use either I2C or SPI for communication with the microcontroller. For simple easy wiring, I will suggest buying the I2C version board.
BME280 :
The new BME280 sensor, an environmental sensor with temperature, barometric pressure, and humidity. The BME280 is the next-generation of sensors from Bosch and is the upgrade to the BMP280. This precision sensor from Bosch is the best low-cost sensing solution for measuring humidity with ±3% accuracy, barometric pressure with ±1 hPa absolute accuracy, and temperature with ±1.0°C accuracy. It can be used in both I2C and SPI.
Note: BME280 can measure humidity but BMP280 can’t. In the market, BMP280 is also available by the name of BME280. So be sure whether it is a BMP280 or BME280.
Step 4: Additional Ports for More Sensors
The Weather Station V2.0 board have 5 additional ports to hook up more weather sensors. The following additional sensors can easily be hooked up :
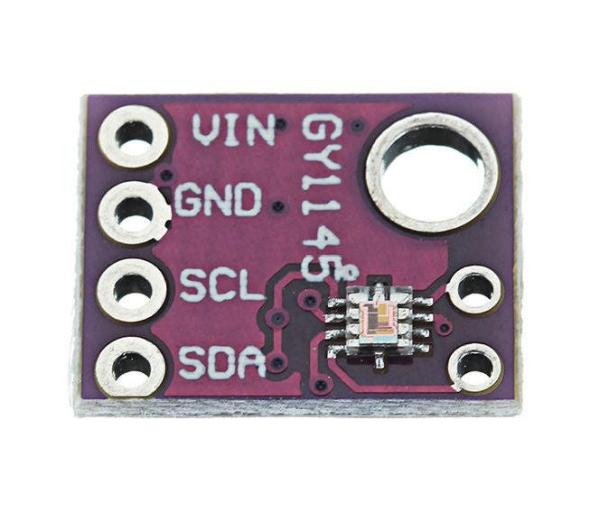
1. GY-1145 Sensor: for measuring UV Index
The SI1145 is a sensor with a calibrated UV sensing element that can calculate the UV Index. It can communicate via I2C communication (address 0x60). You can hook up this sensor with I2C port in the board which is located just side to the power switch.
You can read this article to know more about this sensor.
You can buy this sensor from Banggood.
2. HDC1080: for measuring temperature and humidity
The HDC1080 is a digital humidity sensor with an integrated temperature sensor that provides excellent measurement accuracy at very low power. It can also communicate via I2C communication.
You can read this article to know more about this sensor.
You can buy this sensor from Banggood.
3. DS18B20: for measuring temperature
It can measure temperature with a minimal amount of hardware and wiring. These sensors use a digital protocol to send accurate temperature readings directly to your development board without the need of an analog to digital converter or other extra hardware. It uses a one-wire protocol to communicate with the microcontroller. It can be hooked up in port-P2 in the board which is located on the right side of the Wemos board.
You can read this article to know more about this sensor.
Step 5: Using an External Antenna ( 3dBi )
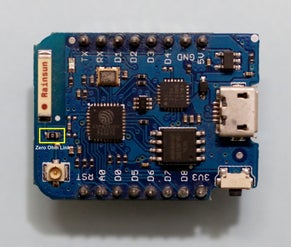
The Wemos D1 mini Pro board have an inbuilt ceramic antenna along with provision for connecting an external antenna to improve the range. Before using the external antenna, you have to reroute the antenna signal from the built-in ceramic antenna, to the external socket. This can be done by rotating the small surface mount (0603) Zero Ohm resistor (sometimes called a link).
You can see the above picture, how I have done this.
You can also watch this video made by Alex Eamesto to rotate the zero ohm resistor. Then snap the antenna SMA connector into the Wemos Pro mini antenna slot.
Step 6: Monitoring Battery Voltage
The weather station is run by a 18650 Li-Ion battery, so it is very important to monitor its status. The max voltage input to the Wemos board is around 3.2~3.3V but a fully charged 18650 battery voltage is 4.2V. So to measure this voltage we have to step down the voltage by using a voltage divider network.
The Wemos D1 mini already has an internal voltage divider that connects the A0 pin to the ADC of the ESP8266 chip. The voltage divider is made up of 220k (R1) and 100k (R2). So, we have to add an external resistance with the inbuilt 220k resistor to read the battery voltage. By using a 100k resistance we can measure the max voltage of the battery, but taking some margin, a 220k resistor is selected. It is named R1 on the PCB board and located just above the battery holder.
To select the voltage divider resistance values, you can use this online calculator.
You can also read this article on battery voltage monitoring.
Source: Solar Powered WiFi Weather Station V2.0
- How does the weather station handle power supply?
It uses a 18650 Li-Ion battery charged via a TP4056 module connected to a 1W solar panel. - What is the difference between BMP280 and BME280 sensors?
The BME280 can measure humidity in addition to temperature and pressure, whereas the BMP280 cannot. - Can I add more sensors to this project?
Yes, the V2.0 PCB includes five additional ports for extra sensors like GY-1145 or HDC1080. - Does the Wemos board support an external antenna?
Yes, you can connect a 3dBi external antenna by rotating a zero ohm resistor on the board. - How is the battery voltage monitored?
A voltage divider network with a 220k resistor is added to the internal divider to step down the 4.2V battery voltage. - Where can I purchase the components for this kit?
Components and the PCB are available as a kit from PCBWay, though batteries and enclosures are not included. - Which platforms can receive the uploaded weather data?
Data is uploaded to the web via the Blynk App and ThingSpeak. - Is this device suitable for remote installation?
Yes, its solar power independence allows it to be installed in geographically challenging environments.