Summary of SMOKING HALLOWEEN PUMPKIN USING ARDUINO AND IC 555
This tutorial shows how to make an automated smoking Halloween pumpkin using an Arduino, IR motion detection, a 555-based mist maker, neopixel LEDs, and a relay. When motion is detected, LEDs and a relay-controlled piezo mist generator create fog and lighting effects inside a pumpkin or 3D-printed enclosure for a spooky effect.
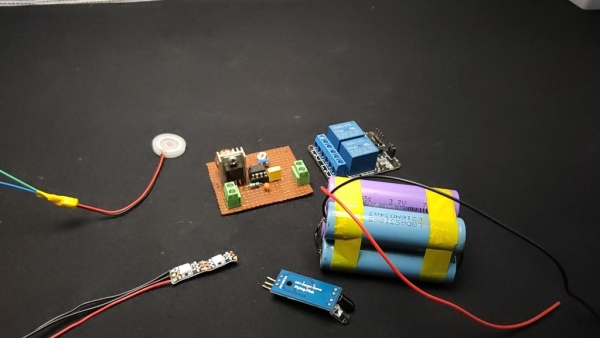
Parts used in the Smoking Halloween Pumpkin:
- Arduino (1)
- Mist maker using 555 circuit or bought mist maker
- Relay module (1)
- IR module (1)
- Neopixel LEDs (2)
- 3D printed pumpkin enclosure or real pumpkin
- Battery (for mist maker power)
- Piezoelectric disc (for mist maker)
- NE555 IC
- 220 µH inductor
- IRFZ44 MOSFET
- 10 nF capacitor
- 2 × 100 nF capacitors
- 10 ohm resistor
- 5 kΩ variable resistor
Lots of people celebrate Halloween by making pumpkin sculptures most of them only just carve a scary looking face from the pumpkin and place. in this tutorial, I am showing how to give a more awesome effect to your pumpkins. here I added human/obstacle detection, smoke and lights. let’s scare them all

Step 1: Components Needed for Making
- Arduino *1
- mist maker using 555( or you can buy)
- relay module*1
- IR module*1
- neopixel led*2
- 3D printed pumpkin enclosure
- battery
Step 2: The 555 Mist Maker Circuit
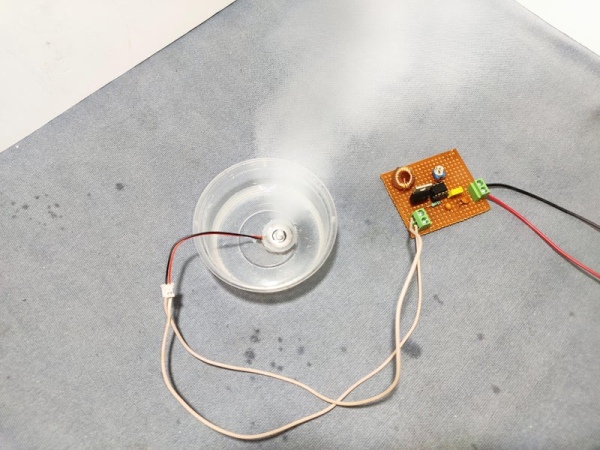
The main component of a mist maker is a piezoelectric disc the working of the piezo is very simple. Every piezo has its own resonance frequency In our case that is 113kz. So if we apply a 113kz signal With suitable voltage piezo disc will start to vibrate with a 113kz frequency. If we place the piezo on top of a water surface the water will also start to vibrate. mist or fog will form due to the high vibration of water+air
component needed for making mist maker
- Piezoelectric disc
- NE555
- 220uH inductor
- IRF Z44 MOSFET
- 10nf capacitor
- 2*100nf capacitors
- 10ohm resistor
- 5k variable resistor
you can check the mist maker tutorial from this Instructables
Step 3: Circuit Diagram of Smoking Pumpkin
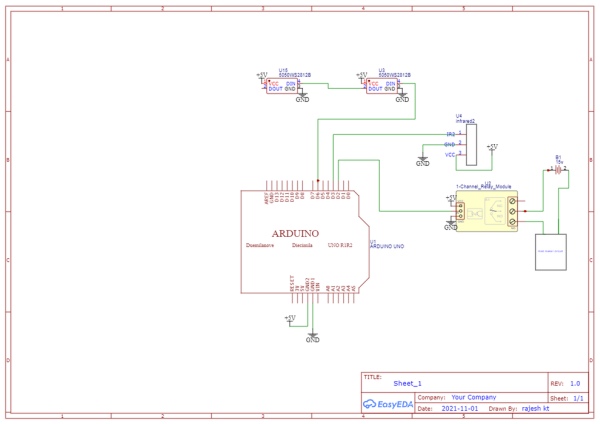
this is the circuit diagram here I used an IR module to detect the obstacle/motion. I connected 2 neopixel LEDs to Arduino and a relay. then the mist maker power supply I connected via relay.
Step 4: Building the Cicuit

first I connected wires to their module then I connected the ground and VCC of IR module to Neopixel VCC and ground. Next, I connected the common positive to 5v and common ground to the ground of Arduino, I connected IR output to pin 3 of Arduino and neopixel data into pin 6. Finally, I connected the ground and VCC of the relay module to Arduino and relay input to pin 2.Now let’s set up the mist maker I connected the battery through the relay module
Step 5: Arduino Programming of Smoking Pumpkin
the code is very simple first i included the fastled library for controll the neopixel leds and then i defined the led pin, total number of led etc.
#include
#define NUM_LEDS 2
#define DATA_PIN 6
#define CLOCK_PIN 13
CRGB leds[NUM_LEDS];
in the setup section i defined the pins and leds
void setup()
{
pinMode (3,INPUT);
pinMode (2,OUTPUT);
FastLED.addLeds(leds, NUM_LEDS);
}
in the loop section first I read the state of the IR module and stored it in x. then I gave if condition according to it state.
void loop()
{
int x=digitalRead(3);
if (x==0)
{
digitalWrite(2,LOW);
leds[0] = CRGB::Red;
FastLED.show();
delay(500); leds[1] = CRGB::Red;
FastLED.show();
delay(500);
leds[0] = CRGB::Black;
FastLED.show();
delay(500);
leds[1] = CRGB::Black;
FastLED.show();
delay(500);
}
else
{
digitalWrite(2,HIGH);
}
}
you can download the code from here
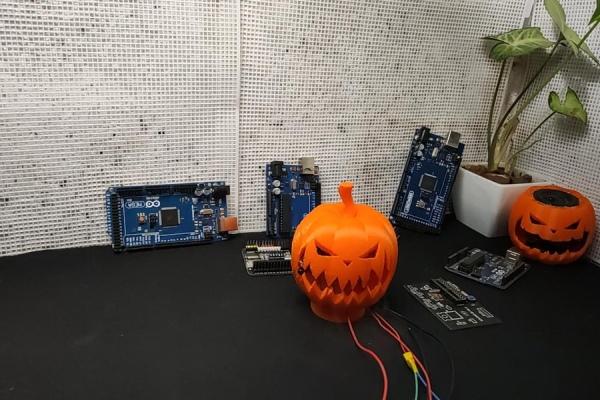
Step 6: The Pumpkin Enclosure
you can either use normal pumpkin or you can download the .st file from here and 3D print that. if you are going with the second option then use orange colour filament.
Step 7: Finishing
finally, insert and fix the IR module and neopixel LEDs inside the pumpkin enclosure . after that I placed piezo on the surface of some water and finally I placed the pumpkin on the top of the water. you can refer to the video If you have any doubt.
Step 8: Tutorial Video
Source: SMOKING HALLOWEEN PUMPKIN USING ARDUINO AND IC 555
- What components are needed to build the smoking pumpkin?
Arduino, mist maker using 555 or purchased mist maker, relay module, IR module, 2 neopixel LEDs, 3D printed pumpkin enclosure or real pumpkin, battery, and the listed mist maker components. - How does the mist maker work?
The piezoelectric disc vibrates at its resonance frequency (113 kHz) when driven, causing water at the surface to vibrate and form mist. - Can I use a purchased mist maker instead of building the 555 circuit?
Yes, the tutorial states you can buy a mist maker instead of making the 555-based one. - How is motion detected for triggering the effects?
An IR module is used to detect obstacles or motion and its output is read by the Arduino. - Which Arduino pins are used for the IR module, relay, and neopixel data?
IR output is connected to pin 3, relay input to pin 2, and neopixel data to pin 6 on the Arduino. - How many neopixel LEDs are used and how are they controlled?
Two neopixel LEDs are used and controlled using the FastLED library in the Arduino code. - What does the Arduino code do when motion is detected?
The code reads the IR module; if detected (x==0) it flashes the two LEDs red in sequence and keeps the relay off; otherwise it sets the relay high. - How is the mist maker powered in the assembled circuit?
The mist maker power supply is connected through the relay module so the relay controls its power. - How should the piezo be placed to produce mist?
Place the piezo disc on the surface of some water so the vibration creates mist. - Can I 3D print the pumpkin enclosure?
Yes, you can download the provided .stl file and 3D print the pumpkin enclosure, preferably in orange filament.