
Summary of Small Arduino DMX controller
This article shows how to build a compact Arduino-based DMX512 controller (six analog channels plus 12 pushbutton binary channels) to operate a smoke machine or for testing. It uses inexpensive parts, an Arduino (Uno/Mega/Nano with minor changes), potentiometers, pushbuttons with internal pullups, and the Arduino four universes DMX 512 library. The code reads six analog inputs (10-bit scaled to 8-bit) and multiple digital inputs to populate DMX channels. Known issues and tips include selecting the correct board, Nano USART limits, and reinstalling the DMX shield after programming.
Parts used in the Small Arduino DMX controller:
- Arduino board (Uno, Mega, Nano or similar)
- DMX shield
- Potentiometers (6)
- Pushbuttons (up to 12)
- Wiring/jumper cables
- Power supply for Arduino and DMX
- Computer with Arduino IDE
- Arduino four universes DMX 512 library (lib_dmx)
- Fritzing for wiring sketches (optional)
In this article, we demonstrate how to create a compact and practical Arduino DMX512 controller that can be used to operate a smoke machine with DMX or for testing purposes.
Arduino Mega, Arduino UNO, and other similar devices can be utilized with minor modifications.
Only a few cheap components are utilized.
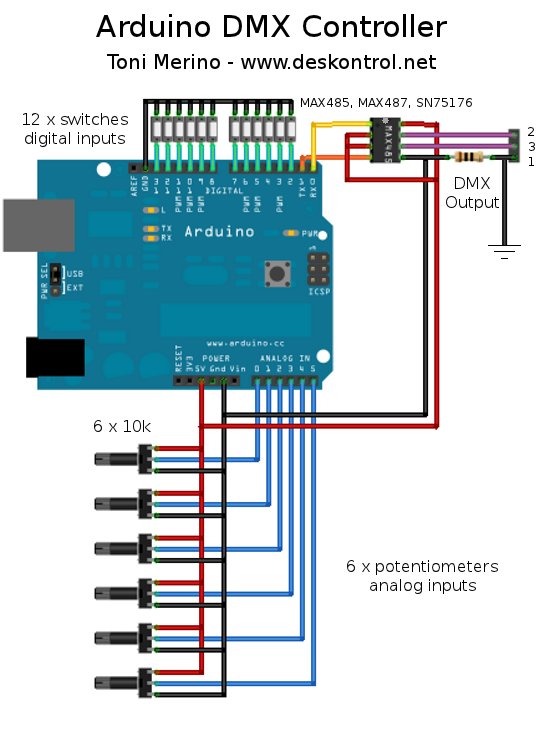
The setup includes 6 channels with adjustable values from potentiometers connected to Arduino analog inputs, where 10-bit values are converted to 8 bits (0-255 for DMX). Additionally, there are 12 channels with binary values controlled by push buttons connected to Arduino digital inputs, utilizing internal pullup resistors to read input states. When a button is pressed, the input value is 0; when not pressed, the input value is 1.
You need dowload and install our Arduino four universes DMX 512 library
Download project and source code Small Arduino DMX controller
Issues that are currently recognized:
When we compile, we encounter the error: ‘ArduinoDmxN’ was not defined in this scope.
Verify if the correct board type is selected in the Arduino IDE under the menu tools > board.
Using Arduino nano restricts the use of only one USART, which is ArduinoDmx0 or USART0.
Mistakes encountered during Arduino programming:
It will be required to uninstall the DMX shield, and then reinstall it after programming.
The images below show the wiring.
Pictures and sketches created using Fritzing software found at www.fritzing.org
Code example for testing the function:
|
1
2
3
4
5
6
7
8
9
10
11
12
13
14
15
16
17
18
19
20
21
22
23
24
25
26
27
28
29
30
31
32
33
34
35
36
37
38
39
40
41
42
43
44
45
46
47
48
49
50
51
52
53
54
55
56
57
58
59
60
61
62
63
64
65
66
67
68
69
70
71
72
73
74
75
76
77
78
79
|
//*********************************************************************************************************#include <lib_dmx.h> // libreria DMX 4 universos // four universes DMX library - www.deskontrol.net/blog//*********************************************************************************************************// New DMX modes *** EXPERIMENTAL ***//*********************************************************************************************************#define DMX512 (0) // (250 kbaud - 2 to 512 channels) Standard USITT DMX-512#define DMX1024 (1) // (500 kbaud - 2 to 1024 channels) Completely non standard - TESTED ok#define DMX2048 (2) // (1000 kbaud - 2 to 2048 channels) called by manufacturers DMX1000K, DMX 4x or DMX 1M ???void setup() { // configurar pines arduino del 2 al 13 como entradas con pullup, (cuando se pulsa el boton = 0 si no = 1) // configure arduino pins 2 to 13 as inputs with pullup, (button pressed = 0, button free = 1) for (int i=2;i<=13;i++) { pinMode(i,INPUT); // pines como entradas // pins as inputs digitalWrite(i, HIGH); // activar resistencias pullup internas // turn on pullup internal resistors } ArduinoDmx0.set_tx_address(1); // poner aqui la direccion de inicio de DMX // put here DMX start address ArduinoDmx0.set_tx_channels(100); // poner aqui el numero de canales a transmitir // put here the number of DMX channels to transmmit ArduinoDmx0.init_tx(DMX512); // iniciar transmision universo 0, modo estandar DMX512 // starts universe 0 as TX, standard mode DMX512} //end setup()void loop(){// seis entradas con potenciometros que envian valores DMX entre 0 y 255 a los canales 1 al 6 // six analog inputs with potentiometers, sending values from 0 to 255, to dmx output channels 1 to 6 ArduinoDmx0.TxBuffer[0] = scale(analogRead(0)); // copiar valor de la entrada analogica 0 al canal DMX 1 // copy value from analog input 0 to DMX channel 1 ArduinoDmx0.TxBuffer[1] = scale(analogRead(1)); // copiar valor de la entrada analogica 1 al canal DMX 2 // copy value from analog input 1 to DMX channel 2 ArduinoDmx0.TxBuffer[2] = scale(analogRead(2)); // copiar valor de la entrada analogica 2 al canal DMX 3 // copy value from analog input 2 to DMX channel 3 ArduinoDmx0.TxBuffer[3] = scale(analogRead(3)); // copiar valor de la entrada analogica 3 al canal DMX 4 // copy value from analog input 3 to DMX channel 4 ArduinoDmx0.TxBuffer[4] = scale(analogRead(4)); // copiar valor de la entrada analogica 4 al canal DMX 5 // copy value from analog input 4 to DMX channel 5 ArduinoDmx0.TxBuffer[5] = scale(analogRead(5)); // copiar valor de la entrada analogica 5 al canal DMX 6 // copy value from analog input 5 to DMX channel 6 if (digitalRead(2) == LOW) // pulsador en pin 2 apretado // push-button on pin 2, is pressed ArduinoDmx0.TxBuffer[6] = 255; // enviar 255 al canal DMX 7 // send value 255 to DMX channel 7 else ArduinoDmx0.TxBuffer[6] = 0; // si no enviar 0 // push-button free, send 0 if (digitalRead(3) == LOW) // pulsador en pin 3 apretado ArduinoDmx0.TxBuffer[7] = 255; // enviar 255 al canal DMX 8 else ArduinoDmx0.TxBuffer[7] = 0; // si no enviar 0 if (digitalRead(4) == LOW) // pulsador en pin 4 apretado ArduinoDmx0.TxBuffer[8] = 255; // enviar 255 al canal DMX 9 else ArduinoDmx0.TxBuffer[8] = 0; // si no enviar 0 // añadir aqui hasta el pin 13 // add here the others inputs} //end loop()uint8_t scale(uint16_t value) // scale values from 10 bits to 8 bits{ if(value > 1023) // test for 10 bits limit value = 1023; return (value >> 2); // scale} //end scale()//************************************************************************************************************* |

For more detail: Small Arduino DMX controller
- What Arduino boards can be used with this DMX controller?
Arduino Mega, Arduino UNO, and similar devices can be utilized with minor modifications; Arduino Nano can be used but is limited to one USART. - How many analog DMX channels does the project provide?
The setup includes six analog channels (potentiometers) mapped to DMX channels 1 to 6. - How are pushbuttons read and used in the project?
Pushbuttons are connected to digital inputs using internal pullup resistors; pressed reads as 0 and not pressed as 1, controlling binary DMX channels. - How are analog readings converted for DMX values?
Analog 10-bit values (0–1023) are scaled down to 8-bit (0–255) by shifting right two bits in the scale function. - Which DMX library is required?
You need to download and install the Arduino four universes DMX 512 library (lib_dmx). - What compilation error is mentioned and how to check for it?
The error ArduinoDmxN was not defined in this scope can occur; verify the correct board type is selected in the Arduino IDE under Tools > Board. - What limitation does Arduino Nano impose?
Using Arduino Nano restricts use to a single USART, referenced as ArduinoDmx0 or USART0. - Are there any programming steps required for the DMX shield?
It is required to uninstall the DMX shield before programming and reinstall it after programming.