Summary of SjoelSim!
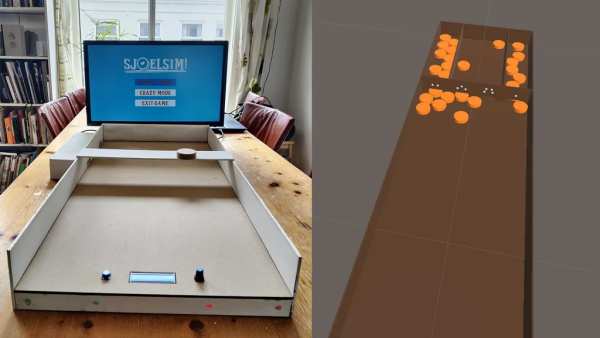
SjoelSim is a mixed-reality shuffleboard game using an Arduino and Unity Engine. It replaces traditional discs with a single disc tracked by two ultrasonic sensors to measure velocity, allowing players to compete online. The project features a physical wooden board with an LCD display, LEDs, and a button for interaction, simulating the classic Dutch Sjoelen rules in a digital format.
Parts used in the SjoelSim:
- Arduino UNO (or similar)
- USB-B cable
- 2 x HC-SR04 Ultrasonic Sensors
- Standard 20mm 10kΩ Potentiometer
- Standard 12x12mm Pushbutton
- Standard 16x2 LCD Display
- I2C interface
- 4 x Green LED
- 4 x Red LED
- Electrical wire
- Dupont wires
- 10kΩ Resistor
- 4 x 220Ω Resistor
- Laptop with USB jack
- 120x100cm 4mm MDF board
- White paint
- Wood glue
- Insulating tape
- Styrofoam
- Fabric sheet
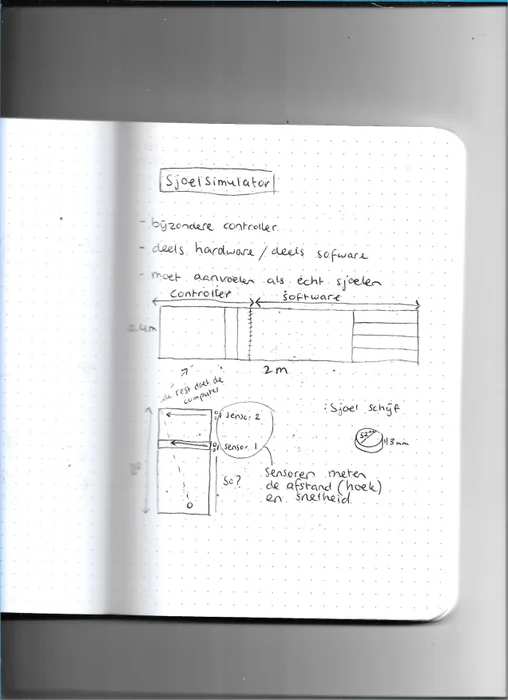
SjoelSim! Is a mixed-reality version of the popular and historic Dutch shuffleboard game “Sjoelen”. The circuit makes use of two HC-SR04 ultrasonic distance sensors to measure the X and Z velocity of a playing disc. In combination with a program built in the Unity Engine, it makes for a pretty good alternative to the real deal.
Supplies
Components
2 x HC-SR04 Ultrasonic Sensors
1 x Standard 20mm 10kΩ Potentiometer
1 x Standard 12x12mm Pushbutton
4 x LED (Green)
4 x LED (Red)
1 x 10kΩ Resistor
4 x 220Ω Resistor
A laptop with USB jack!
Equipment
Soldering iron & tin
Laser cutter
Pair of stripping pliers (or scissors)
Pair of cutting pliers (or scissors)
Glue gun
Sandpaper
Materials
120x100cm 4mm MDF board
White paint
Wood glue
Styrofoam
A sheet of fabric (around 40x20cm)
Step 1: Sjoelen…What’s That!?
The history of Sjoelen is actually quite mysterious. Some believe it originated in “Friesland”(Frysia) or “Zeeuws-Vlaanderen”(Dutch-Flanders), others believe it started overseas in Britain. One thing is clear however, our beloved party game did not come into being suddenly. It established itself through a long and iterative process! -just like my project-
During the pandemic I’ve missed spending time with my grandma. Who happens to be an avid sjoeler herself. And because we couldn’t play together physically, it seemed like an interesting idea to make a controller so we could play this game online.
I figure not everyone on this website will be familiar with the game of sjoelen.
So here’s the rules:
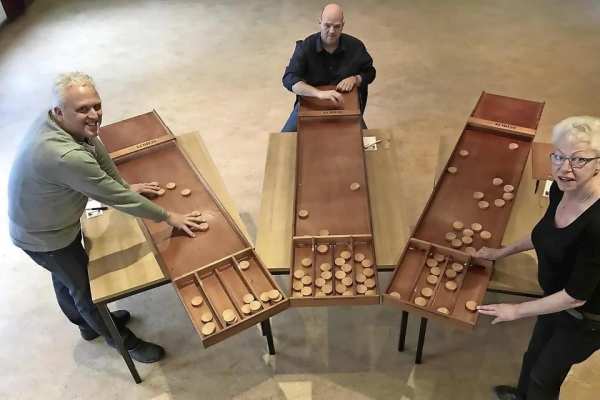
Sjoelen is played on a wooden ‘sjoelbak’ and 30 wooden shuffling board discs. At the end of this sjoelbak there are four slots for the discs to slide in. These slots have a value of 2, 3, 4 and 1. On the side of the player there’s a wooden bar attached to the sjoelbak. The discs have to be slid from under this platform.
The goal of the game is to score as many points possible by sliding discs into slots. The player gets three turns to do this, after the end of each turn, discs that didn’t find its way into a slot get returned to the player. After three turns the points get distributed and the torch gets passed to another player.
To get a high score its worthwhile to aim your discs evenly at each of the four slots. For every combination of four evenly distributed discs, the player is awarded 20 points. When all quartets are counted, remaining discs have the same value as their accompanying slot score.
The highest possible score is 148. This happens when there are 7 discs in each slot, plus 2 extra discs in the 4-slot. (7 x 20 + 2 x 4)
My SjoelSim works a bit differently though. It needs only 1 disc! I’ll explain the workings below.
Step 2: How It Works
The program has a main menu which can be used to traverse the game. At this moment the “Crazy Mode” feature hasn’t been developed yet. While playing, it’s possible to quit to the main menu by holding the button for a second. “Normal Mode” is very similar to a regular game of Sjoelen. It is played with one playing disc that can be ‘reloaded’ by pressing on the button. After each round, the remaining virtual discs get retreived and the current status of the slots are visible.
The program has a main menu which can be used to traverse the game. At this moment the “Crazy Mode” feature hasn’t been developed yet. While playing, it’s possible to quit to the main menu by holding the button for a second. “Normal Mode” is very similar to a regular game of Sjoelen. It is played with one playing disc that can be ‘reloaded’ by pressing on the button. After each round, the remaining virtual discs get retreived and the current status of the slots are visible.
Step 3: Building the Sjoelbak
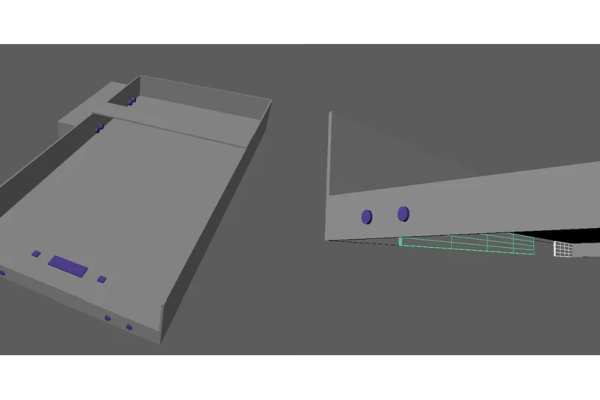
First I tried to get a feeling for the design by modeling it in Maya. When it became clear what parts I needed, I constructed a .dxf file in Adobe Illustrator. The upper sliding deck needs to be polished with sandpaper before attaching it to the rest of the parts. My prototype is different from the plans because I made an error by leaving too big a hole for the potentiometer. I was able to readjust this by making an extra fitting. I was able to cut all parts out of a 120x100cm 4mm MDF board. I used the spare room to try out different disc designs. The discs consist of four circles glued together. Make sure to polish the disc as well. The back of the sjoelbak has a cushion. I made it with leftover styrofoam and a piece of cloth which I glued on the back panel. I painted most of the panels except for the sliding deck and the supports. When all parts are ready and dried, use wood glue to put everything together. Or if you’re like me and want quick results, use a glue gun. (this will lead to less pretty results)
Step 4: The Code
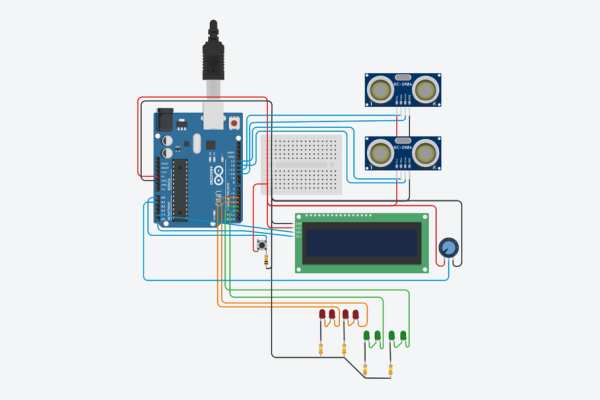
Make sure to include the Wire, NewPing and LiquidCrystal_I2C libraries.
The program uses the following pins.
10, 11, 12, 13 for the ultrasonic sensors,
2, 3, 4, 5 for the LED’s,
A4, A5 for the I2C lcd display,
A3 for the potentiometer,
and A2 for the button.
A version of the game can be downloaded here. This is a zip folder with an .exe file. The default serial port is COM3.
// lcd stuff
#include <Wire.h>
#include <LiquidCrystal_I2C.h>

LiquidCrystal_I2C lcd(0x27, 16, 2);

bool backlight = false;
String dT = "30";
String sT = "000";

//led stuff
const int g1 = 2;
const int g2 = 4;
const int r1 = 3;
const int r2 = 5;
bool lightBool;
int lightMode;
long lightTimer;
bool blinkBool;

// potentiometer stuff
const int potPin = A3;
int potState;
int lastPotState;

// button stuff
const int buttonPin = A2;
int buttonState = 0;
int lastButtonState = 0;
bool toggleBool = false;
long buttonTime;
long timer;
bool watchButton = false;

//ultrasonic sensor stuff
#include <NewPing.h>
#define SONAR_NUM 2      // Number of sensors.
#define MAX_DISTANCE 38 // Maximum distance (in cm) to ping.
NewPing sonar[SONAR_NUM] = {   // Sensor object array.
  NewPing(10, 11, MAX_DISTANCE), // Each sensor's trigger pin, echo pin, and max distance to ping.
  NewPing(12, 13, MAX_DISTANCE),
};

int dist1;
int dist2;

bool cd1 = false;
bool cd2 = false;

void setup() {
  Serial.begin(115200);
  pinMode(buttonPin, INPUT);
  pinMode(potPin, INPUT);
  digitalWrite(g1, HIGH);
  pinMode(g1, OUTPUT);
  pinMode(g2, OUTPUT);
  pinMode(r1, OUTPUT);
  pinMode(r2, OUTPUT);
  lcd.init();
  lastPotState = potState;
}

void loop() {
  timer = millis();
  button();
  buttonHold();
  sense();
  track();
  serialRead();
  potMeter();
  lights();
}

void button() {
  // this function checks if the button is pressed
  buttonState = digitalRead(buttonPin);
  if (buttonState != lastButtonState) {


    if (buttonState == HIGH) {
      buttonTime = timer;
      watchButton = true;
      Serial.println("500");
      cd1 = false;
      cd2 = false;
    } else {
      watchButton = false;
    }


    delay(50);
  }
  lastButtonState = buttonState;
}

// this function checks if the button is held
void buttonHold() {
  if (watchButton) {
    if (timer > buttonTime + 1500) {
      if (buttonState == HIGH) {
        Serial.println("111");
        watchButton = false;
      }
      if (buttonState == LOW) {
        watchButton = false;
      }
    }
  }
}

void potMeter() {
  if ((analogRead(potPin)) < 343) {
    potState = 0;
  } else if ((analogRead(potPin)) > 342 && (analogRead(potPin)) < 686) {
    potState = 1;
  } else {
    potState = 2;
  }
  if (potState != lastPotState) {
    if (potState == 0) {
      Serial.println("990");
    } else if (potState == 1) {
      Serial.println("991");
    } else {
      Serial.println("992");
    }
    delay(50);
  }
  lastPotState = potState;
}

void sense() {
  delay(29);
  dist1 = sonar[0].ping_cm();
  delay(29);
  dist2 = sonar[1].ping_cm();
}

void track() {
  if (dist1 > 0 && !cd1) {
    Serial.println(dist1);
    cd1 = true;
  }
  if (dist2 > 0 && !cd2 && cd1) {
    Serial.println(dist2);
    cd2 = true;
  }
}

void serialRead() {
  //this function handles incoming data from Unity
  while (Serial.available() > 0)
  {
    int dataIn = Serial.parseInt();
    String sub = String(dataIn).substring(0, 1);

    switch (dataIn) {
      case 777:
        digitalWrite(g1, LOW);
        digitalWrite(g2, LOW);
        digitalWrite(r1, HIGH);
        digitalWrite(r2, HIGH);
        break;
      case 888:
        digitalWrite(g1, HIGH);
        digitalWrite(g2, HIGH);
        digitalWrite(r1, LOW);
        digitalWrite(r2, LOW);
        break;
      case 111:
        lcd.backlight();
        screen("start");
        lightMode = 0;
        break;
      case 222:
        screen("normal");
        lightsOff();
        lightMode = 1;
        break;
    }

    // read values from unity
    if (sub == "4") {
      dT = String(dataIn).substring(1);
      screen("updateNormalScreen");
    }

    if (sub == "5") {
      lightTimer = timer;
      blinkBool = true;
      digitalWrite(g1, HIGH);
      sT = String(dataIn).substring(1);
      screen("updateNormalScreen");
    }
  }
}

void screen(String cmd) { // lcd screen functionality
  if (cmd == "start") {
    lcd.clear();
    lcd.setCursor(4, 0);
    lcd.print("Welcome");
    lcd.setCursor(2, 1);
    lcd.print("to SjoelSim!");
  }

  if (cmd == "normal") {
    dT = "30";
    sT = "000";
    screen("updateNormalScreen");
  }

  if (cmd == "toggleBacklight") {
    if (!backlight) {
      lcd.backlight();
    } else {
      lcd.noBacklight();
    }
    backlight = !backlight;
  }

  if (cmd == "updateNormalScreen") {
    lcd.clear();
    lcd.setCursor(1, 0);
    lcd.print("DISCS");
    lcd.setCursor(10, 0);
    lcd.print("SCORE");
    lcd.setCursor(2, 1);
    lcd.print(dT);
    lcd.setCursor(11, 1);
    lcd.print(sT);
  }
}

void lights() {
  if (lightMode == 0) {
    if (lightTimer < timer - 1000) {
      if (lightBool) {
        digitalWrite(g1, HIGH);
        digitalWrite(g2, LOW);
        digitalWrite(r1, LOW);
        digitalWrite(r2, HIGH);
        lightBool = !lightBool;
      } else {
        digitalWrite(g1, LOW);
        digitalWrite(g2, HIGH);
        digitalWrite(r1, HIGH);
        digitalWrite(r2, LOW);
        lightBool = !lightBool;
      }
      lightTimer = timer;
    }
  } else if (lightMode == 1) {
    if (blinkBool) {
      blink();
    }
  }
}

void blink() {
  if (timer - lightTimer > 1000) {
    lightsOff();
    blinkBool = false;
  }
}

void lightsOff() {
  digitalWrite(g1, LOW);
  digitalWrite(g2, LOW);
  digitalWrite(r1, LOW);
  digitalWrite(r2, LOW);
}
Step 5: The Circuit & Wiring
It’s a good thing you don’t see any wiring normally because it’s not very pretty. The button was soldered on a perfboard and glued in place. Most of the wiring is taped on the panel to keep things organized… more or less.
Step 6: Progress Pics
This is one of the first big Arduino projects that I’ve done and I’m pretty happy with the result. Soldering was new to me and I’ve gained a lot of prototyping skills. I wouldn’t say this build is completely finished, as it doesn’t have online multiplayer yet. (for that to work i’d need build another SjoelSim) Initially I had more ideas about different level designs, but I’ve chosen to prioritize getting the normal mode to work well. Thanks for taking the time to read my instructable. I’ll include some progress pictures here, if you’re interested.
Source: SjoelSim!
- How does the SjoelSim track the playing disc?
The circuit uses two HC-SR04 ultrasonic distance sensors to measure the X and Z velocity of the disc. - Can I play multiple rounds in Normal Mode?
Yes, after each round, the remaining virtual discs get retrieved and the current status of the slots becomes visible. - What happens if I hold the button for a second?
Holding the button for a second allows the player to quit from the game back to the main menu. - Does the project currently support online multiplayer?
No, the build is not completely finished regarding online multiplayer as it would require building another SjoelSim unit. - How many discs are needed to play this version?
This version of SjoelSim needs only one physical disc to play, unlike the traditional game which uses thirty. - What libraries must be included in the code?
The program requires the Wire, NewPing, and LiquidCrystal_I2C libraries to function correctly. - Which pins are assigned to the ultrasonic sensors?
Pins 10, 11, 12, and 13 are used for the ultrasonic sensors in the circuit configuration. - What is the highest possible score mentioned for the original game?
The highest possible score in the traditional game is 148 points. - How can I reload the disc during gameplay?
You can reload the playing disc by pressing the standard pushbutton.