This article introduces a single-button combination lock using an Arduino. Instead of entering digits, the user unlocks the device by pressing a button with specific time intervals between presses. The system measures these delays and compares them to stored values with a tolerance range. It is designed for prototyping on a breadboard or finalizing as a bare-bones circuit, suitable for securing doors, testing coordination, or preventing impaired driving.
Parts used in the Single Button Combination Lock:
- Arduino Uno or Eleven
- Solderless breadboard
- Normally-open button
- Digital pin 2 (on Arduino-compatible board)
- 10k ohm pull down resistor
Time for something different – a single button combination lock. Allow me to explain…
Updated 18/03/2013
Normally a combination lock would require the entry of a series of unique numbers in order to unlock something or start an action. For example:

A more contemporary type of lock could be controlled electronically, for example by a keypad where the user enters a series of digits to cause something to happen. Such as the keypad on this dodgy $30 safe from Officeworks:
As you can see there is a button for each digit. You would think that this would be a good idea – however people can watch you enter the digits, or users can be silly enough to write down the combination somewhere. In some cases the more cunning monkeys have even placed cameras that can observe keypads to record people entering the combination. There must be a better way. Possibly! However in the meanwhile you can consider my idea instead – just have one button. Only one button – and the combination is made up of the time that elapses between presses of the button. There are many uses for such an odd lock:
- A type of combination lock that controls an electric door strike, or activates a device of some sort;
- A way of testing mind-hand coordination for skill, or the base of a painfully frustrating game;
- Perhaps an interlock on motor vehicle to prevent drink driving. After a few drinks there’s no way you could get the timing right. Then again, after a double espresso or two you might have problems as well.
We measure the duration of time between each press of the button (in this case – delay 1~4). These delay times are then compared against values stored in the program that controls the lock. It is also prudent to allow for some tolerance in the user’s press delay – say plus or minus ten to fifteen percent. We are not concerned with the duration of each button press, however it is certainly feasible.
To create this piece of hardware is quite easy, and once again we will use the Arduino way of doing things. For prototyping and experimenting it is simple enough to create with a typical board such as a Uno or Eleven and a solderless breadboard – however to create a final product you could minimise it by using a bare-bones solution (as described here). Now let’s get started…
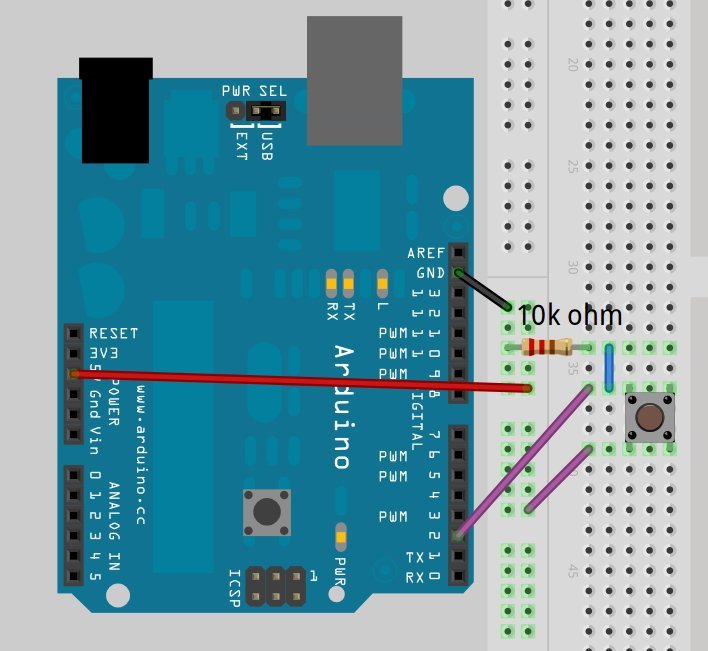
For demonstration purposes we have a normally-open button connected to digital pin 2 on our Arduino-compatible board using the 10k ohm pull down resistor as such:
Project Code and other data:
The next thing to do is determine our delay time values. Our example will use five presses, so we measure four delays. With the following sketch, you can generate the delay data by pushing the button yourself – the sketch will return the delay times on the serial monitor (download).
For more detail: Single button combination lock using Arduino
- How does this single button lock work?
The lock measures the duration of time between each press of the button and compares these delay times against values stored in the program. - What is the advantage of this lock over a keypad?
Unlike keypads where observers can see digits or cameras can record entries, this method relies on timing which is harder to observe directly. - Does the system account for timing errors?
Yes, the design allows for a tolerance of plus or minus ten to fifteen percent in the user's press delay. - Can I build this project without soldering?
For prototyping, it is simple enough to create with a typical board like a Uno or Eleven and a solderless breadboard. - What are some potential uses for this lock?
Uses include controlling an electric door strike, activating a device, testing mind-hand coordination, or serving as an interlock to prevent drink driving. - How many delays are measured if there are five presses?
If the example uses five presses, the system measures four delays between those presses. - Is the duration of the button press itself important?
No, the system is not concerned with the duration of each button press, though it is feasible to measure it. - How can I determine the correct delay time values?
You can use a provided sketch that returns the delay times on the serial monitor when you push the button yourself.