Summary of Simon & Whack-a-Mole Game Using Arduino (also in Tinkercad)
This article details the construction of an Arduino-based educational kit designed to play Simon and Whack-a-Mole games, specifically created for a Girls Who Code club. The guide covers hardware assembly using specific components like push buttons and LEDs, wiring connections, and coding exercises ranging from basic LED control to complex blinking sequences. It also notes that the project can be simulated entirely in Tinkercad without physical parts.
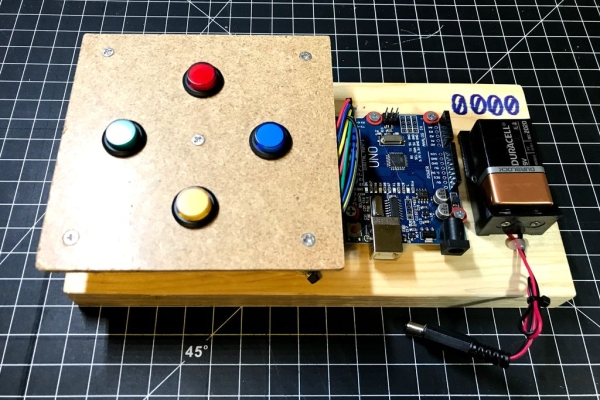
Parts used in the Simon & Whack-a-Mole Game Kit:
- Arduino Uno or equivalent
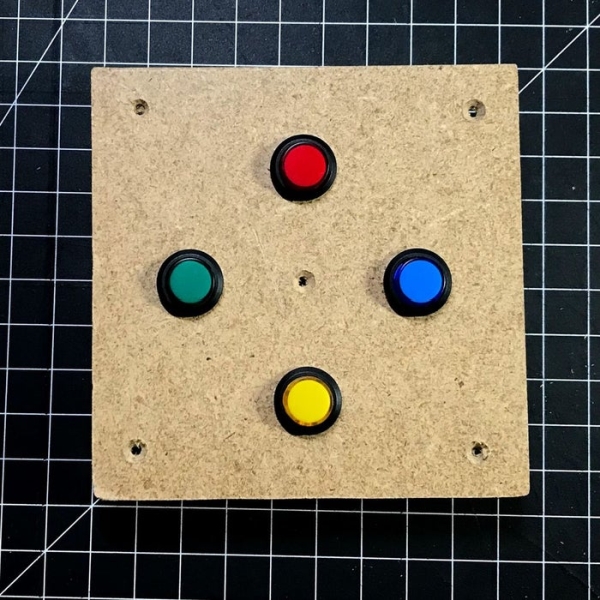
- 4 x color (red, green, yellow, blue) illuminated momentary push button switch
- 4 x 220 ohm resistor
- 5 x 28mm or longer spacer
- 9v battery and holder
- Wires
- Screws
- Pine wood base (1x5)
- Panel board (4 1/2in x 4 1/2in)
If you grew up in ’80s, most likely you played an electronic toy game called Simon. In this Instructable, I will be building an Arduino kit that you can code to play Simon and other button-based games such as Whack a Mole. I developed this kit to be used by a local Girls Who Code club that I facilitate.

If you don’t want to spend any money buying parts, you can do the complete project in Tinkercad.
You can just copy and tinker this project:
https://www.tinkercad.com/things/lozV8434PFG-simon…
Step 1: Parts

- Arduino Uno or equivalent
- 4 x color (red, green, yellow, blue) illuminated momentary push button switch
- 4 x 220 ohm resistor
- 5 x 28mm or longer spacer
- 9v battery and holder
- wires
- screws to put them all together
- case: I’m using a piece of 1×5 pine wood as a base and 4 1/2in x 4 1/2in panel board
Tools Used: soldering iron, cutter, screw drivers, saw, drill, glue gun (optional)
Step 2: Push Button Switch Unit
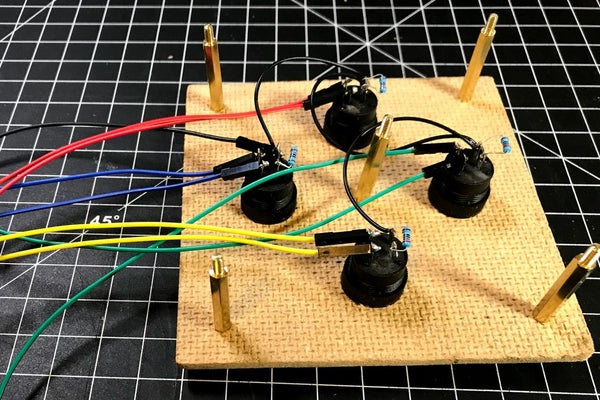
This part requires soldering wires to push button switches. Connect 9 wires to switch buttons as shown in the diagram.
I’m using the following wiring color code:
- Red = red switch LED
- Red/striped = red push button switch
- Blue = blue switch LED
- Blue/striped – blue push button switch
- Yellow = blue switch LED
- Yellow/striped – blue push button switch
- Green = blue switch LED
- Green/striped – blue push button switch
- Black – GND
Step 3: Attach Button Switch Unit to the Main Board
Use 5 board spacers to attach the button switch assembly to the main board as shown in the picture. I’m using 28mm spacers here but anything longer than 25mm should work .
Step 4: Attach Arduino and Battery Holder to the Base Board
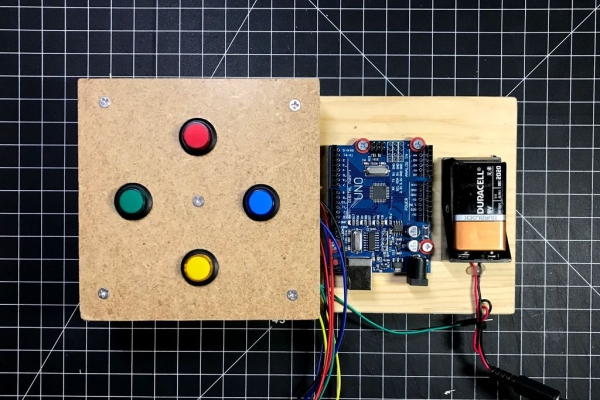
Use 7 small wood screws to attach Arduino and the battery holder to the base board.
Step 5: Connect Button Switch Wires to Arduino
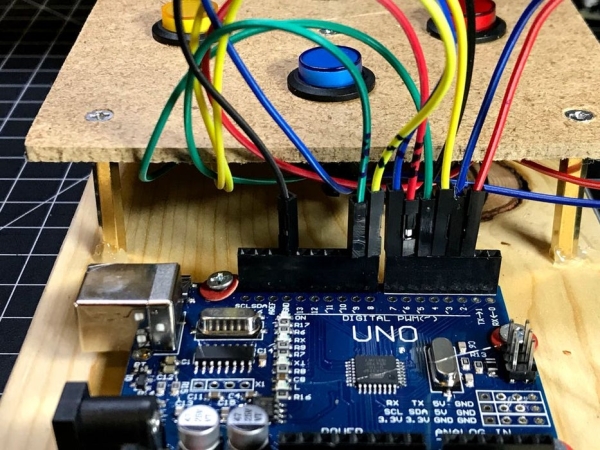
There are 9 wires coming out of the button switch assembly. Connect them to Arduino according to the following pin assignment:
D2: Red – red switch LED
D3: Blue = blue switch LED
D4: Yellow = yellow switch LED
D5: Green = green switch LED
D6: Red/striped = red push button switch
D7: Blue/striped = blue push button switch
D8: Yellow/striped = yellow push button switch
D9: Green/striped = green push button switch
GND: Black
Step 6: Tidy Up
Use some wire ties to hide all the wires under the button switch unit. I also used hot glue to bond all the connectors to Arduino.
Step 7: Code #1 Setup & LedOn/Off
First, let’s create code to do basic LED on and off.
First thing we will do is create constant variables for the Arduino pin assignment. Rather than using numeric pin numbers in your main code, we’ll create constant variable names for these pins so that if we have to change our pin assignment later, we can simply change this section and not in the main code.
const int redLED = 2;
const int blueLED = 3;
const int yellowLED = 4;
const int greenLED = 5;
const int redButton = 6;
const int blueButton = 7;
const int yellowButton = 8;
const int greenButton = 9;
Next, we move over to the setup section and declare these pins as either input or output. Note that I’m using INPUT_PULLUP on switch buttons so that these switches are set to HIGH when open (not pressed) and change to LOW when closed (pressed). If you just declare them as INPUT, you’re required to add a resistor and ground the switch. (See Arduino tutorial on digital pin.)
void setup() {
  // initialize LEDs as output.
  pinMode(redLED, OUTPUT);
  pinMode(blueLED, OUTPUT);
  pinMode(yellowLED, OUTPUT);
  pinMode(greenLED, OUTPUT);

  //use "PULLUP" to set open/unpressed to HIGH
  pinMode(redButton, INPUT_PULLUP);
  pinMode(blueButton, INPUT_PULLUP);
  pinMode(yellowButton, INPUT_PULLUP);
  pinMode(greenButton, INPUT_PULLUP);
}
Before we start the main section, let’s create functions to turn on and off LEDs. This way, our main loop section would just consume these functions.
(Note: Experienced coders will noticed that using arrays for switches and LEDs are much more efficient way to handle these tasks. Since this code will be taught to middle school students, We’ll stay away from array for now. For the last coding lesson, however, we have to use an array to store the button sequence for the Simon game so eventually we will have to cover that at the end…but not now.)
Let’s create our first function that turns on a specific LED when you specify a color. (Color is actually a numeric value of your constant variable.)
void ledOn(int color) {
   if (color == redLED) {     digitalWrite(redLED, HIGH);   }
   else if (color == blueLED) {     digitalWrite(blueLED, HIGH);   }
   else if (color == yellowLED) {     digitalWrite(yellowLED, HIGH);   }
   else if (color == greenLED) {     digitalWrite(greenLED, HIGH);   }
}
Similarly, create another function that turns off a specific LED.
void ledOff(int color) {
  if (color == redLED) {     digitalWrite(redLED, LOW);   }
  else if (color == blueLED) {     digitalWrite(blueLED, LOW);   }
  else if (color == yellowLED) {     digitalWrite(yellowLED, LOW);   }
  else if (color == greenLED) {     digitalWrite(greenLED, LOW);   }
}
In our main loop, we would simply consume above functions. Here is an example of our loop section that turns on and off the red led every 1 sec.
void loop() {
  ledOn(RedLED);
  delay(500);
  ledOff(RedLED);
  delay(500);
}
Doesn’t this look alike the blink program where you blink the built-in LED on D13?
Step 8: Code #2 On/Off ALL
In this code exercise, we will turn on and off ALL LEDs.
Let’s add two more functions for turning on and off ALL LEDs.
void ledOnAll() {
  ledOn(redLED);
  ledOn(blueLED);
  ledOn(yellowLED);
  ledOn(greenLED);
}
And for the off:
void ledOffAll() {
  ledOff(redLED);
  ledOff(blueLED);
  ledOff(yellowLED);
  ledoff(greenLED);
}
Once we have these functions ready, we can consume them in our main loop section. Here is our main loop section to blink ALL leds.
void loop() {
  ledOnAll()
  delay(500);
  ledOffAll();
  delay(500);
}
Step 9: CODE #3 BLINK
In our last exercise, we blinked all LEDs in the main loop. Why not create a function to blink all LEDs as well as individual LEDs? As you can see, we started from low level functions and now we are moving to higher functions that either combine functions and/or calls other low level functions.
Function: blinkAll
You specify the blinkTime in msec when you call this function.
void blinkAll(int blinkTime) {
   ledOnAll();
   delay(blinkTime);
   ledOffAll();
   delay(blinkTime);
}
Function: blink
You specify the color and the blinkTime in msec when you call this function.
void blink(int color, int blinkTime) {
  ledOn(color);
  delay(blinkTime);
  ledOff(color);
  delay(blinkTime);
}
Main Loop
Here is an an example of how we consume these functions.
void loop() {
  blink(redLED, 500);
  blinkAll(500);
}
Source: Simon & Whack-a-Mole Game Using Arduino (also in Tinkercad)
- Can I build this project without buying any parts?
Yes, you can complete the entire project in Tinkercad. - What is the best way to handle pin assignments in the code?
Create constant variable names for pins instead of using numeric numbers directly in the main code. - How should the push button switches be declared in the setup section?
Use INPUT_PULLUP so switches are set to HIGH when open and change to LOW when pressed. - Does the code use arrays for the initial lessons?
No, arrays are avoided for middle school students until the final lesson on storing button sequences. - What function turns on all LEDs at once?
The ledOnAll function calls individual ledOn functions for each color. - How do I specify the blink duration for the blinkAll function?
You specify the blinkTime in milliseconds when calling the function. - What tool is optional for bonding connectors to the Arduino?
A glue gun is optional for bonding connectors. - Can I use spacers shorter than 28mm?
Any spacer longer than 25mm should work.