Overview
In the first serial lab, you sent data from one sensor to a personal computer. In this lab, you’ll send data from multiple sensors to a program on a personal computer. You’ll use the data from the sensors to create a pointing-and-selecting device (i.e. a mouse).
(:toc Table of Contents:)
Connect the sensors
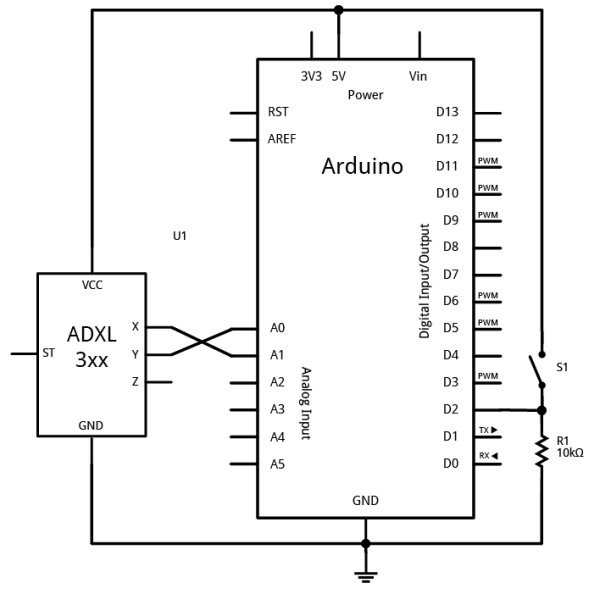
Connect two analog sensors to analog pins 0 and 1 like you did in the analog lab. Connect a switch to digital pin 2 like you did in the digital lab.
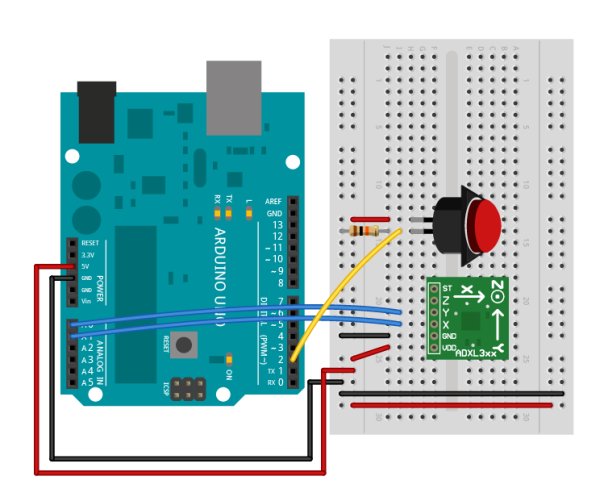
The photos and schematic in this lab show an accelerometer and a pushbutton. You don’t have to use these, though. Use whatever sensors are appropriate to your final application. While you’re figuring what sensors to use, use the most convenient sensors you’ve got in hand; perhaps two potentiometers for the analog sensors and a pushbutton?
Read and send the serial data
To begin with, just send the value from one sensor, the first analog sensor (the first axis of the accelerometer in the photos) and divide the output to give a maximum value of 255:
When you open the serial monitor, you should see a number between 0 and 255 scrolling down the window. That’s because Serial.println() formats the value it prints as an ASCII-encoded DECimal value, with a linefeed at a carriage return at the end. Also, the serial monitor assumes it should show you the ASCII character corresponding to each byte it receives. Try changing the Serial.println to a Serial.write().
Now you get a range of garbage characters. What’s going on?
For example, imagine that analogValue = 32:
Serial.println(analogValue)results in “32” with a linefeed and carriage returnSerial.write(analogValue)results in ” “, the space character, which has the ASCII value 32.
Send the data in many formats
Try this program and view the results in the Serial Monitor:
void loop() { // read the analog input, divide by 4: int analogValue = analogRead(A0) /4;
// print in many formats: Serial.write(analogValue); // Print the raw binary value analogValue
Serial.print(‘\t’); // print a tab
Serial.print(analogValue, BIN); // print the ASCII encoded binary analogValue
Serial.print(‘\t’); // print a tab
Serial.print(analogValue, DEC); // print the ASCII encoded decimal analogValue
Serial.print(‘\t’); // print a tab
Serial.print(analogValue, HEX); // print the ASCII encoded hexadecimal analogValue
Serial.print(‘\t’); // print a tab
Serial.print(analogValue, OCT); // print the ASCII encoded octal analogValue
Serial.println(); // print a linefeed and carriage return }
You should get output like this:
â	11100010	226	E2	342
á	11100001	225	E1	341
á	11100001	225	E1	341
á	11100001	225	E1	341
à	11100000	224	E0	340
à	11100000	224	E0	340
ß	11011111	223	DF	337
ß	11011111	223	DF	337
ß	11011111	223	DF	337
It’s printing the raw binary value, then the ASCII-encoded binary value, then the ASCII-encoded decimal, hexadecimal, and octal values. You may never need all of these differnt formats, but you’ll likely need at least the decimal and the raw binary versions at some point.
Send the values for all three sensors
In the first serial lab, you sent one byte representing one sensor’s value, over and over. When you’re sending multiple sensor values, it gets a little more complicated. You need to a way to know which value represents which sensor. For example, imagine if you used the following loop to send your sensor values:
int sensorValue = analogRead(thisSensor);
Serial.print(sensorValue); Serial.print(“,”); } }
you’d get a string like this:
452,345,416,234,534,417,325,452,231
There are two ways to get your sensor values in order. You can use punctuation or you can use a call-and-response or handshaking method. Use whichever makes the most sense to you.
Punctuation Method
One way to send the data such that it can be interpreted clearly is to punctuate each set of data uniquely. Just as a sentence ends with a period, you can end your data with a carriage return and a newline. Change the for loop above so that a carriage return and newline are printed at the end of each string of three values.
Write a program that reads the two analog sensors on your board and the one digita switch, and prints them out in this format:
analog1, analog2, switch
analog1, analog2, switch
analog1, analog2, switch
Start by setting up a constant for the switch pin’s number. Then in the setup, initialize serial communications at 9600bps, and declare the switch pin as an input.
In the main loop, use a local variable called sensorValue to read each input. Read the two analog inputs first, and print them with a comma after each one. Then read the digital input, and print it with a carriage return and linefeed at the end.
Once you’ve got a data format, all you have to do is read it in the receiving program. Now write a Processing sketch that reads the data as formatted by the Arduino program above.
First, set up the beginning of your program as you did in the first serial lab, to import the serial library and make a global variable to hold an instance of it. Then in the setup(), print out a list of serial ports, and put the one you want in a string. Then instantiate the serial library in the global variable you made.
Note: you might get an error message when trying to use the Processing Serial Library for the first time. If this happens: inn Processing 2.0 and beyond, there is an item in the Tools menu, “Fix the Serial Library” that fixes the serial library. Test it by deleting /var/lock/ and running the Processing serial sketch again, it should now work!
Add one extra line at the end of the setup() method. This line tells the sketch not to call serialEvent() unless an ASCII newline byte (value 10) comes in the serial port. It will save any other bytes it gets in the serial buffer, so you can read them all at once when the newline arrives:
For more detail: Serial Duplex using an Arduino