Summary of Secure IOT With AWS and Hornbill ESP32 Using Arduino.
Secure IOT With AWS and Hornbill ESP32 Using Arduino: concise summary (under 100 words) This article explains how to securely connect a Hornbill ESP32 Dev board to AWS IoT using TLS 1.2. It outlines steps: create an AWS account, register a new Thing in AWS IoT, generate security certificates, test with an MQTT desktop client, and communicate with the ESP32 hardware. The Hornbill ESP32 is recommended as an affordable microcontroller that supports TLS-enabled secure connections.
Parts used in the Secure IOT With AWS and Hornbill ESP32 Using Arduino:
- Hornbill ESP32 Dev board
- AWS account (for AWS IoT services)
- MQTT desktop client (for testing)
- USB cable (to connect ESP32 to PC)
- Computer with Arduino IDE (or equivalent) for programming
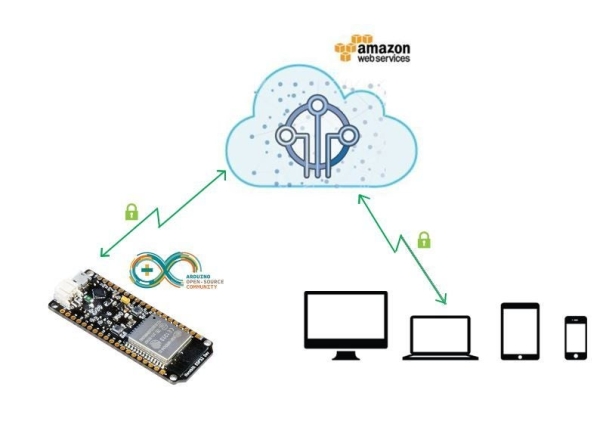
Security of connected devices is of paramount concern. There are several possible ways to make the devices secure. One of the most essential and widely used options is to use end to end encryption. The widely used Transport Layer Security (TLS) version 1.2 is the latest standard used on web for secure connections including banking. There are very few micro-controller based solutions that implement TLS 1.2 due to lack of resources. ESP32 is one of the most affordable options out there. So let’s look at securely connecting Hornbill ESP32 Dev board to Amazon web services (AWS) IOT.
We will start with configuring AWS account, setting up the thing, generating the security certificates, testing with a MQTT desktop client and then communicating with the hardware.
You’ll need an ESP32 Dev board to accomplish this. We are running a campaign for the most affordable and feature rich ESP32 dev tools called Hornbill. Get one from the campaign here:
https://www.crowdsupply.com/explore-embedded/hornbill
Step 1: AWS User Account :
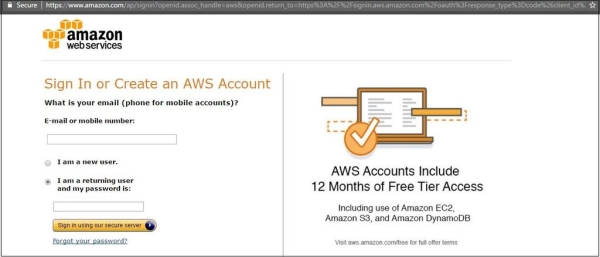
For using the AWS services you need to have a user account and login using the AWS Login link
Existing users can directly login and directly jump to next. New users should register first and link the credit card for payments. Basic plan is free for first Year, other plans are chargeable.
Step 2: Creating a New Thing :
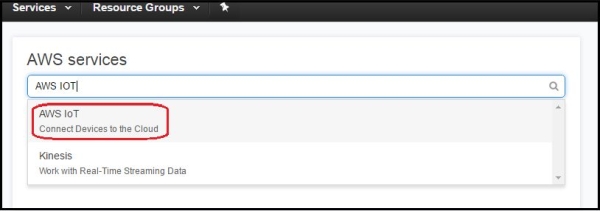
After Login, click on Signin To Console to go to AWS dashboard. Now type AWS IOT and Select the AWS IOT (Connect Devices to Cloud) from drop down as shown below.
Read more: Secure IOT With AWS and Hornbill ESP32 Using Arduino.
- What is the main security method recommended for connected devices?
The article recommends using end to end encryption, specifically Transport Layer Security TLS 1.2. - Which microcontroller board is used in this project?
The project uses the Hornbill ESP32 Dev board. - What AWS service is used to connect the device to the cloud?
AWS IoT (Connect Devices to Cloud) is used. - What are the high level steps to connect the ESP32 to AWS IoT?
Steps include creating an AWS account, creating a Thing in AWS IoT, generating security certificates, testing with an MQTT desktop client, and communicating with the ESP32 hardware. - Do I need an AWS account to follow this project?
Yes, you need an AWS account and to sign in to the AWS console. - Is TLS 1.2 supported by many microcontroller solutions according to the article?
The article states very few microcontroller based solutions implement TLS 1.2 due to resource constraints, but ESP32 is an affordable option that can. - Can I test the AWS IoT connection before using the hardware?
Yes, the article recommends testing with an MQTT desktop client before communicating with the hardware. - Is there a link to obtain the Hornbill ESP32 dev tools?
Yes, the article provides a Crowdsupply link to get the Hornbill ESP32.